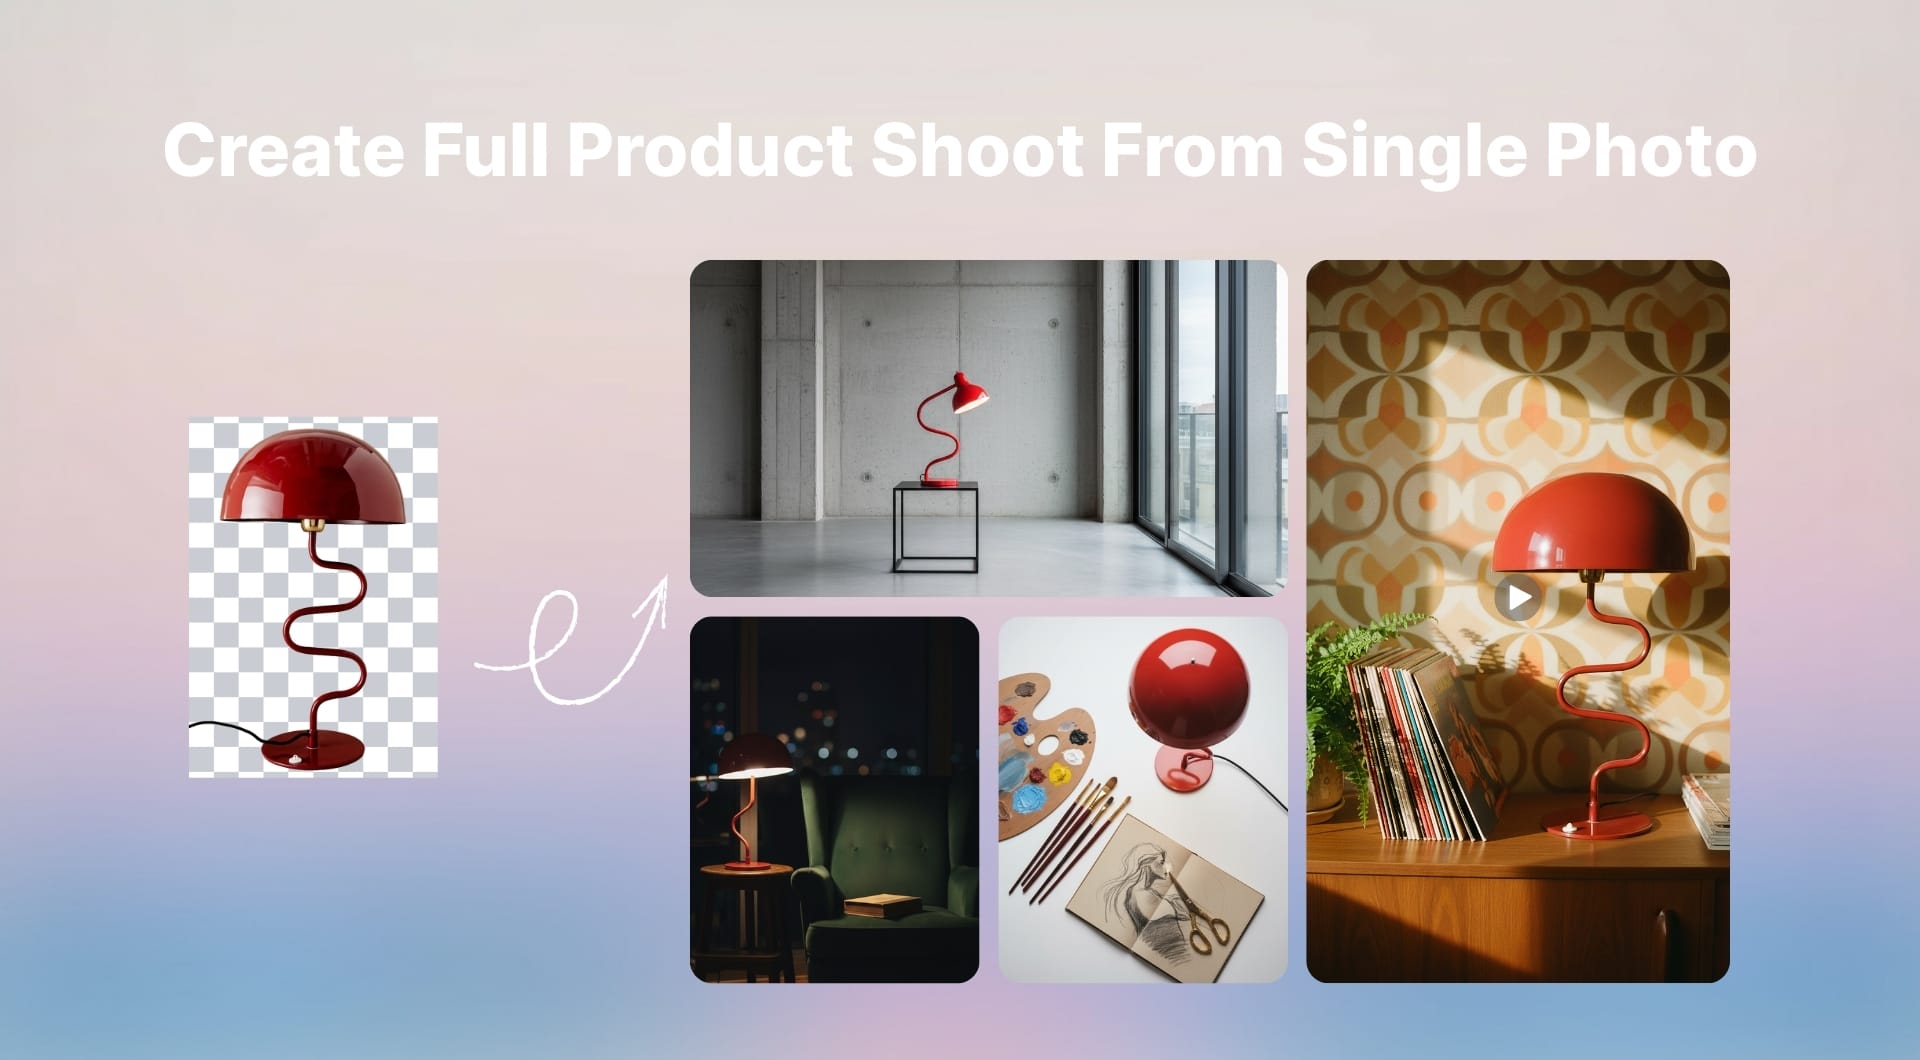
For anyone managing e-commerce catalogs or social content, product photography is expensive, slow, and inconsistent. This is a step-by-step workflow to remove image background, generate new shots, and turn them into short animations with LetsEnhance.
Continue reading to learn more!
Getting started with a solid base product photo
To accurately remove the background, the product should be clearly distinguishable from the background with no overlap. You can upload PNG, JPG or WebP images and even process up to 20 images in one batch. Here are some more recommendations for better results:
- Shoot at 1000 px or more on the shortest side. This is enough for LetsEnhance to upscale cleanly if needed.
- Avoid hard, mixed lighting. A window, a softbox, or open shade works better than a cluttered office light mix.
- Leave some breathing room. Frame with space around the product so the AI has context to find edges and you have room to crop later.
Once you have one clean shot of the product, you can move on to the next stage.
Background removal and enhancement
LetsEnhance has a dedicated background remover that can output transparent PNGs or white background photos and does not even require an account for simple cases. Let’s see the step-by-step guide below.
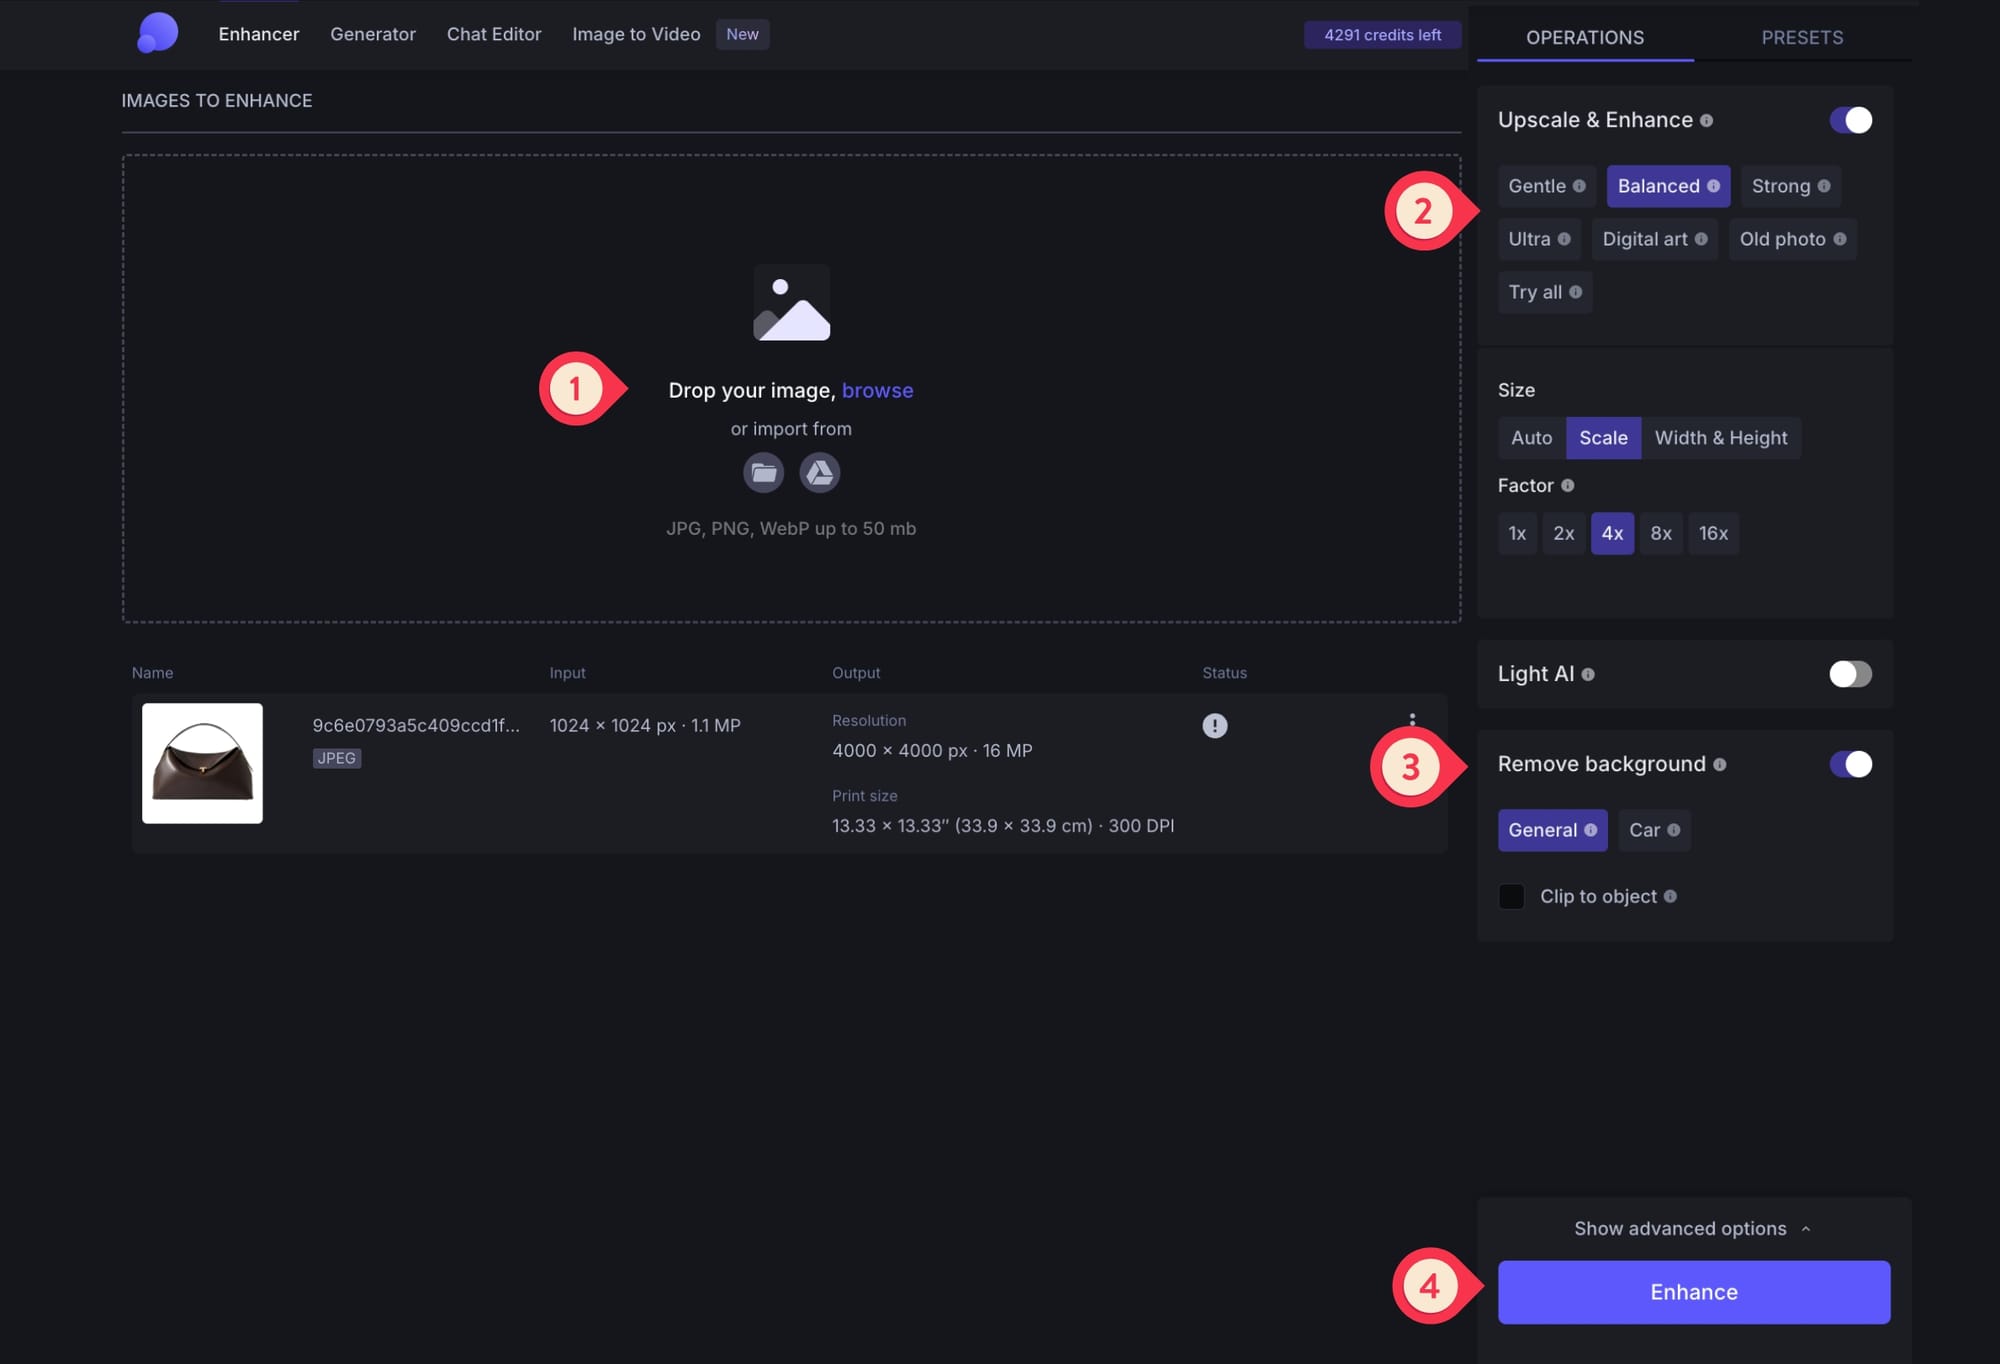
Step 1
Log in or signup into LetsEnhance and open Enhancer. New users get 10 free processing credits to test the platform.
Step 2
Drag and drop your product photo in one of these formats: JPG, PNG, or WebP.
Step 3
Leave the default Balanced mode on or choose another upscaler. Turn on the Remove background toggle on.
Step 4
Click Enhance and download your ready-to-use PNG within seconds.
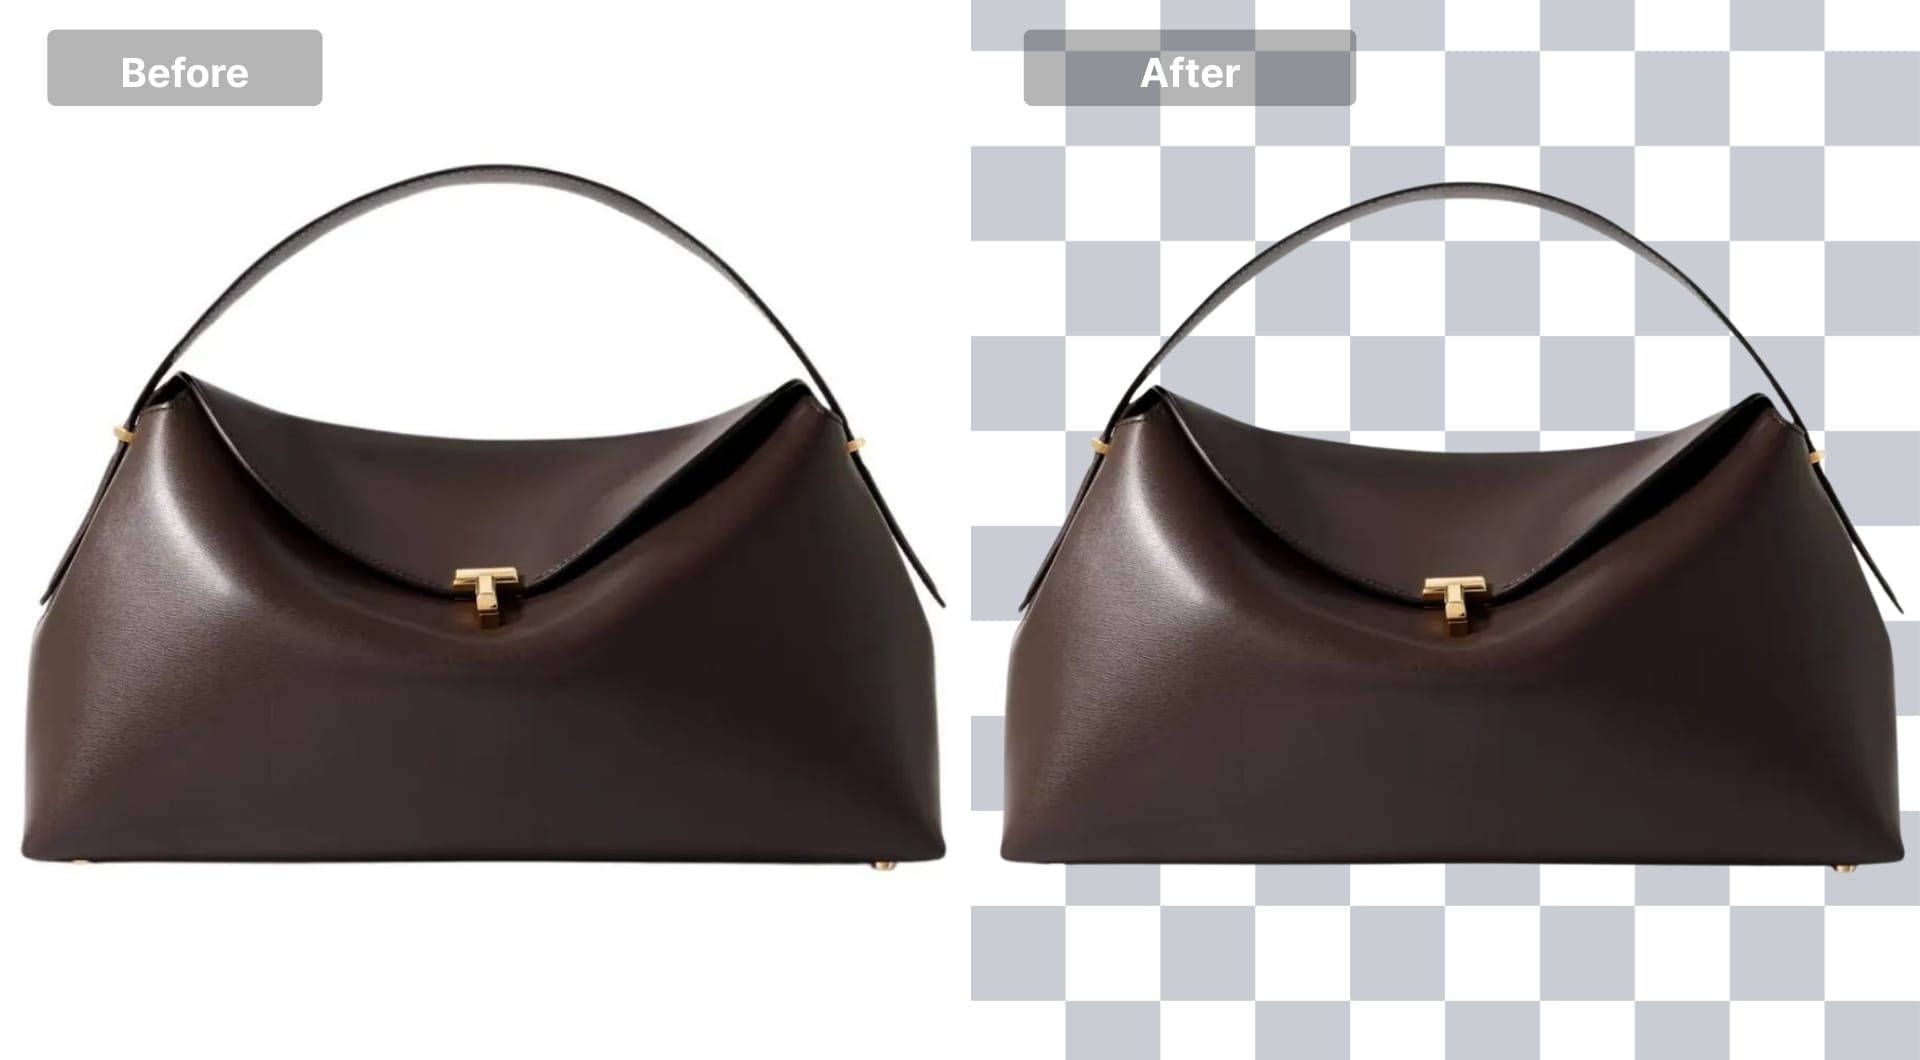
Now you have a clean cutout that you can drop onto any background, use in layouts, or feed into generative tools.
Generate new product images using Chat Editor
Once you have a strong cutout, you can let AI handle the rest of the “photoshoot”.
LetsEnhance’s Chat Editor offers a new way of editing images by typing. You only need to upload an image and tell the AI what to change. You can remove blemishes from a portrait, change a background, or turn a drawing into a realistic photo.
This time, we’re gonna ask it to generate completely new product photos from a simple PNG while preserving shape, materials, and branding. Here’s how to do that.
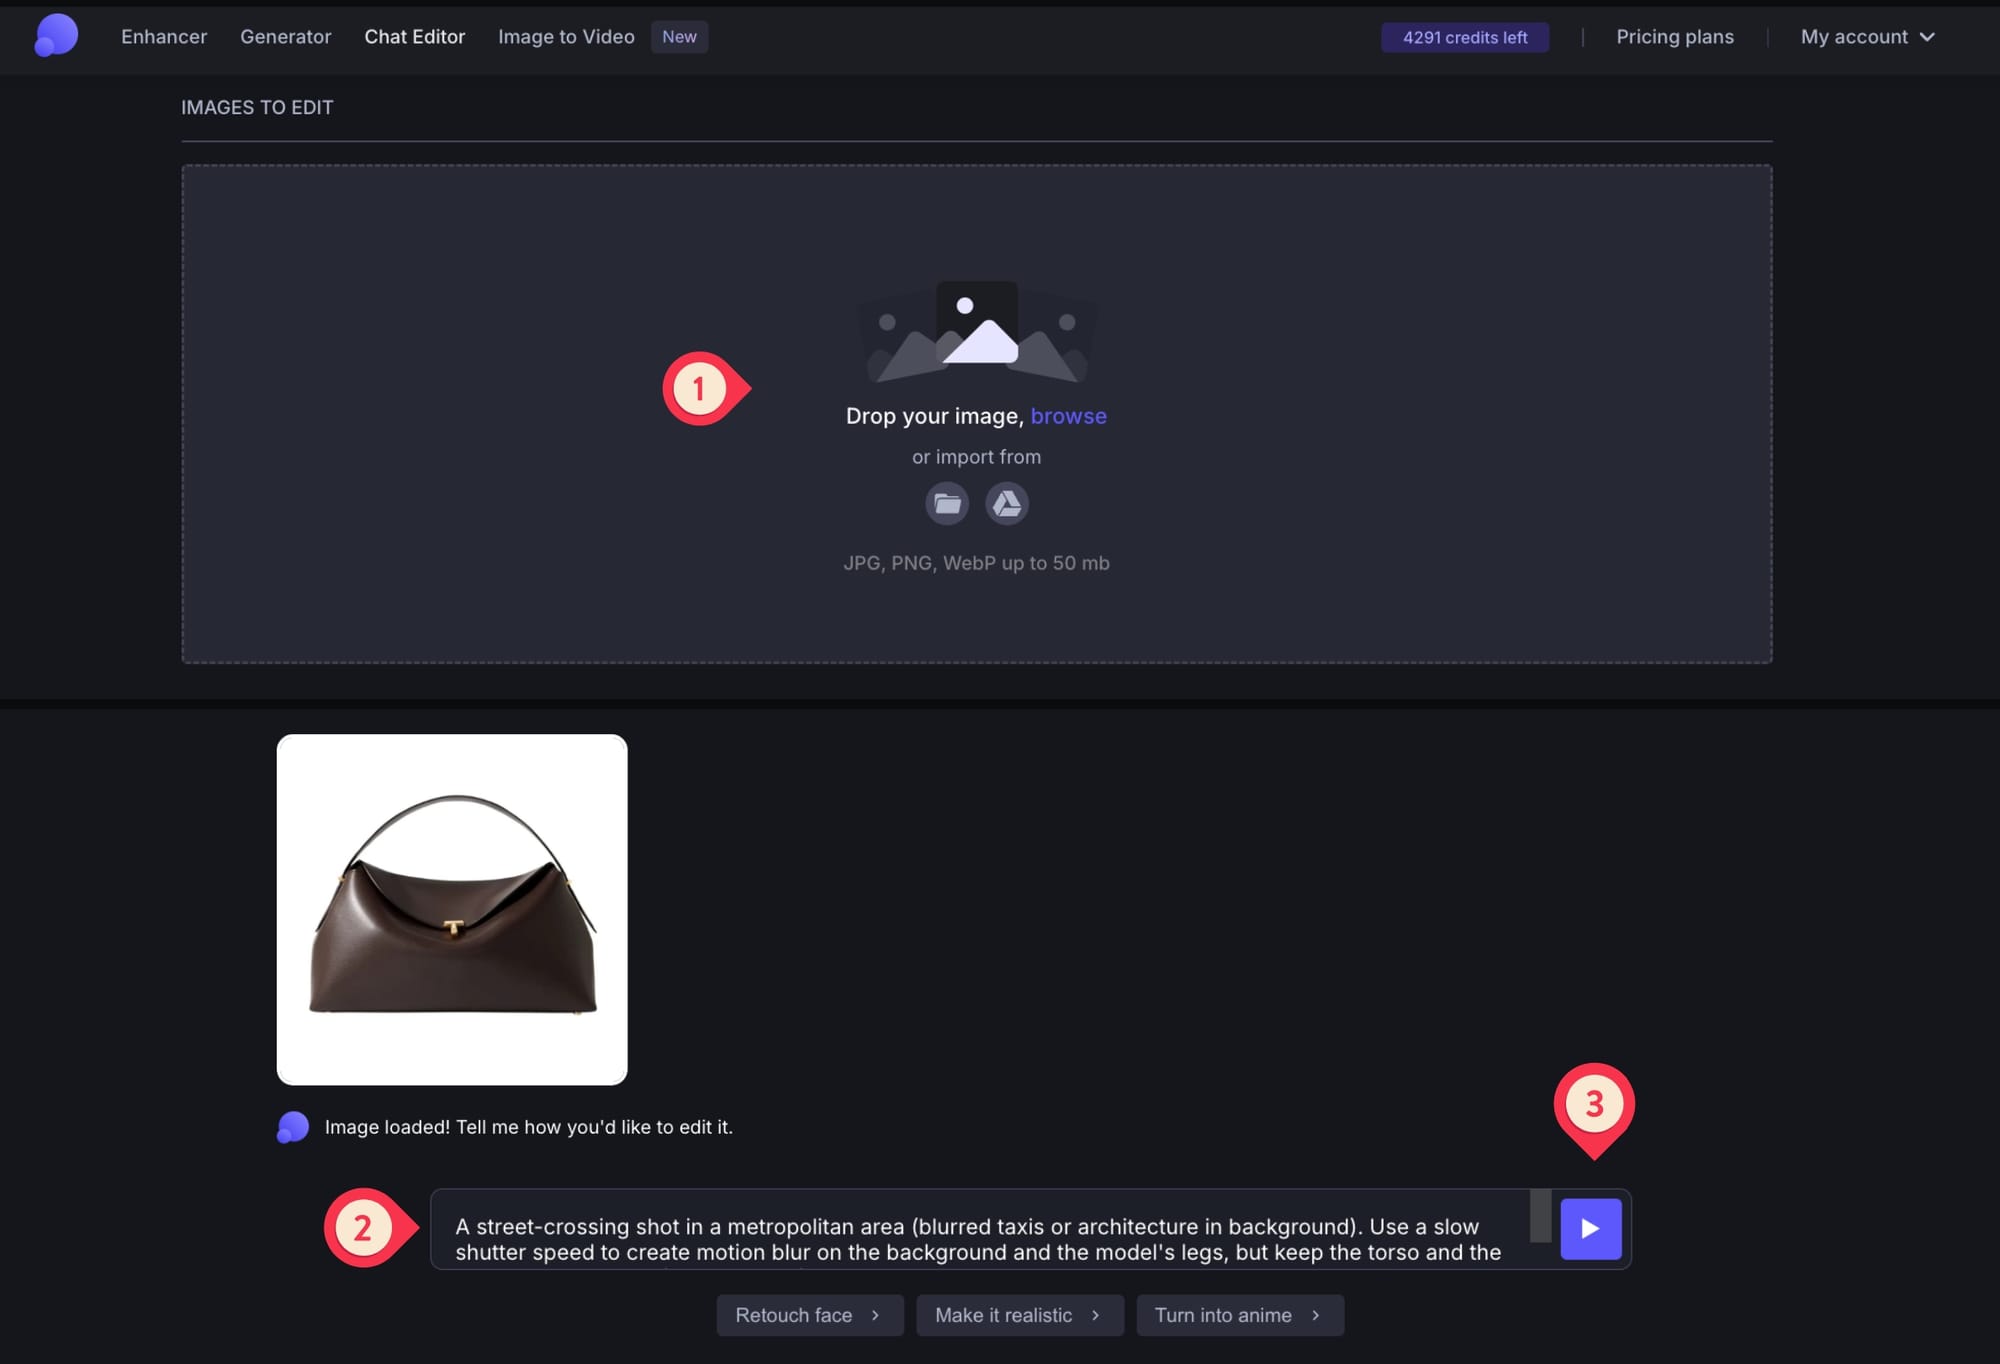
Step 1
Open Chat Editor and drop the transparent PNG created earlier.
Step 2
Write your prompt to create the scene you want. Remember: the more detailed and clear your prompt, the better your result will be.
Step 3
Hit Enter, export your product-ready image and repeat the cycle to generate as many product shots as you need.
This is perfect to generate and use product shots for social posts, ads, landing pages, or brand storytelling when you want to save time and avoid time-consuming photoshoots.
Here are the prompts we used to generate such visuals. You can either copy paste them to use for your own product, or twist them to match your vision.
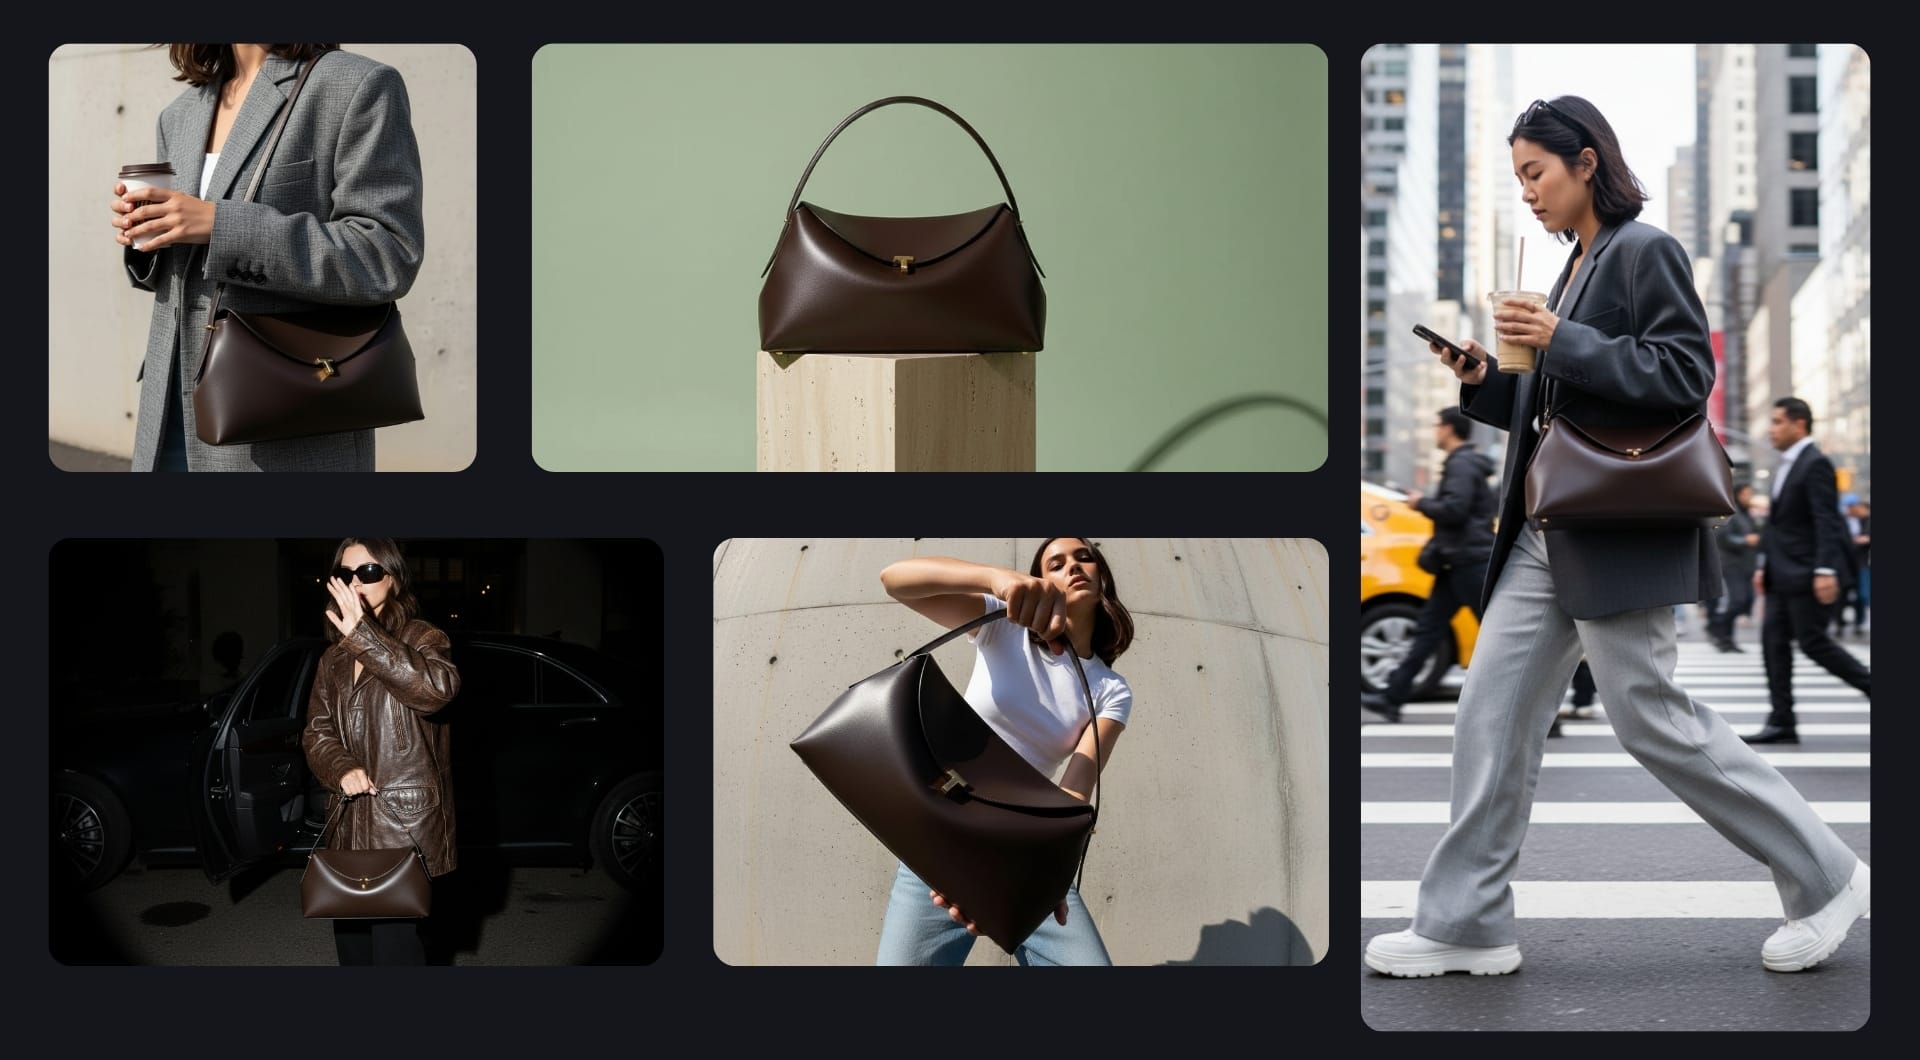
- A tight crop focusing on the model's torso and hands. No face is visible. The model is wearing a textured oversized gray blazer. She is holding a takeaway coffee cup in one hand and the bag is hooked on the crook of her arm, prominently displaying the gold hardware. The lighting is soft, diffused window light (cloudy day vibe). The depth of field is shallow (f/2.8), blurring the background completely to make the gold clasp pop. Keywords: Detail shot, outfit of the day (OOTD), soft focus, texture contrast, minimalism, neutral palette, coffee run.
- A studio shot with a solid, muted pastel background (like sage green or butter yellow). The bag is balanced precariously on top of a geometric prop, like a rough travertine stone block or a clear acrylic cube. The lighting is "hard sun" style, creating a very sharp, dark shadow cast by the bag onto the background. The angle highlights the curve of the top handle and the sheen of the leather. Keywords: Hard shadows, geometric props, studio photography, pastel background, sculptural, modern art.
- A low-angle shot taken with a wide-angle lens (24mm or wider). The model stands against a stark, raw concrete wall or a blue sky. She leans toward the camera, holding the bag out in the foreground so it appears slightly larger than life (forced perspective). Her outfit is minimal: baggy denim jeans and a tight white baby tee. The lighting is bright, natural sunlight (high noon) creating crisp shadows. The distortion emphasizes the bag’s geometric shape. Keywords: Fisheye effect, forced perspective, distorted, edgy, streetwear, raw concrete, 0.5x lens style.
- A medium-long shot of a model exiting a black luxury car or walking out of a hotel at night. The lighting is harsh, direct camera flash, creating a dark vignette and hard shadows behind her. She is wearing an oversized vintage leather jacket and sunglasses (even at night). She holds the bag by the top handle, shielding her face slightly with her other hand. The focus is razor-sharp on the bag's leather texture and the gold T-clasp, while the background falls into deep shadow. Keywords: Direct flash, high contrast, candid celebrity style, night luxe, grainy texture, 35mm film vibe.
- A candid street style photograph of a young woman (early 20s) walking across a busy crosswalk in a metropolitan city like New York or London. She is wearing an oversized charcoal blazer, wide-leg trousers, and chunky white sneakers. The black, minimalist crossbody bag is worn across her chest, sitting at her hip. She is holding an iced coffee in one hand and checking her phone in the other. The background is a blur of yellow taxis, other pedestrians, and tall glass buildings. The lighting is natural daylight, giving the scene a dynamic, on-the-go feel.
Turn product photos into short animation
Static images are great, but for social media, ads, and portfolios short animations perform better.
LetsEnhance’s new AI image-to-video tool turns a single image into a 5-second, 1080p MP4 clip at 24 frames per second. Generation typically takes about 90 seconds per clip.
Step 1
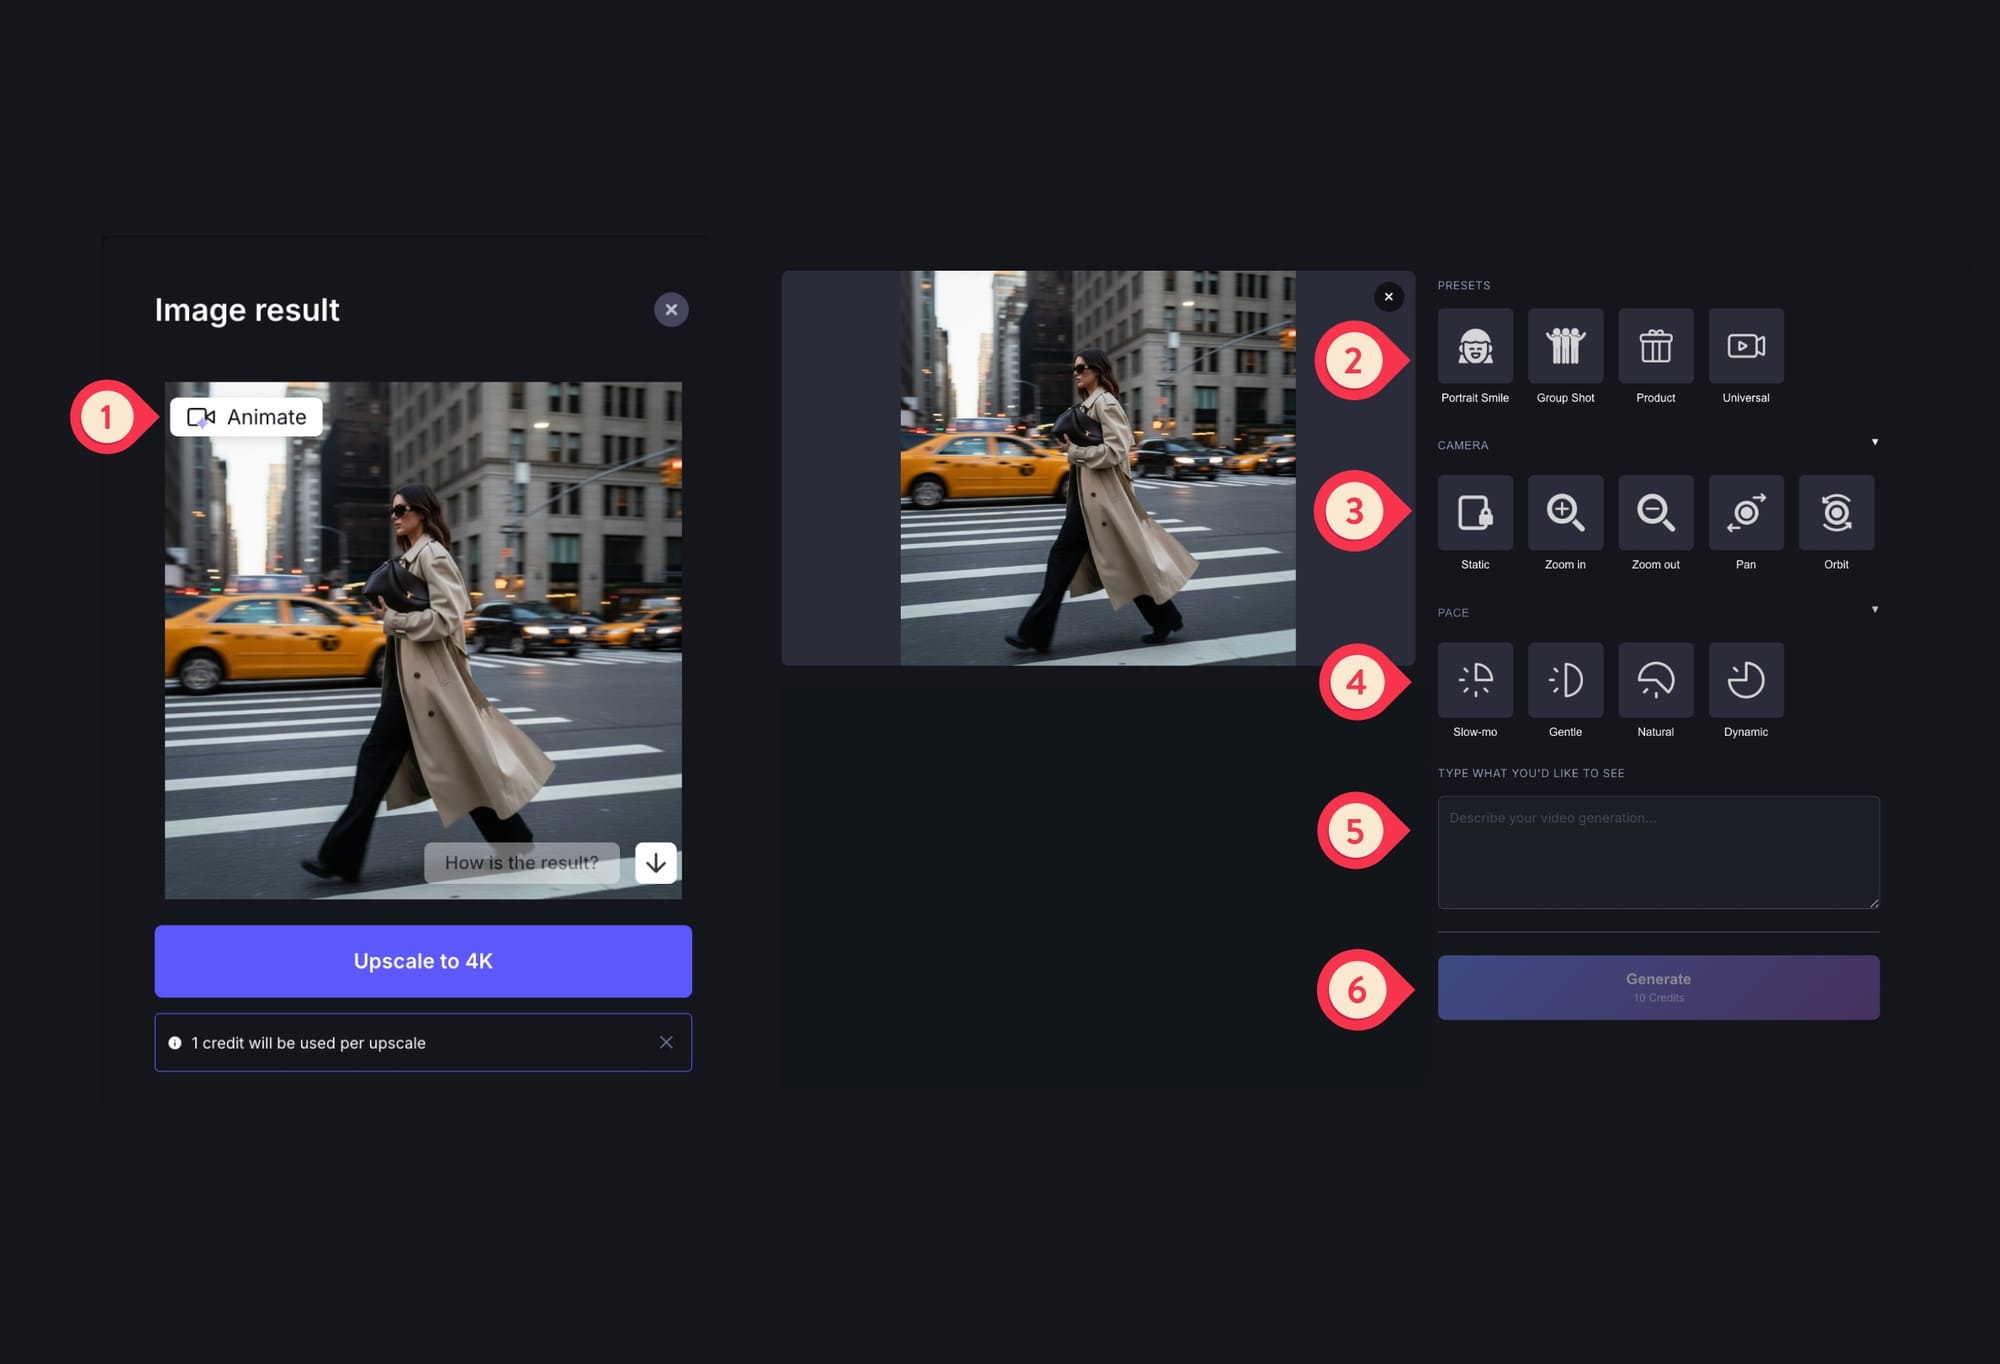
Simply click the Animate button on the result card, which will navigate you to AI video workspace.
Step 2
Here you have ready-to-use settings, you just need to adjust them. Choose the right preset (product in this case), your desired camera movement (e.g. zoom-in, zoom-out, pan, orbit) and pace speed (slow-motion, gentle, natural, dynamic).
If you want to direct the scene exactly the way you want, use the prompt box to write your directions using camera language.
Step 3
After you’re done with the settings, click Generate and you’ll get a 5-second 1080p AI animation within 90 seconds.
AI-generated product animations made from AI-generated product shots.
Scale the workflow with Claid.ai for real catalogs
For a single product you can do everything inside LetsEnhance. For 100 or 10,000 product shots you need structure and automation. Claid.ai is built exactly for that: a focused AI product photography suite with studio, batch, and API workflows.
Here you'll also have access to Claid’s flagship generative tool, AI Photoshoot. It offers 5 different modes and lets you generate different scenes from one product image.
- Precise keeps your product’s angle and placement fixed for clean editorial shots.
- Creative reimagines the entire scene, letting you experiment with new angles, environments, and storytelling.
- Inspiration follows the look and feel of a reference image to match a specific mood or campaign.
- Backgrounds swap only the backdrop while preserving the original photo.
- Mockups keep the whole scene intact but replace the product inside it.
AI Photoshoot is available via API, so you can easily generate product galleries programmatically and keep the style consistent over time.
Try yourself now
If you have product images and want to either remove background, generate new ones or animate them, sign up to letsenhance.io and get started.
Upon signup, you’ll get 10 free credits to try out the tool before buying a subscription. Note, that AI video is available only for paid users.
FAQ
What resolution should my source photo be?
Aim for at least 1000 pixels on the short side. LetsEnhance can upscale up to 16×, so you can safely go from a solid base image to high resolution for print or large banners.
Do I need to shoot on a white background?
No. Background removal works with most environments as long as the product edges are visible and not merging into the background. You can remove and replace the background later, then use AI Photoshoot or Chat Editor to create more creative scenes.
Should I use JPG or PNG for this workflow?
Use JPG when you are still exploring and do not need transparency. Use PNG for master cutouts and anything that will go over custom backgrounds or layouts where transparency matters. Both formats are supported in LetsEnhance and Claid.ai.
Can I generate lifestyle scenes that stay consistent across a collection?
Yes. In LetsEnhance, re-use the same prompt structures and visual language. In Claid.ai, AI Photoshoot can apply similar prompts and reference images across many products, and the API can standardize size, padding, and background color for entire categories.
Are these outputs marketplace compliant?
Claid.ai provides presets and recommended settings for popular marketplaces such as Amazon, Etsy, Walmart, and Shopify, including white backgrounds, square or vertical crops, and safe margins.
Can I automate processing for thousands of products?
Yes. LetsEnhance is ideal for working in the interface, one image or small batches at a time. If you need to process a large catalog, Claid.ai provides an API. Your developer can connect it to your online store or website backend (for example, Shopify or another content management system), or your product database.
From there you can automate a sequence such as: upscale, remove background, set padding, generate new scenes, then save the final images back to your store or database.
Do I still need a real photoshoot?
You still need at least one clear photo for each product variant (for example, each color or size). After that, AI can handle studio-style shots, lifestyle images, seasonal versions, and video snippets. Many teams keep a minimal photo session for new products, then use AI to generate the rest of the visuals.
Can I prepare images for high-resolution print?
Yes. You can upscale in LetsEnhance to reach 300 DPI and sufficient megapixels. It can reach up to 500 megapixels for AI generated content, which is beyond typical print needs.
