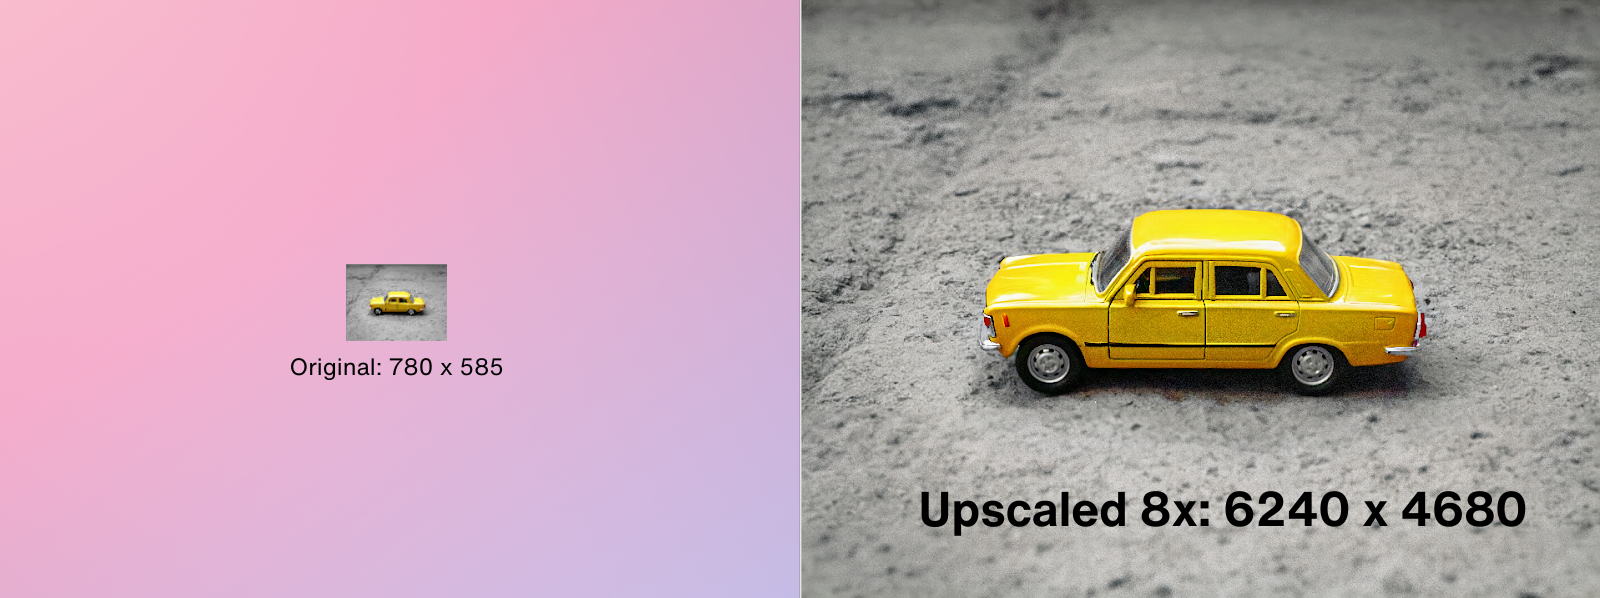
You can’t just stretch a small image and expect it to look sharp. To enlarge a photo or design without turning it into a blurry mess, you need AI that adds detail while it scales. That’s exactly what LetsEnhance does: it upscales images up to 16× and 512 MP while actually improving quality.
Keep reading to learn how to use the technology, how to choose the right model and settings for different cases.
Upscale images with LetsEnhance (step-by-step)
LetsEnhance.io is an AI-powered tool that increases image resolution while enhancing quality. It adds details where standard upscaling methods fail, making it ideal for both beginners and professionals.
Step 1: Sign up or log in
Go to LetsEnhance and create an account or log in. New users get 10 free credits, so you can test the quality before paying.
Step 2: Upload your image
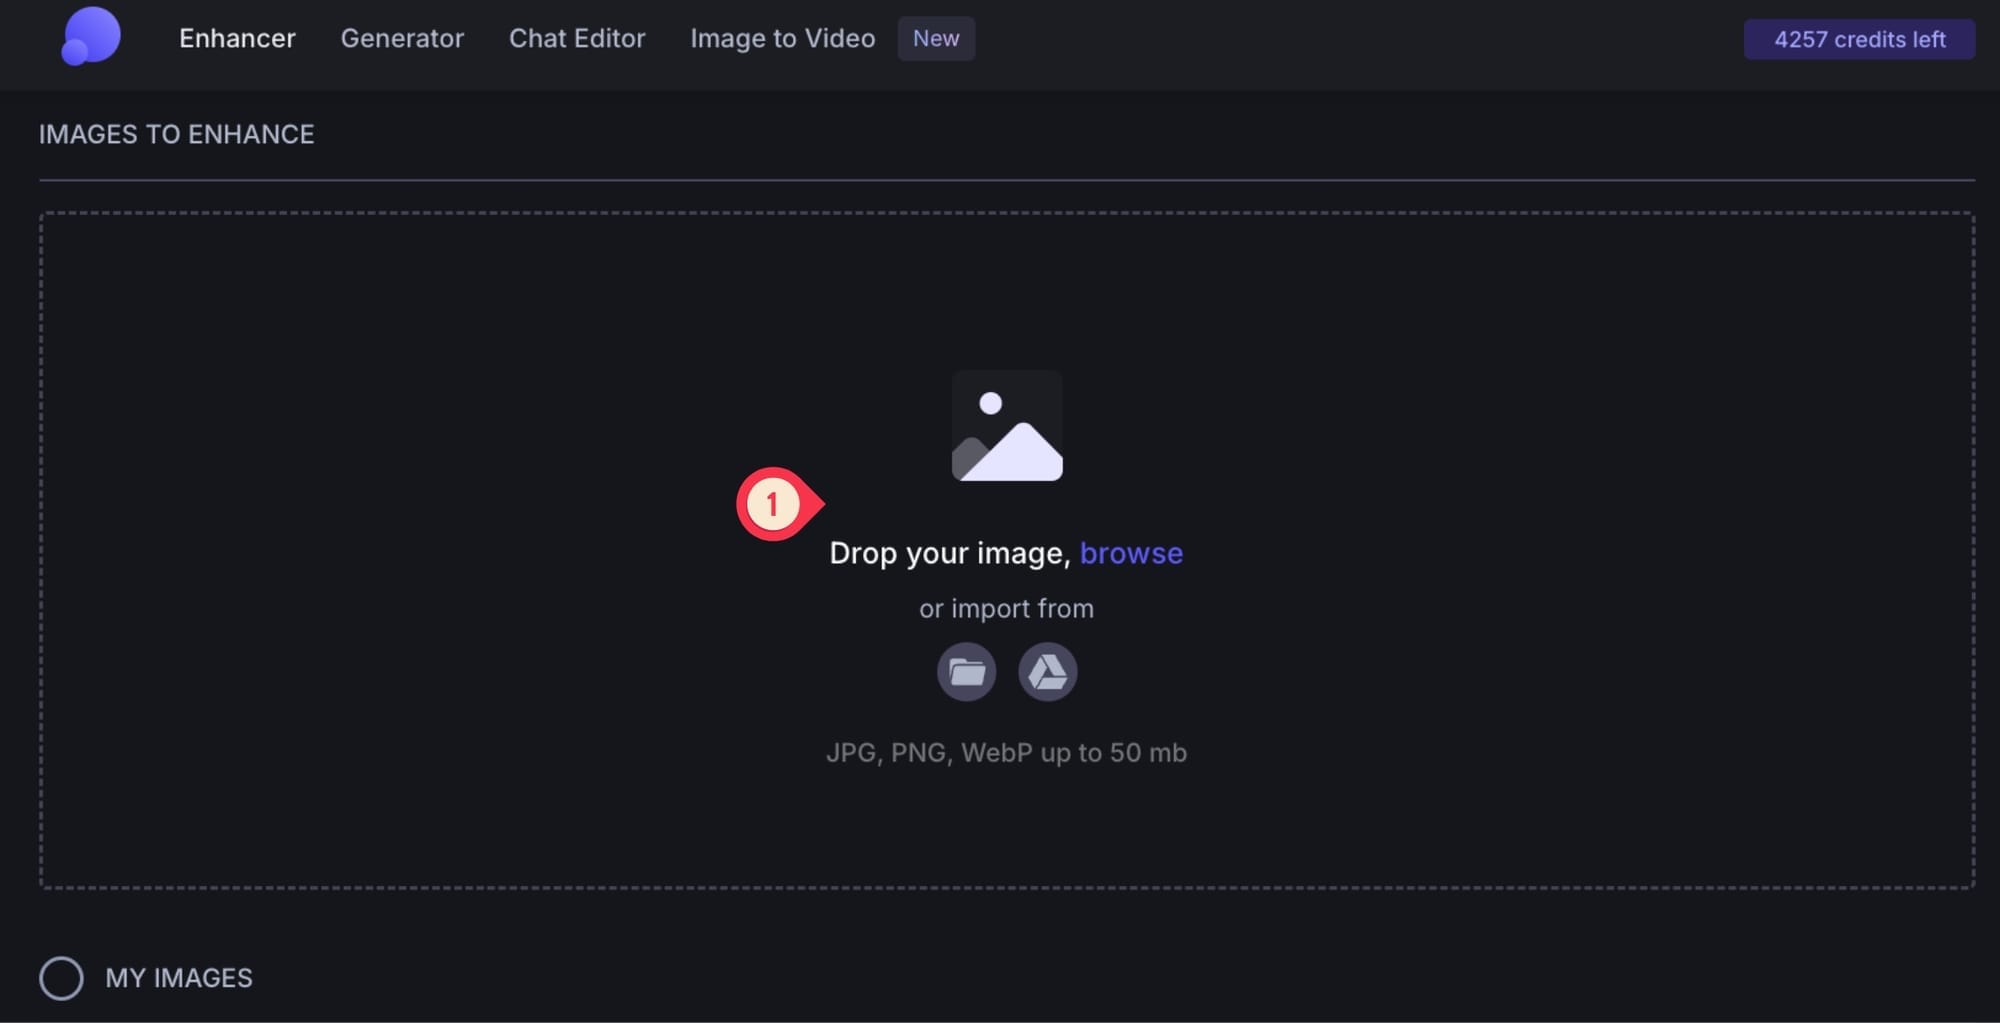
After logging in, drag and drop your file into the workspace or use the upload button. LetsEnhance supports JPG, PNG, WebP formats.
Free users can process up to 24–64 megapixels input, paid plans go up to 512 megapixels output and 50 MB per file.
Step 3: Select the upscaling mode
On the right-hand panel, pick an Upscale type from the available seven models.
Learn about each upscale type and when to use each below.
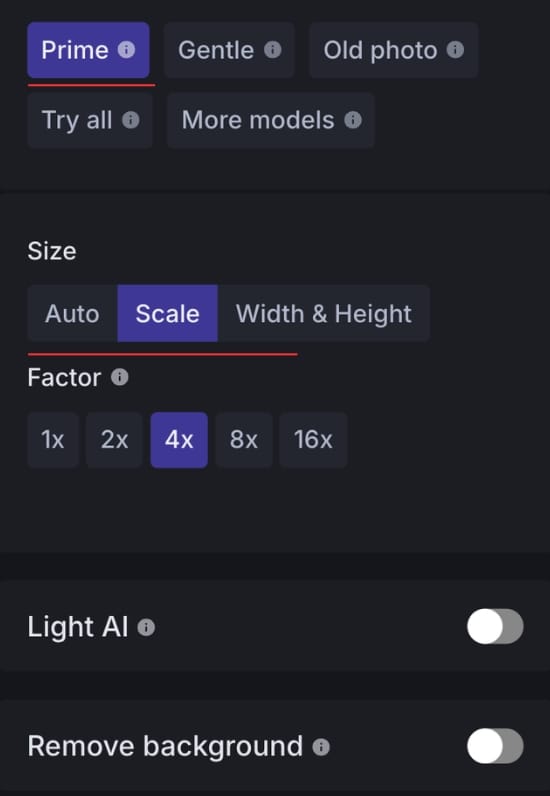
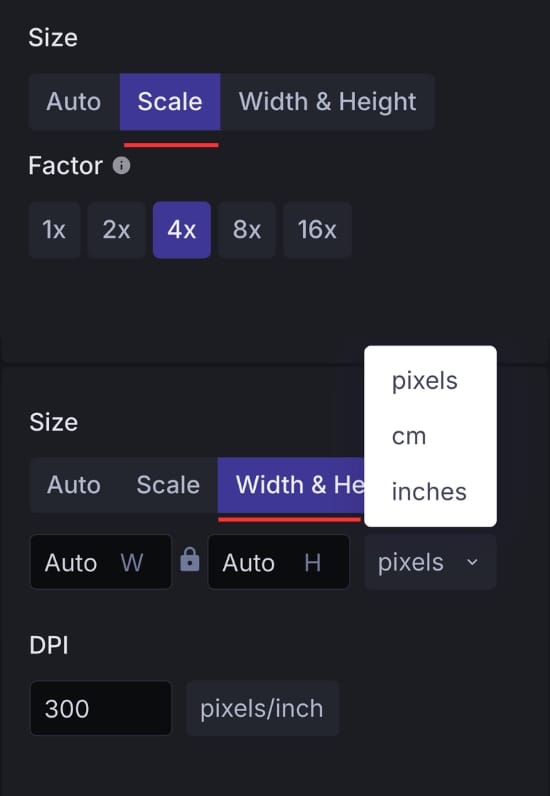
Step 4: Set your target size
Under Size, choose how big you want the result to be (2×, 4×, 8×, up to 16×) or set an exact width and height in pixels.
If you’re preparing a print, you can set DPI (dot per inch) to 300+ or pick a printing preset such as A4, poster, or other common sizes. The tool will calculate the right pixel dimensions automatically.
Step 5: Adjust additional settings (optional)
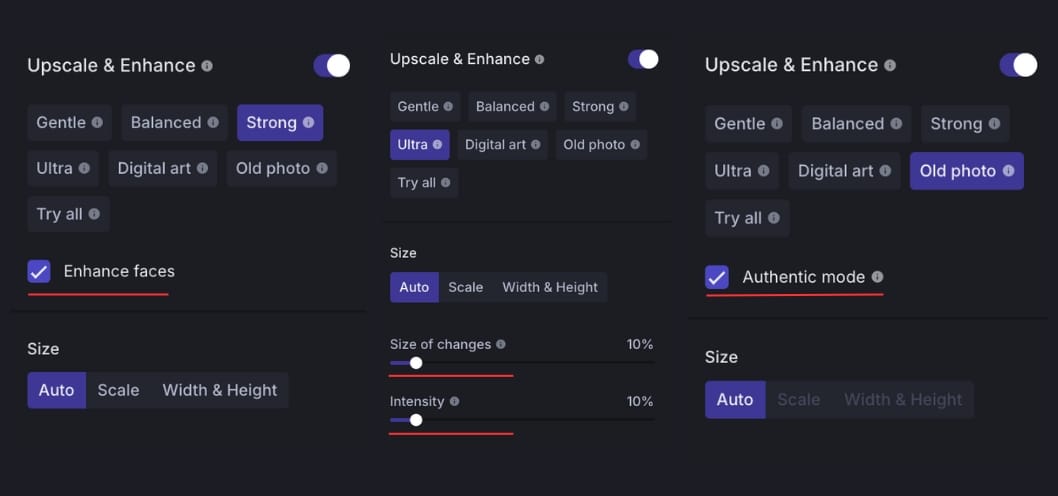
Depending on the upscaler, you’ll see extra controls such as Enhance face, Size of Changes, Intensity, Strength and Authentic mode. More about these settings are presented below.
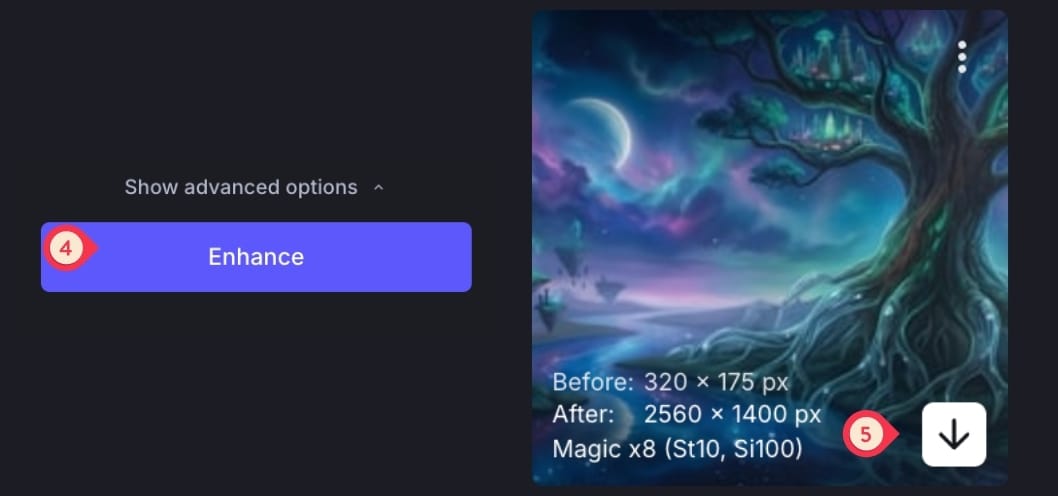
Step 6: Start processing
Click Enhance to get started. Most images are in a few seconds; very large files and high scales may take a bit longer.
Once the processing is complete, click on your image to preview the results. You use the before-and-after slider to compare the original and upscaled images.
If satisfied, click Download to save the high-resolution image to your device.
Choosing the right upscaler for your image
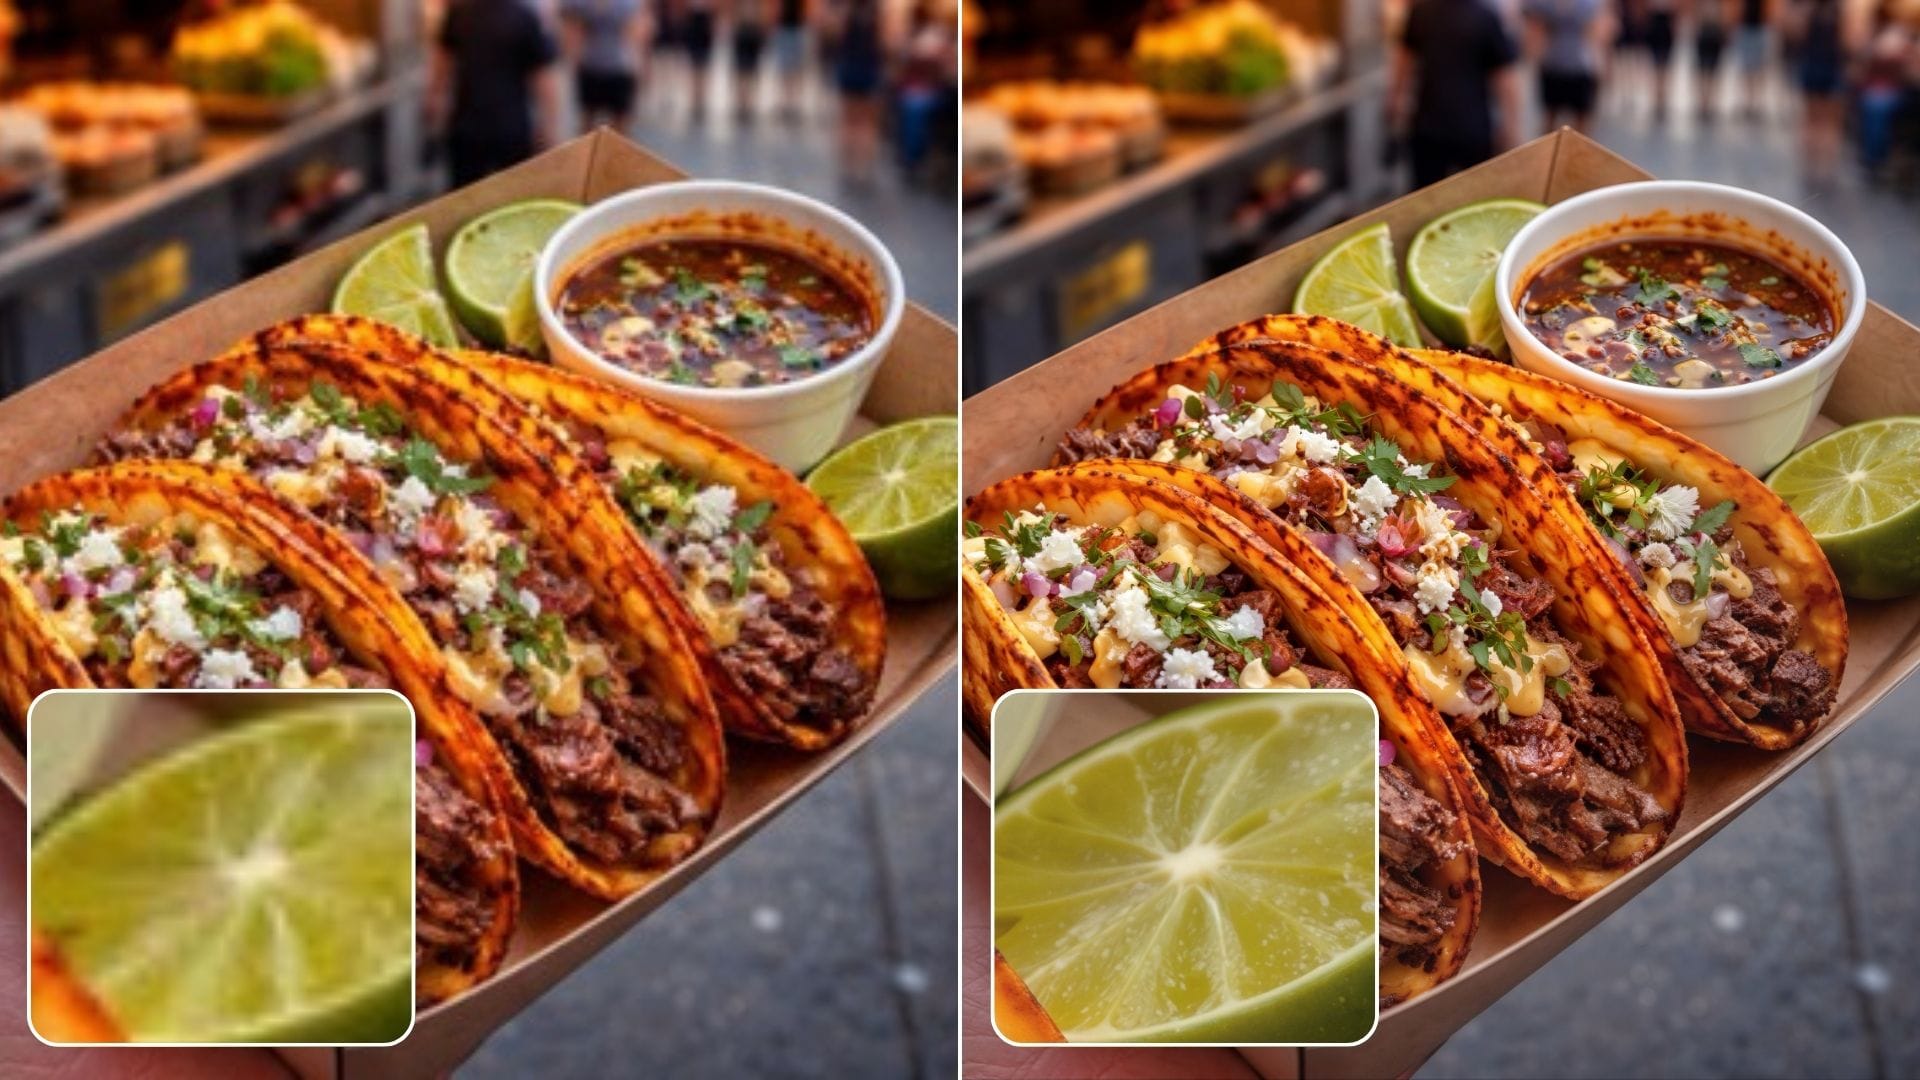
LetsEnhance.io offers seven upscalers that run from “barely touch the original, just make it bigger” to “rebuild heavy blur and artifacts.” That range is what lets you upscale without losing quality.
Below is how each mode behaves, when to use it, and what kind of result to expect.
| Mode | Best for | Key strengths |
|---|---|---|
| Prime | Natural, high-fidelity upscaling for photos and portraits | Enhances what's already there without inventing detail; ideal for skin texture, identity preservation, and print-ready output |
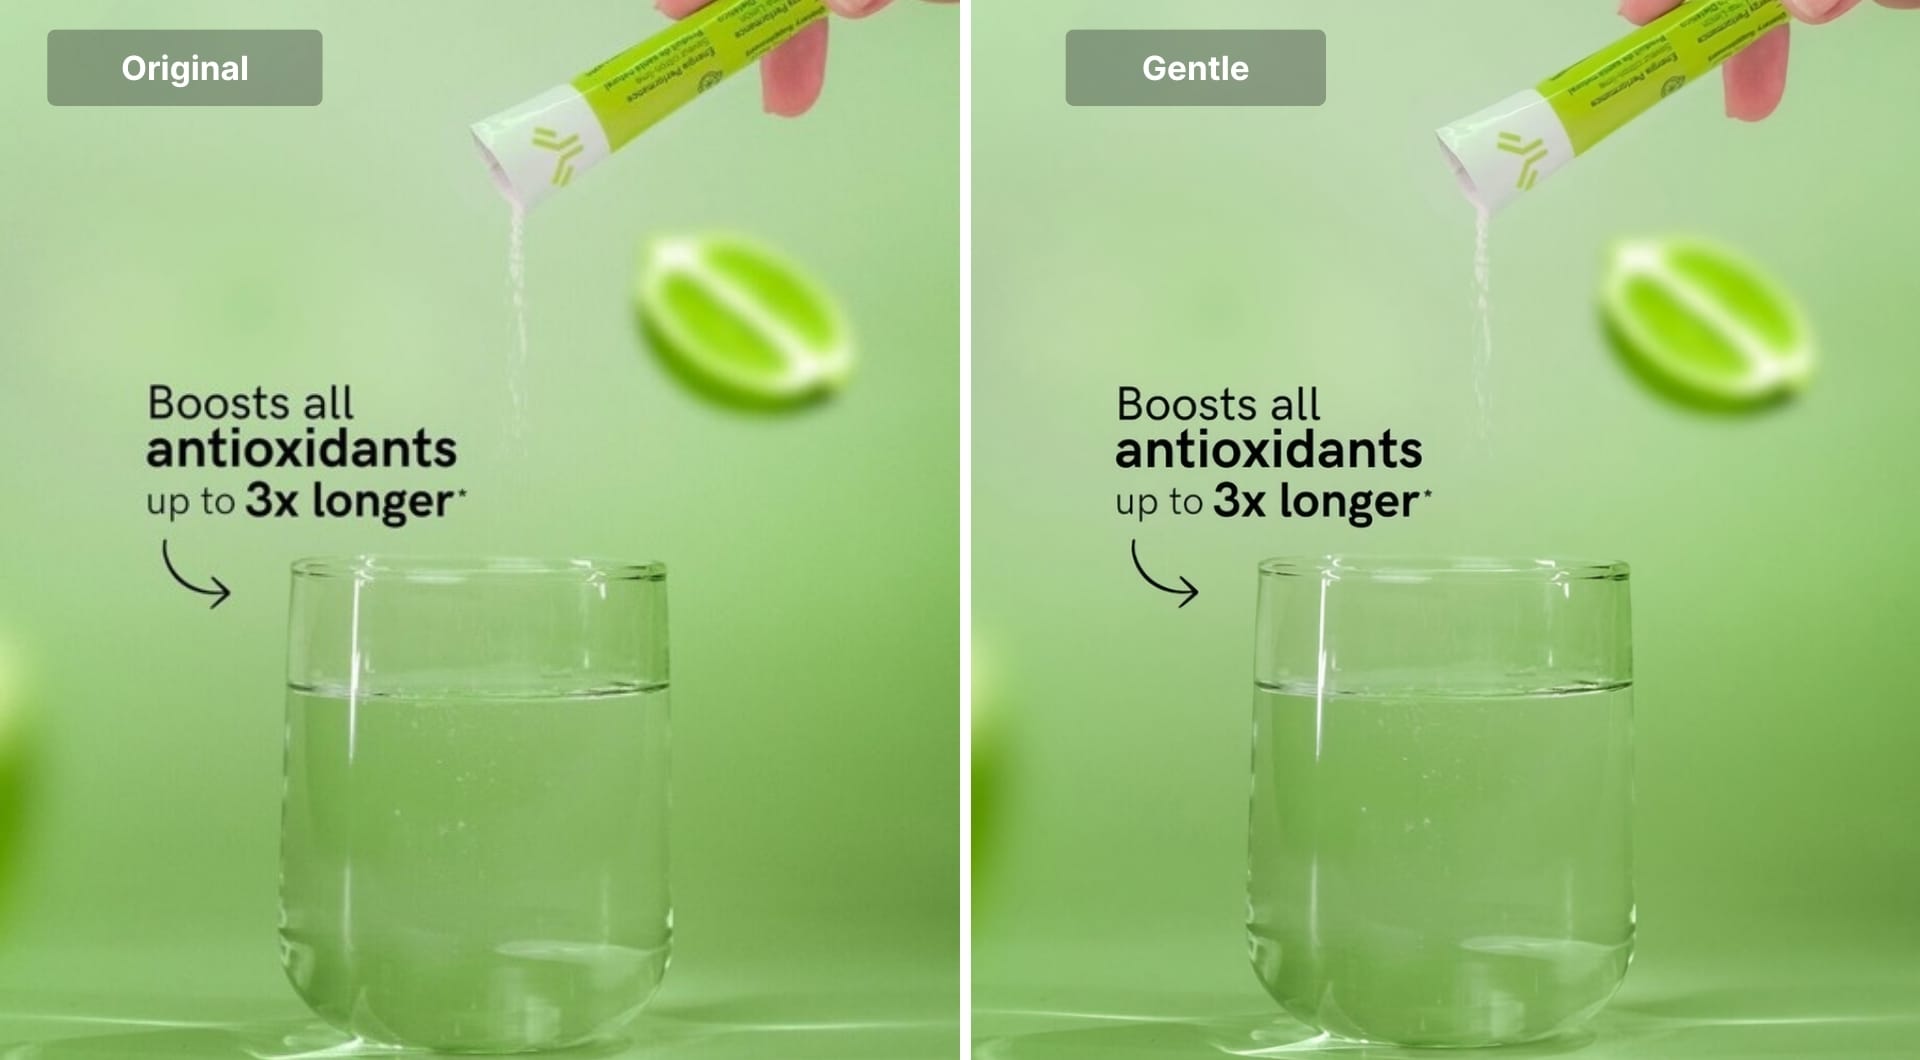
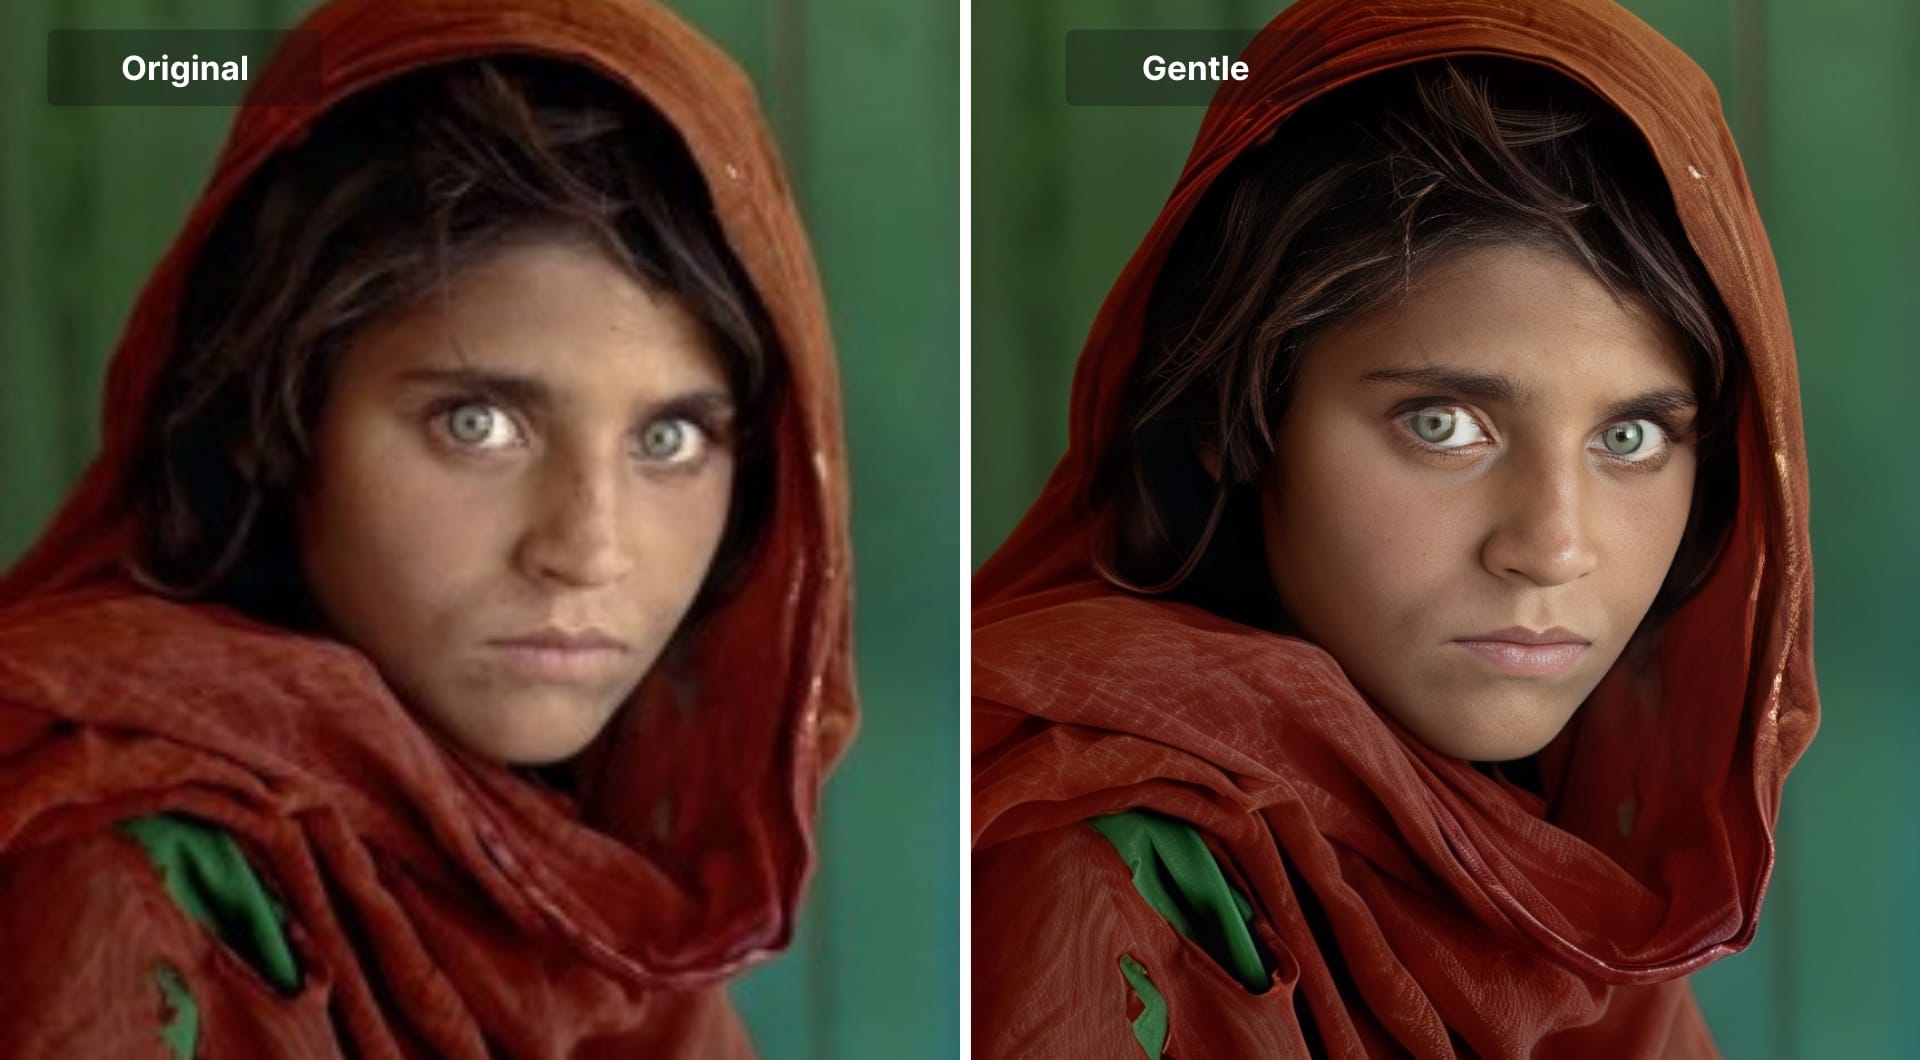
| Gentle | Images where accuracy is critical | Preserves small text, logos, and fine details; high-fidelity results with minimal change; ideal for e-commerce product photos and UI; reduces artifacts without over-sharpening |
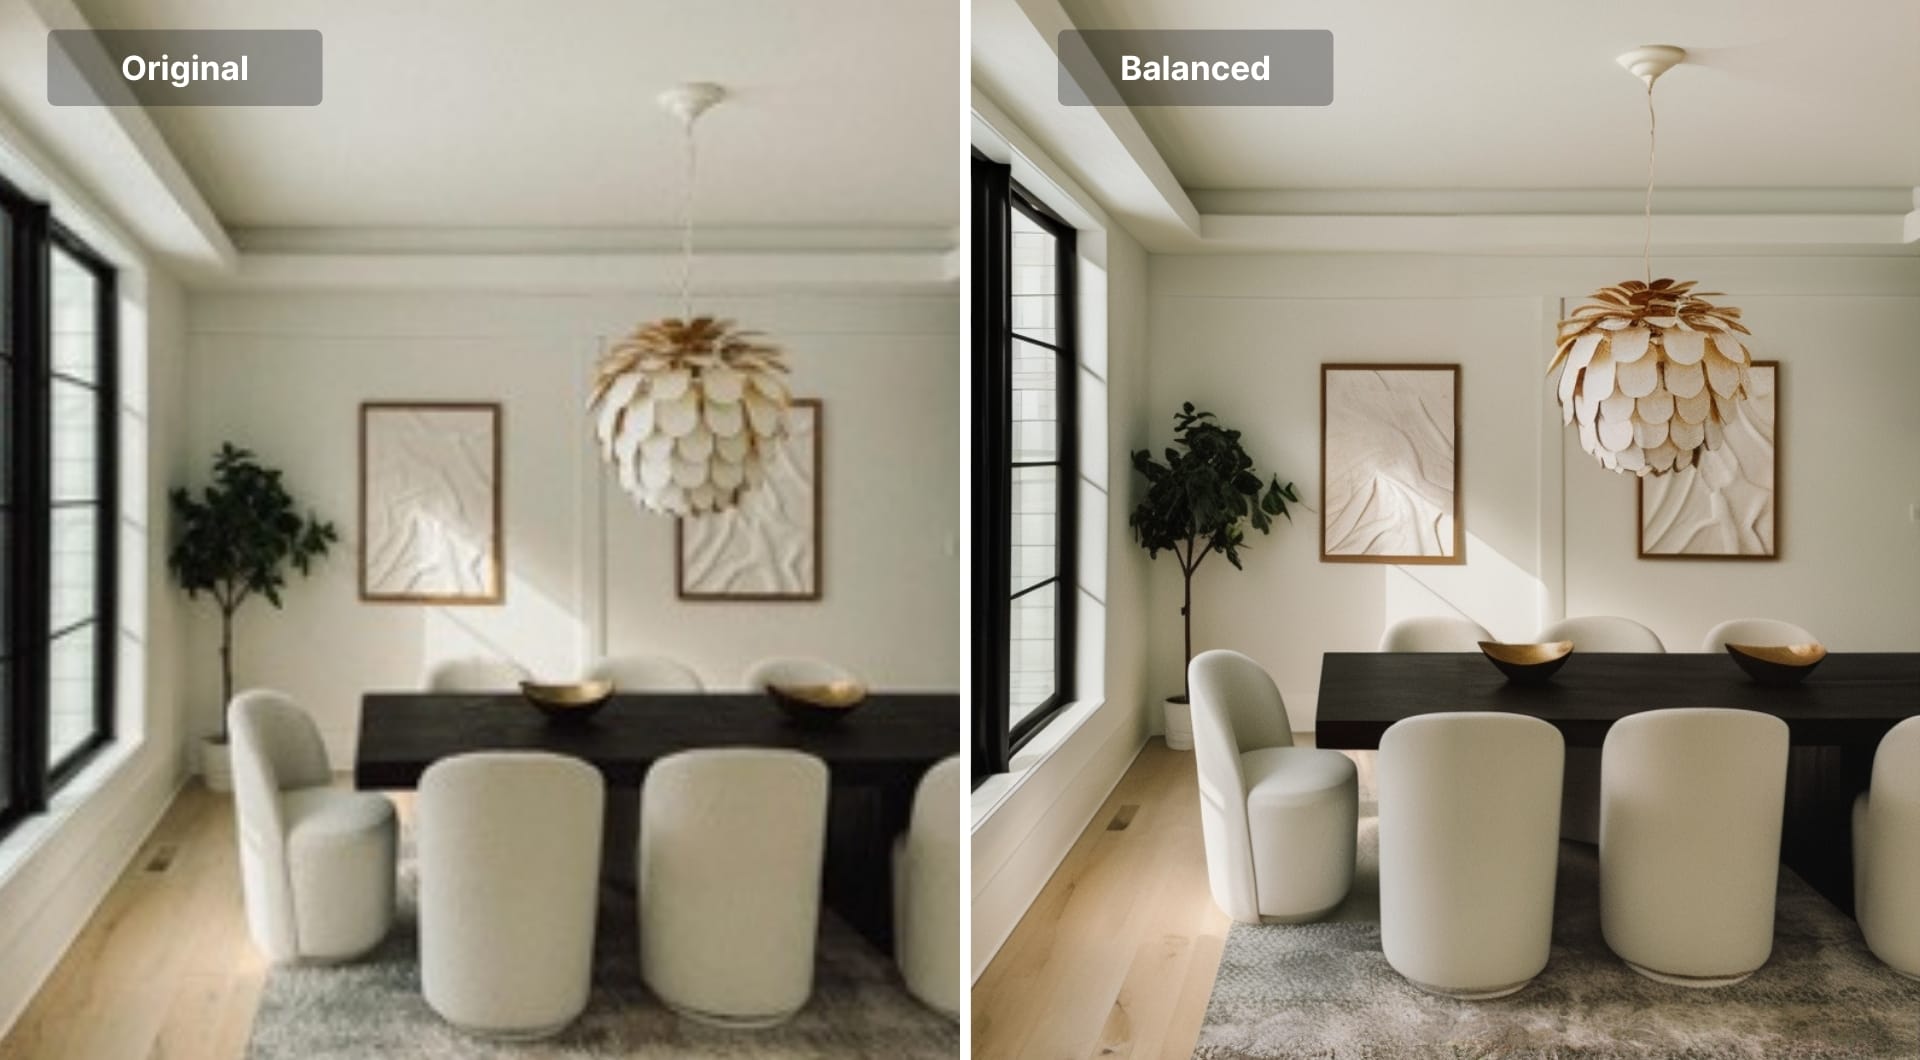
| Balanced | Most photographs and everyday images | Natural-looking enhancement; great for portraits, travel, and lifestyle; handles mixed textures (skin, fabric, foliage, sky); safe default for web and print photos |
| Strong | Images that are visibly blurry or low quality | Recovers clarity in soft or noisy photos; face-aware enhancement for natural skin and features; cleans heavy JPEG compression and artifacts; stronger sharpening for a more dramatic boost |
| Ultra | Maximum sharpness and texture | Best for big upscales and demanding images; recovers fine detail in challenging files; great for catalogs, banners, and large prints; extra controls for Size of changes and Intensity |
| Digital Art | Illustrations, graphics, and AI-generated art | Keeps linework crisp and colors solid; perfect for comics, anime, concept art, and game assets; great for Midjourney/SDXL and other AI artwork; enhancement controls for conservative or stylized looks |
| Old Photo | Restoring vintage and damaged photos | Repairs fading, scratches, and color cast; recovers faces and key details in scans; ideal for family archives and historical images; produces a clean base for further upscaling with other modes |
Prime
Prime is the default upscaler and it's the most natural mode available. It's best to use for portraits, food, fashion and general photography where texture and detail matter.
Balanced
Balanced boosts clarity and contrast while still looking natural. Use it when you:
- Work with everyday photos such as portraits, travel, food, interiors
- Want a “looks like my original, just sharper and bigger” outcome
- Don’t want to tweak much and need reliable results quickly
You can use it with real estate photos, social content, blog imagery, basic e-commerce with no tiny text.
Gentle
Gentle is the most conservative model. It keeps almost everything about your original intact and focuses on cleaning edges and noise. Use it when you:
- Need text, logos, or labels to stay perfectly readable
- Have inputs that are already decent and just need more pixels
- Care more about fidelity than aggressive sharpening
Best cases to use Gentle are product photos with ingredient lists, UI screenshots, posters, menus and infographics.
Strong
This model is made to significantly improve blurry, compressed, or low-megapixel inputs. For images with faces, it reconstructs facial features intelligently so people don’t end up looking like wax figures. Use Strong when you:
- Need to enhances faces in portraits
- Have smartphone photos taken in low light
- Are dealing with heavy JPEG compression (blockiness, halos)
- Want to unblur social images, older camera files, or small online photos
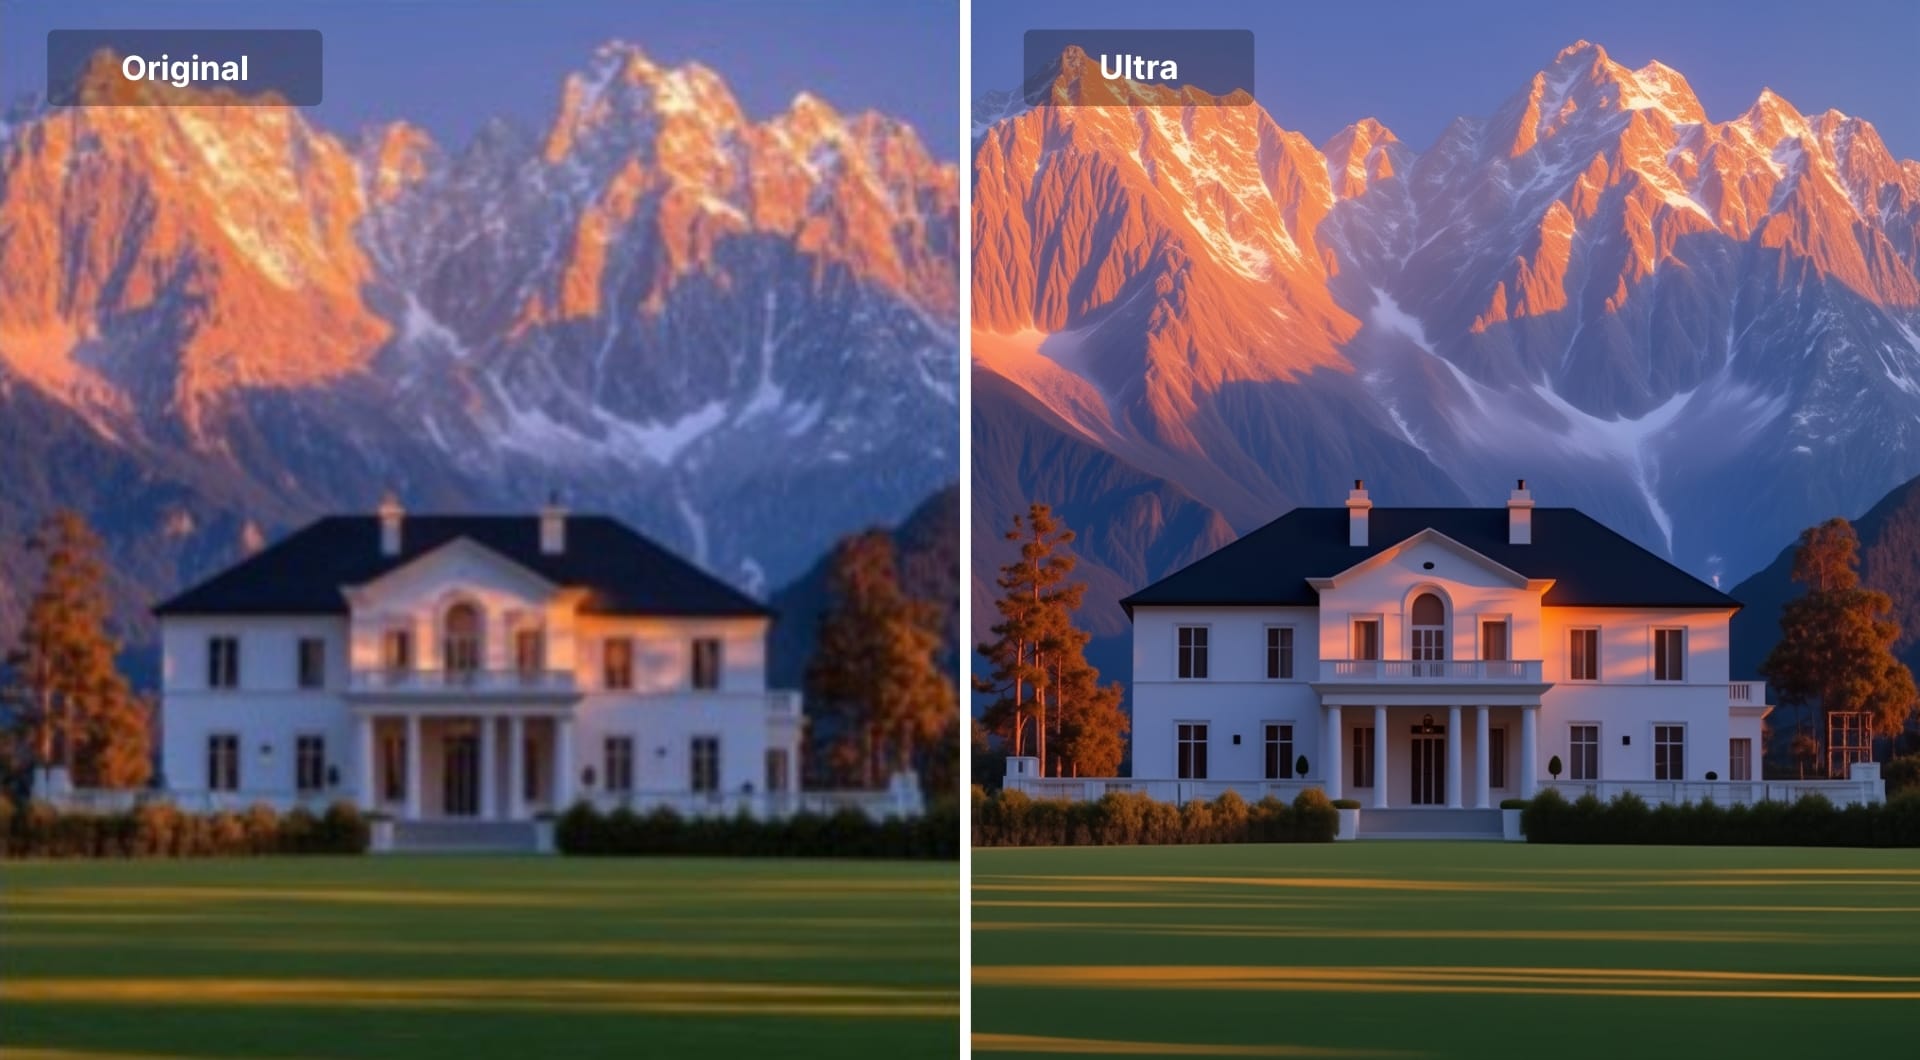
Ultra
Ultra is our flagship upscaler for maximum sharpness and print-grade detail. It’s made for strong source images that you want to use big without losing quality. Use Ultra when you:
- Need high-quality photos to go from screen to large prints
- Want premium product shots or campaign visuals that stay crisp at 300 DPI
- Upscale AI images that already look good and just need more pixels
Ultra also gives you two extra settings: Size of changes (0% stays closer to the original by refining small textures, 100% improves larger areas for a more creative boost) and Intensity (0% provides a high-fidelity polish, 100% applies a powerful transformation to rebuild detail).
Best cases to use Ultra are professional photography, catalogs, hero banners, and high-end AI renders for posters or billboards.
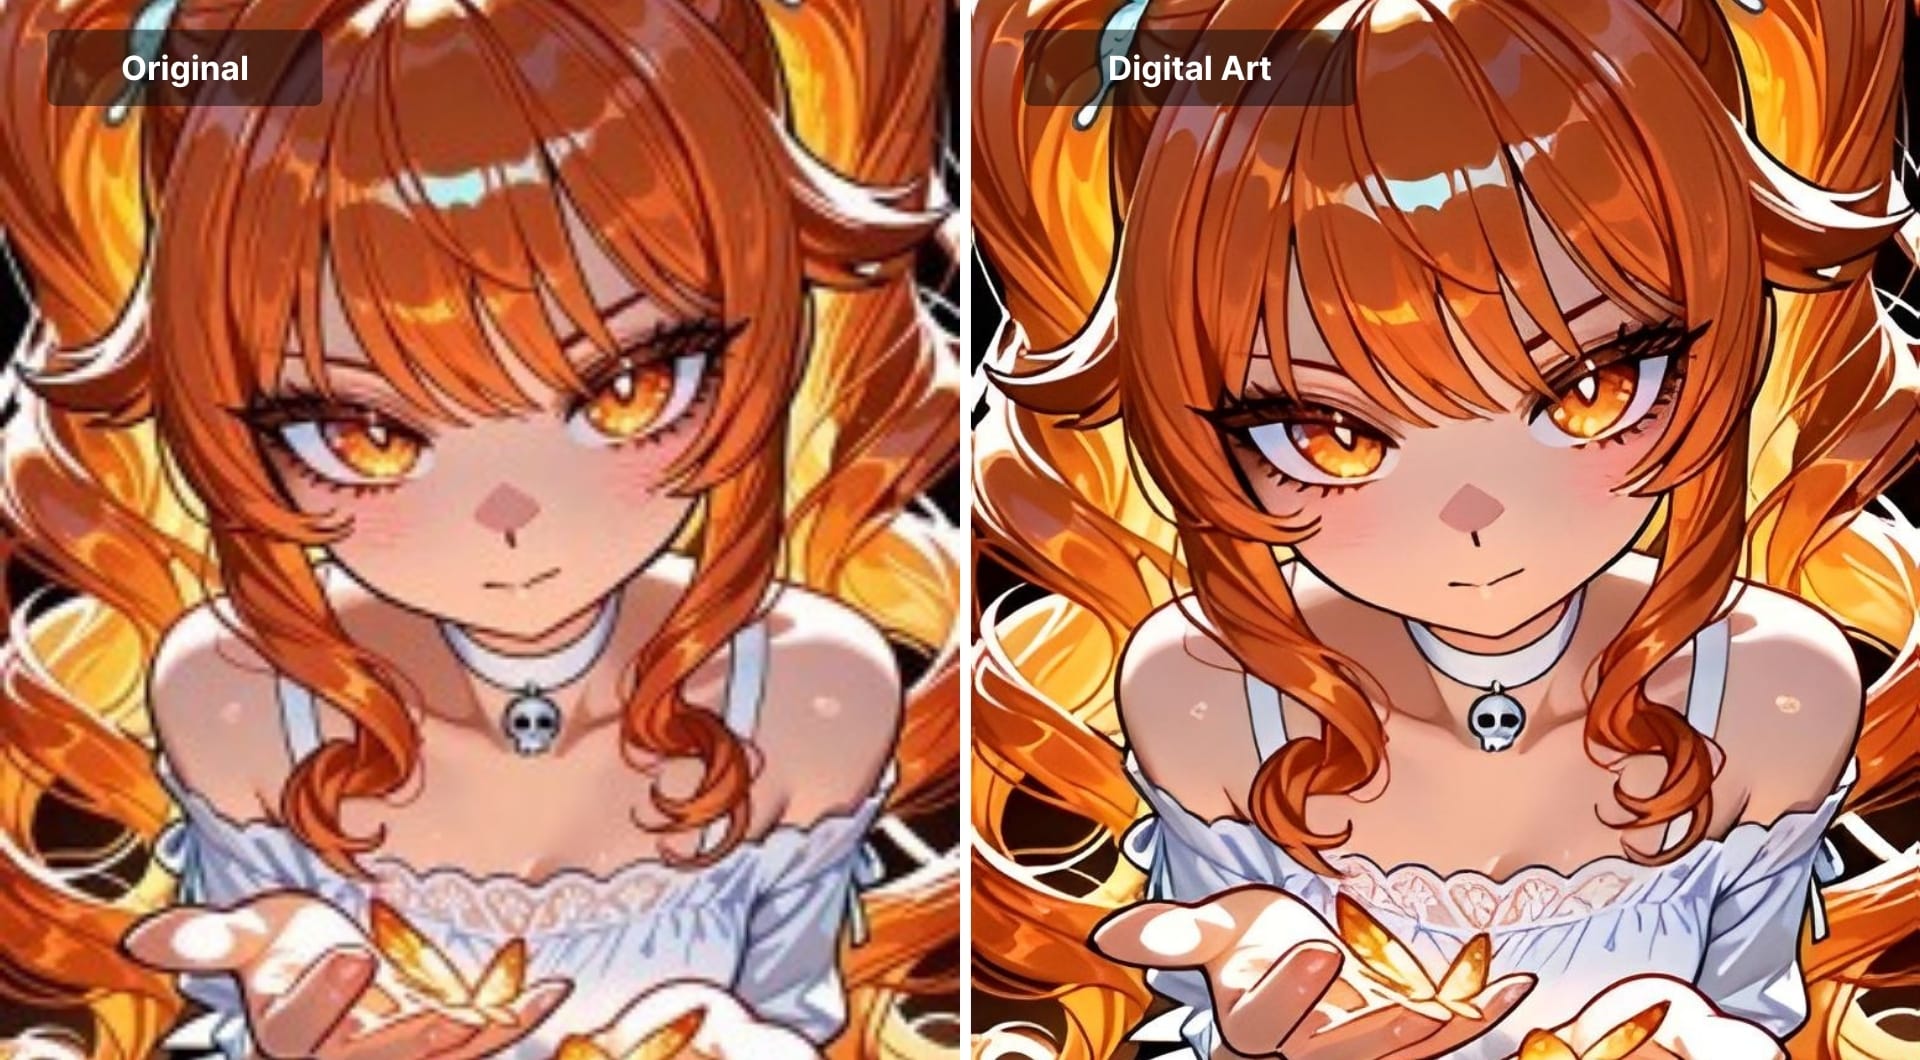
Digital Art
Digital art is tuned specifically for non-photographic content like illustrations and AI-generated art. It preserves clean lines, flat colors, and stylized shading without turning everything into photo texture. Use it when you:
- Work with comics, anime, concept art, logos, or UI elements
- Upscale Midjourney, SDXL, or other AI artwork that relies on sharp outlines
- Need to resize assets for prints, merch, or higher-res exports without banding
Inside Digital Art, you'll have Strength setting that controls how many new details the AI can add: higher values give clearer, more detailed output but may diverge from the original, while lower values keep it closer to your source.
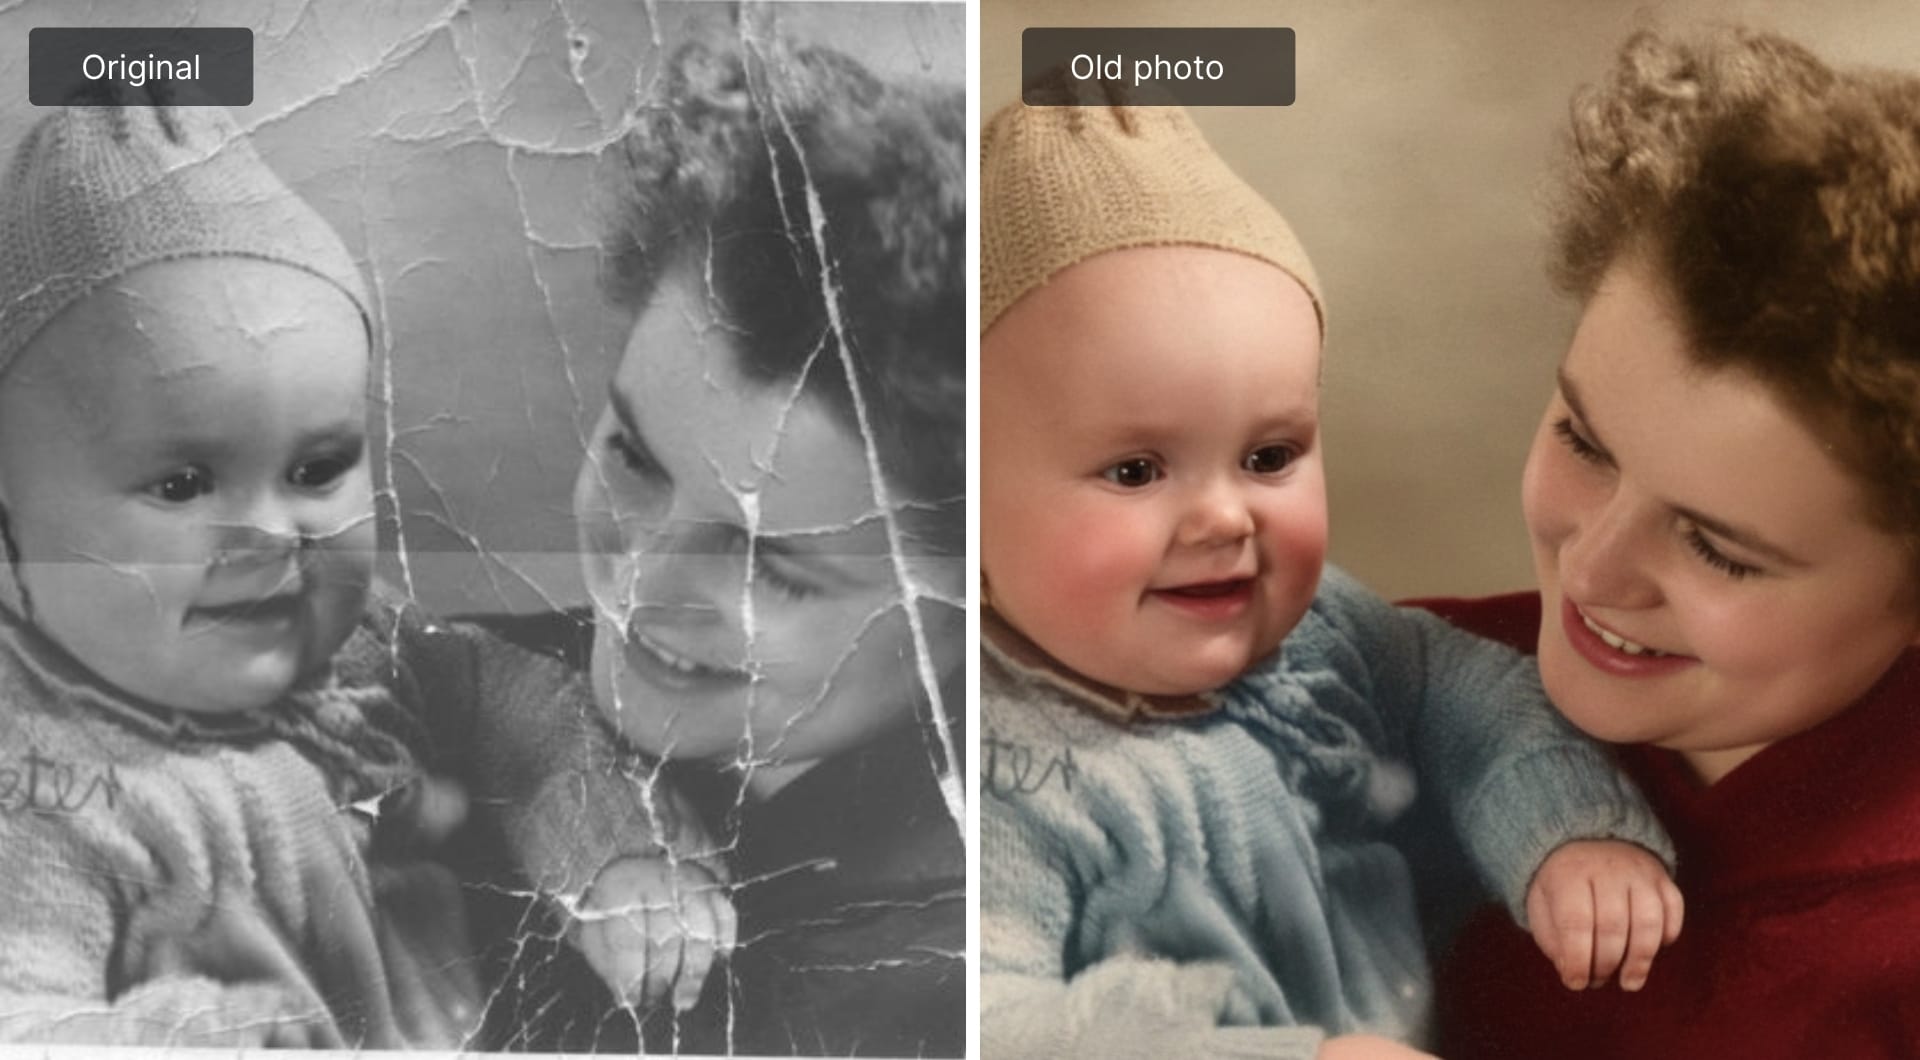
Old Photo
Old photo is made for restoring vintage and damaged images. It repairs fading, scratches, and color shifts so you start from a clean, modern-looking base. Use it when you:
- Scan family albums, historical photos, or film prints
- Need to recover faces and important details from very old or low-quality originals
- Want to fix yellow tint, low contrast, or visible damage
Inside Old Photo, you'll find Authentic mode toggle. Turning it on keeps the original photo characteristics with Less colorization for a more authentic look.
Tips to choose the right model
- Assess Your Image Type: Is it a photo, digital art, or a vintage image?
- Determine Your Goal: Do you want to preserve the original look or enhance it significantly?
- Experiment: Try processing the same image with different modes to compare results.
- Use "Balanced" for a medium-strength improvement if unsure.
Make the most out of LetsEnhance
- The better the original, the better the upscaled result.
- When upscaling small images, set the upscaling factor to 4x or more
- Saving in PNG may retain more details than JPEG (especially true for graphics and photos with text)
- Use the preview with zoomed-in before/after comparison before downloading.
How to make images bigger in Photoshop
For users comfortable with Photoshop, manual upscaling offers more control but requires more effort.
Step 1: Open your image
- Launch Photoshop.
- Click File > Open and select your image.
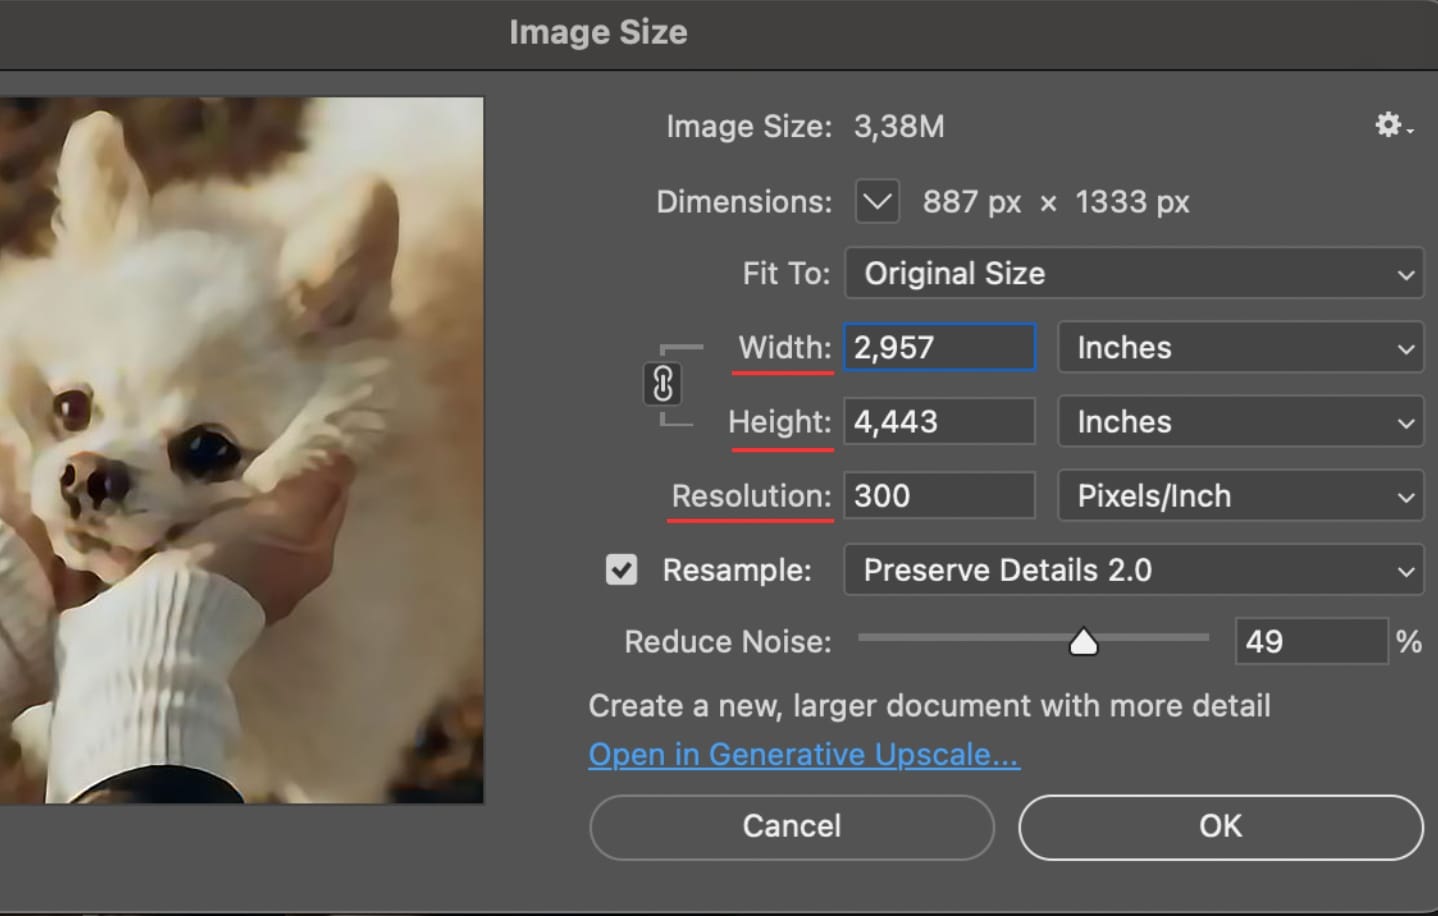
Step 2: Access image size settings
- Navigate to Image > Image Size or press Alt + Ctrl + I (Windows) or Option + Command + I (Mac).
Step 3: Enable resampling
- Ensure the Resample checkbox is selected.
- This allows you to change the image dimensions independently of the resolution.
Step 4: Choose resampling method
- From the Resample dropdown, select Preserve Details 2.0 (if available).
- Tip: If using an older version of Photoshop, choose Bicubic Smoother.
Step 5: Adjust image dimensions
- Enter the desired Width and Height.
- The resolution (DPI) can remain the same unless you're preparing for print.
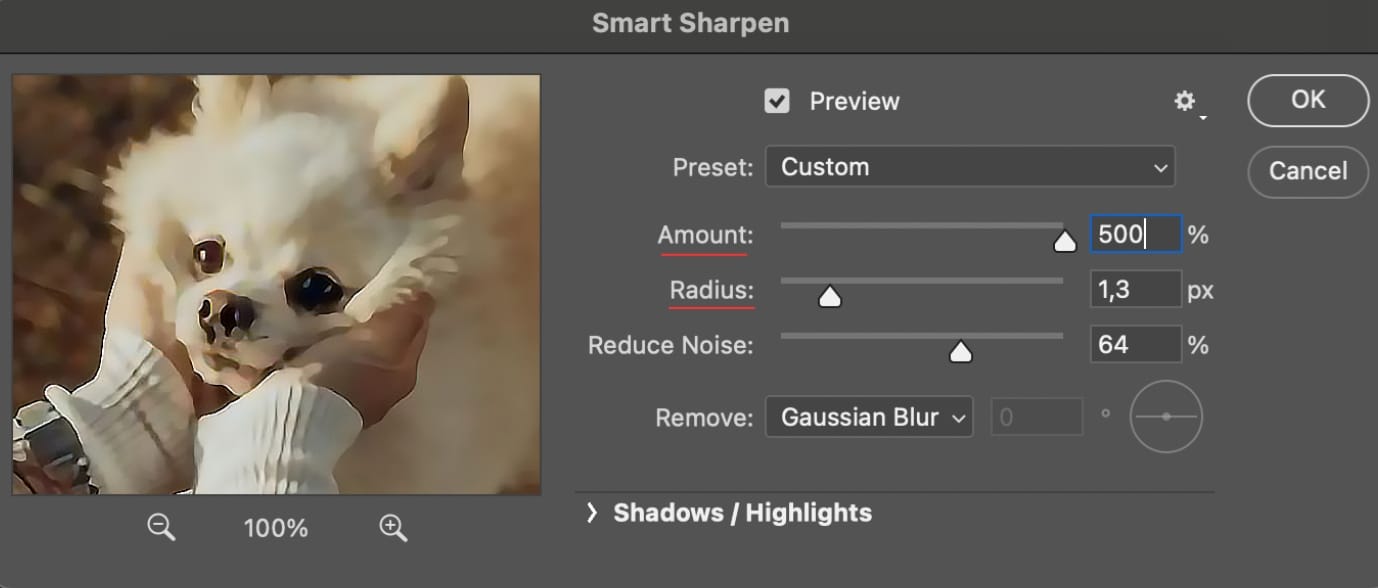
Step 6: Fine-tune with smart sharpen (optional)
- Go to Filter > Sharpen > Smart Sharpen.
- Adjust the Amount and Radius to enhance details.
- Tip: Be cautious; too much sharpening can create noise.
Step 7: Save Your Image
- Click OK to apply changes.
- Save your image via File > Save As.
- Choose a format that suits your needs (JPEG, PNG, TIFF).
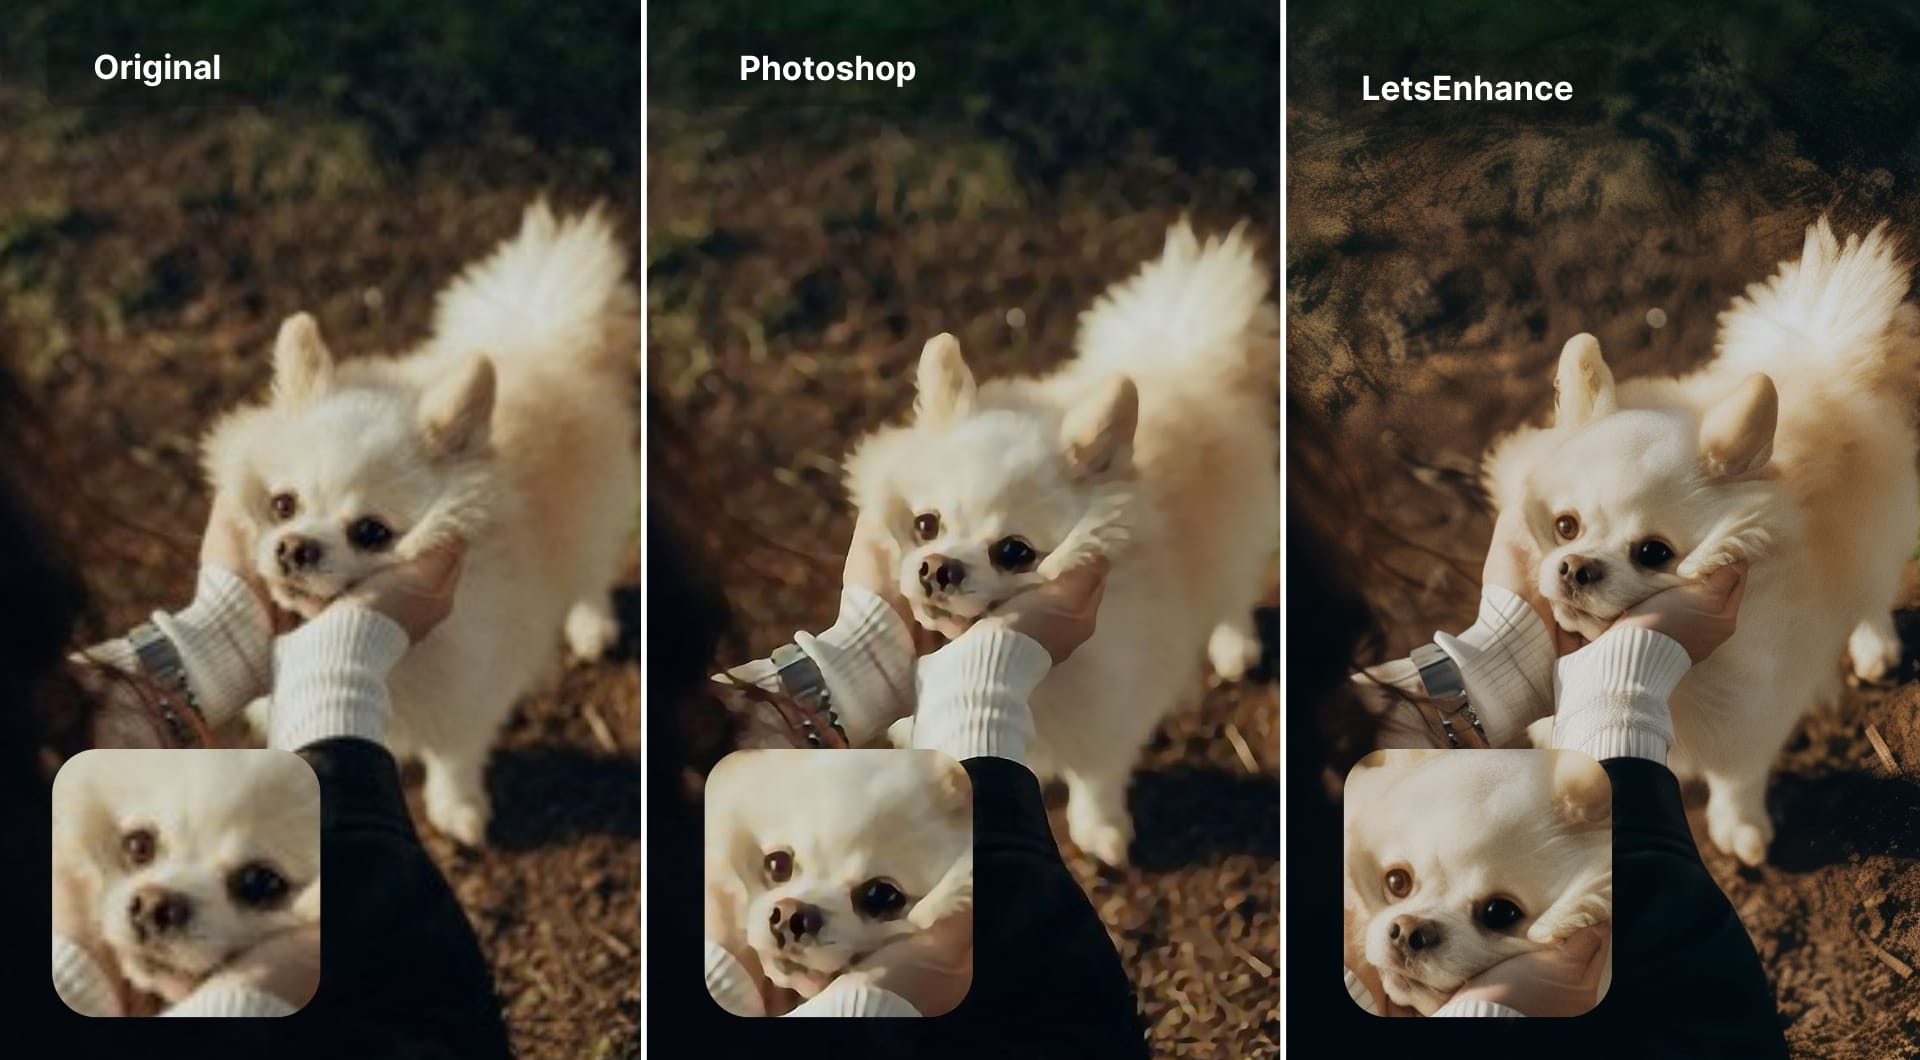
As you can see from the comparison above, Photoshop also gives cleaner result than the original. Edges are a bit sharper and the blur is reduced. But it still looks soft and slightly smeared when you zoom in. LetsEnhance's version keeps the fur texture, eyes, and hands much clearer and more defined, so you can safely use it bigger on screen or in print without it falling apart.
Getting started with LetsEnhance
If you care about print quality, brand consistency, or AI art that holds up full-screen, you want an upscaler that actually adds information. LetsEnhance gives you:
- 10 free credits upon signup to test image upscaling with different models
- Upscaling up to 16× and 512 megapixels on paid plans, which is enough for billboards and large prints
- Flexible pricing with pay as you go bundles and subscriptions starting from $9/month
- API access via Claid.ai if you need to automate enhancement for e-commerce, print-on-demand, or your own app
Ready to enhance your images? Visit LetsEnhance.io and try it out for yourself.
FAQ
What is upscaling?
Simply enlarging a low-resolution image produces a pixelated result, as the process merely stretches existing pixels. True upscaling aims to intelligently add detail while increasing size.
Modern upscaling primarily uses AI-based Super Resolution or Diffusion models, that analyze existing pixel patterns to synthesize new, coherent details. This approach maintains sharpness even at significant magnification levels.
How large can I upscale an image with LetsEnhance?
On paid plans, LetsEnhance can upscale up to 16× in each dimension and up to 512 megapixels per image, depending on your subscription. Free users typically get lower caps (up to 8 MP output), which is still enough for web and smaller prints.
What are the benefits of AI upscaling with LetsEnhance?
Super Resolution and other AI-based upscaling methods powering LetsEnhance outperform traditional interpolation methods in five key areas:
- Preserving details: While interpolation blindly applies mathematical formulas to fill pixels, AI recognizes and preserves patterns and shapes, resulting in sharper, more natural-looking images.
- Improved image quality: AI upscalers maintain image integrity across the entire frame, eliminating the blurriness and pixelation common to interpolation methods.
- Speed: LetsEnhance's AI upscalers process most images in seconds, significantly faster than traditional methods. Only the most complex tasks take more than a minute.
- Hardware independence: Running server-side, LetsEnhance AI upscalers require only an internet connection, not powerful local hardware. This makes professional-grade upscaling accessible to anyone with a stable connection.
- Versatility: Beyond basic upscaling, AI platforms offer targeted optimization for specific image types - photos, digital art, or text-heavy content. Advanced features include deblurring, artifact removal, and automated batch processing for eCommerce product images.
Can I batch upscale images or automate this for my store?
Yes. LetsEnhance lets you upload and process 20 images at once. For full automation, you can use Claid.ai, which exposes the same upscaling and enhancement models via API.
What DPI should I use for printing?
DPI (dots per inch) describes how dense your pixels are on paper:
- 300 DPI is the standard for high-quality prints viewed up close.
- 150–225 DPI is usually enough for posters or banners seen from a distance.
In LetsEnhance, you can set both pixel dimensions and DPI or just use a printing preset; the tool does the math for you. Click here to learn how to increase DPI.
Are there non-AI methods of upscaling?
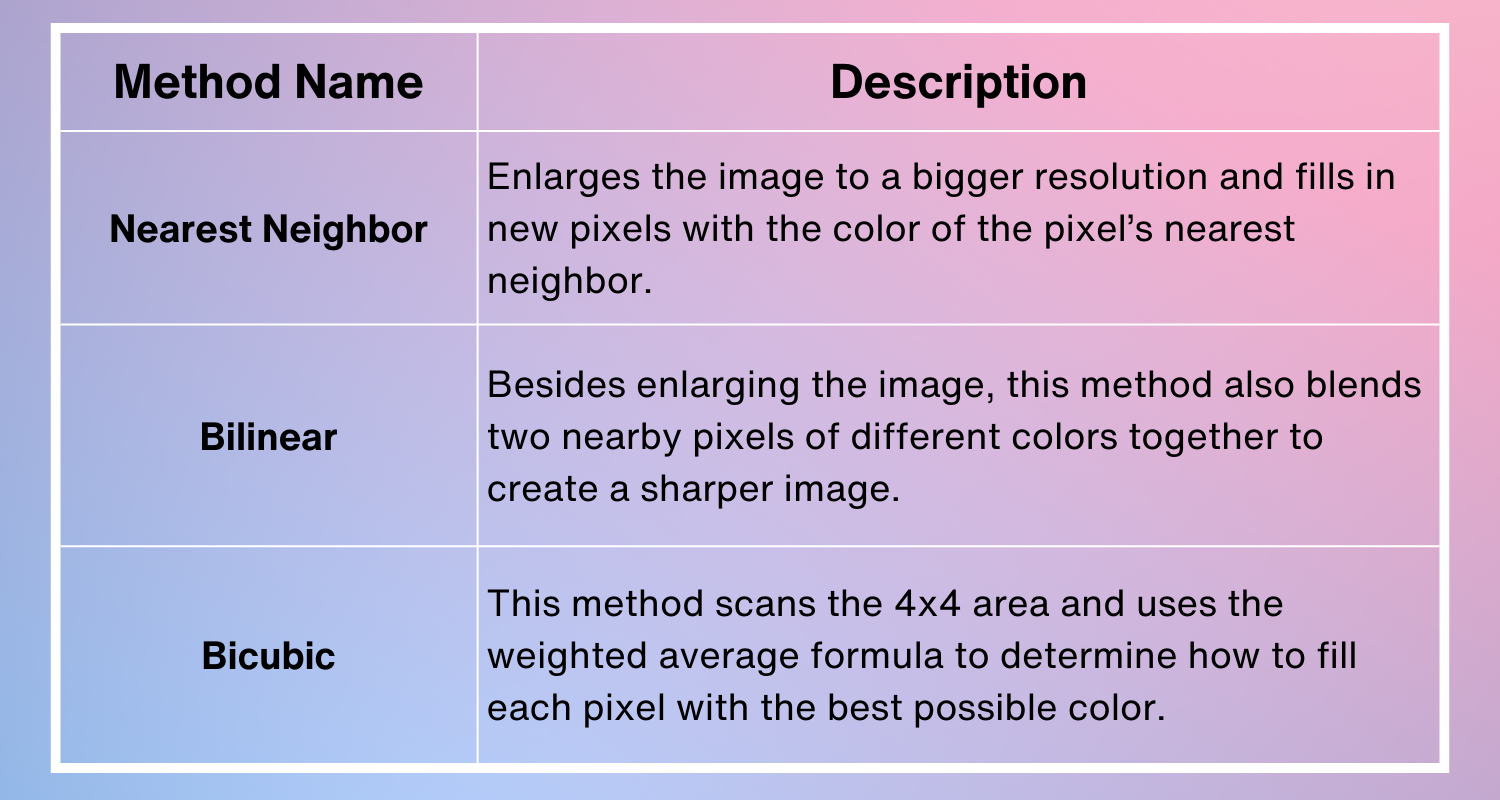
Before AI, three main interpolation methods dominated:
- Nearest Neighbor, the simplest approach: new pixels copy values from their closest neighbors. While computationally efficient, it produces obvious blockiness and jagged edges, especially on curves and diagonals.
- Bilinear Calculates new pixels by linearly interpolating between neighbors in both dimensions. Produces smoother results but tends to blur edges and lose fine detail, making images appear soft.
- Bicubic Uses cubic polynomial interpolation across a 4x4 pixel neighborhood. Generally superior to bilinear, offering better detail preservation, but can introduce ringing artifacts ("halos") around high-contrast edges. Despite being more computationally intensive, it remained the industry standard until machine learning approaches matured.
While these traditional methods still have specific use cases (like real-time scaling in games or when maintaining pixel-perfect edges is crucial), AI-based upscaling tools now deliver superior results for most photographic and artistic content.
How is LetsEnhance different from Photoshop’s upscaling?
Photoshop’s Preserve Details 2.0 and sharpening tools are still useful, but they mostly work with the pixels you already have. Dedicated AI upscalers like LetsEnhance use larger, purpose-built models to reconstruct missing detail, work in the cloud (no GPU required), and offer modes tuned for text, portraits, AI art, and old photos. That’s why results often look cleaner and more realistic, with less manual tuning.
How can I increase the resolution of an image online for free?
Some online tools offer free basic upscaling. But free versions may have size limits or add watermarks. We recommend to use free trials of reputable services for better quality.
Is there a free AI upscaler?
Yes, but be cautious of the quality and data privacy. LetsEnhance.io offers 10 free credits to try out the tool.
Can I upscale images on my phone?
Yes, some mobile apps offer image upscaling. Alternatively, just visit letsenhance.io from your iPhone or Android device and use the mobile-optimized version of LetsEnhance.
