Buyers form an opinion in roughly two seconds. If the first photo is dark, blurry, or makes the living room look like a corridor, most of them move on before reading the description.
The data backs this up and we've covered how image quality affects buyer behavior and sales performance in depth. Listings with professional-quality photos sell 32% faster and spend an average of 89 days on the market compared to 123 days for listings with poor images. And yet, most agents are still posting photos that have problems they could fix in minutes.
This guide is about understanding the specific issues that make property photos fail and the practical ways AI tools can fix them.
Why most listing photos fall short
The problems tend to cluster around three things: exposure, resolution, and composition. Let's refer to them one by one.
Lighting that hides the room
Interior photography has a fundamental technical problem: the gap between window brightness and room brightness is too wide for a single exposure to handle. Point a camera at a well-lit living room and you'll get one of two results. Either the interior is exposed correctly and the windows blow out to pure white, or the windows look fine and the room looks like a cave.
Professional photographers solve this with HDR blending, which is shooting several exposures and merging them in post. But many agents are shooting on smartphones and the results look smaller, darker, and less inviting than they are in person. Poor lighting is by far the number-one reason real estate photos get rejected by agents and portals.
Resolution that falls apart
Photos taken in decent resolution can still end up pixelated by the time they reach a listing. MLS portals and property sites routinely compress and resize uploaded images. A sharp, well-composed shot can degrade enough during that process to look soft or blocky on a high-resolution display. The problem compounds when agents repurpose listing photos for printed flyers, brochures, or large-format displays. Such cases demand much at least 300 DPI than web-optimized files provide.
Low-resolution photos don't just look bad. They read as careless, and buyers associate that carelessness with the listing itself.
Angles and framing that distort the space
Camera angle affects perceived room size more than almost any other variable. Shooting too low makes ceilings feel oppressive. Shooting from a corner with an ultra-wide lens stretches proportions until the room looks bigger in the photo than it actually is. Shooting against the light turns a well-furnished space into a silhouette.
These problems get worse when the person who takes the pictures doesn't know how to hold the camera. For example, a kitchen that's perfectly proportioned in person can look like a narrow hallway if the shot is taken from the wrong spot.
Getting the angle right during the shoot is always the first choice. But angles can also be corrected or supplemented in post-production.
What AI can do for real estate photography today
AI image tools have become genuinely capable across a range of tasks that used to require either professional equipment, hours in Lightroom, or both. For real estate, the most relevant capabilities break down into a few categories.
The most direct fixes are exposure and resolution. AI can correct underexposed rooms, balance the contrast between a dark interior and a bright window, clean up grain from high-ISO shots, and increase pixel count from a compressed listing file to something print-ready.
Beyond technical fixes, AI has moved into territory that used to require a dedicated designer or a reshooting budget. With prompt-based editing, you can remove clutter from a room just by describing it, change wall colors or countertop finishes to test how they photograph, swap a gray exterior sky for a clear blue one, or shift the overall mood of a shot from flat to warm.
AI can also animate still photos into short video clips, which is increasingly useful for social media listings and property previews. A well-composed interior photo can become a slow pan or a subtle motion clip without any video equipment involved.
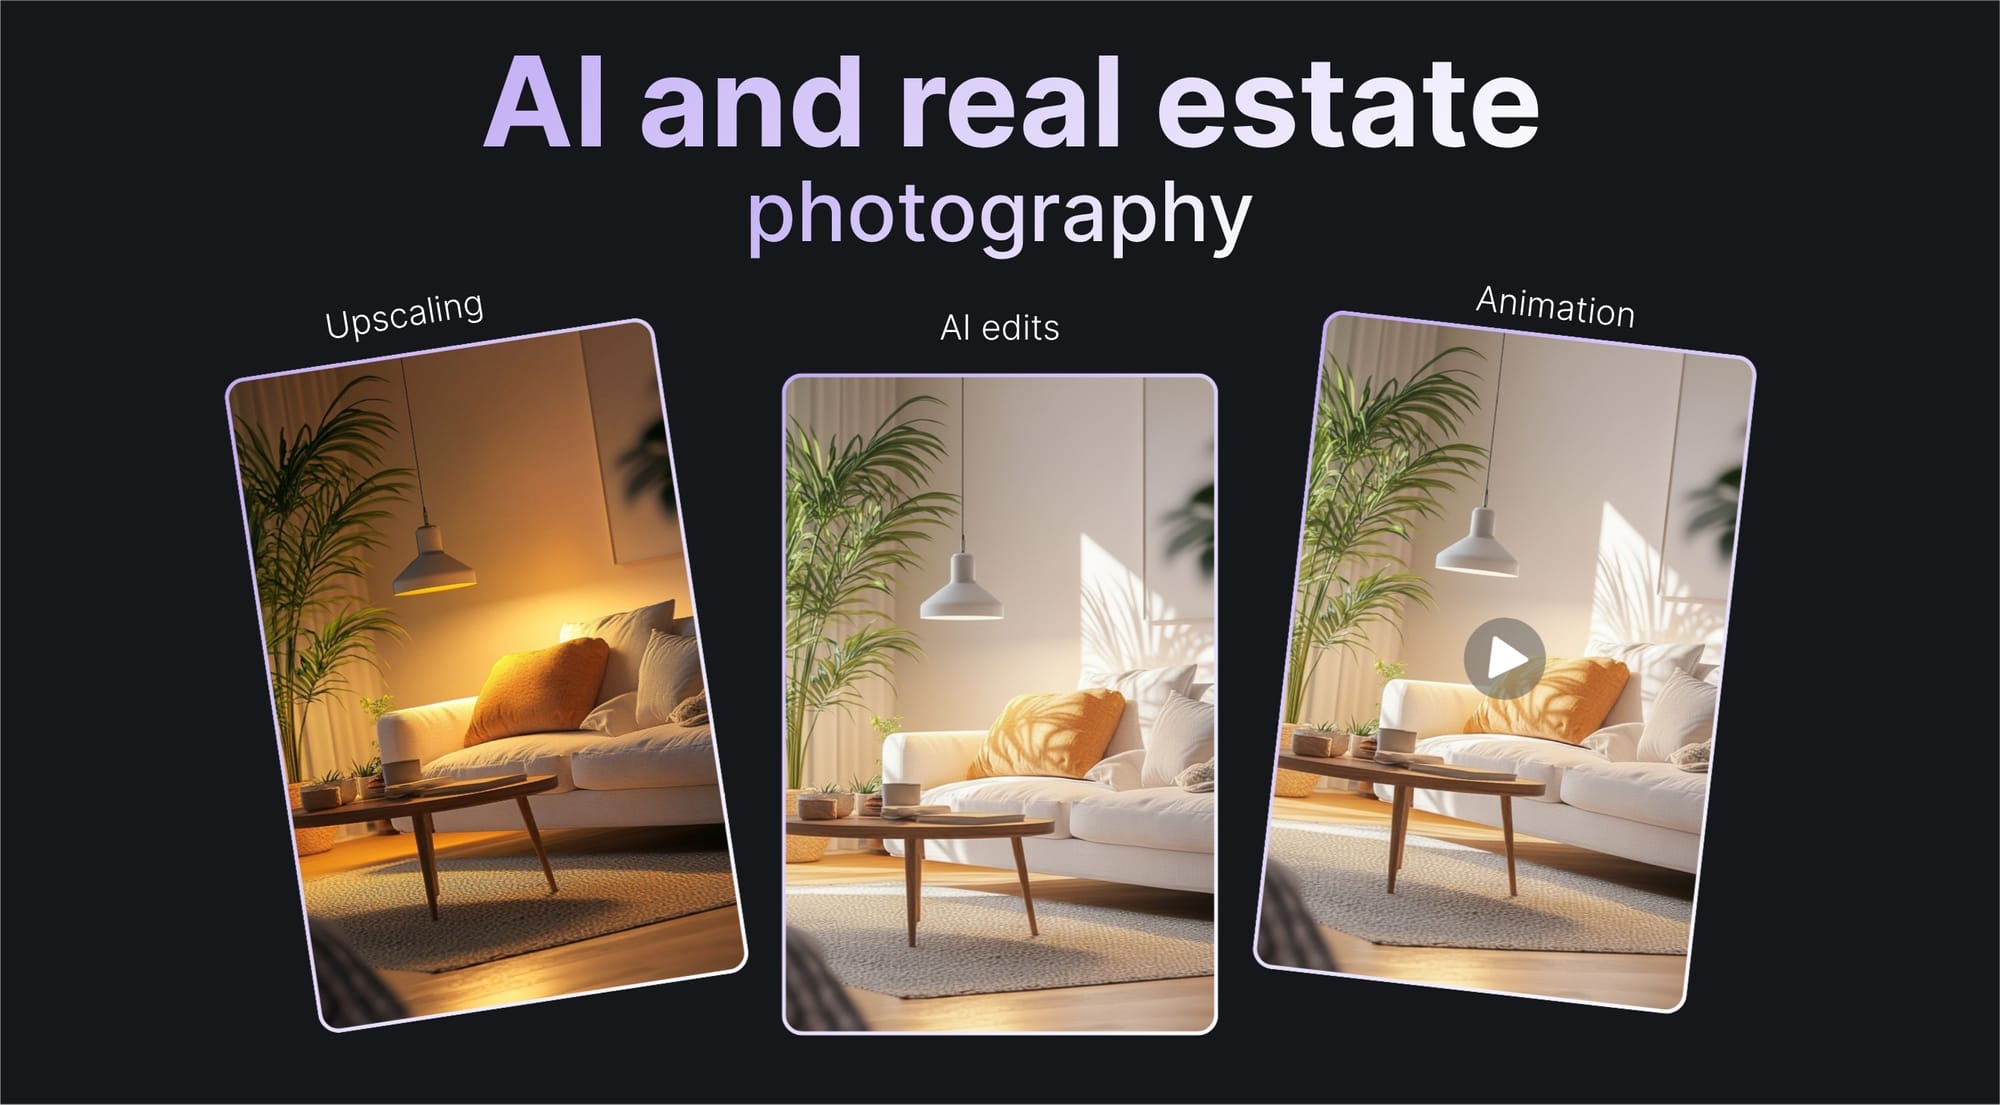
Let's Enhance covers all of these: from upscaling and lighting correction animation and more. Let's delve deeper into what each one does and how to make the most out of your real estate images.
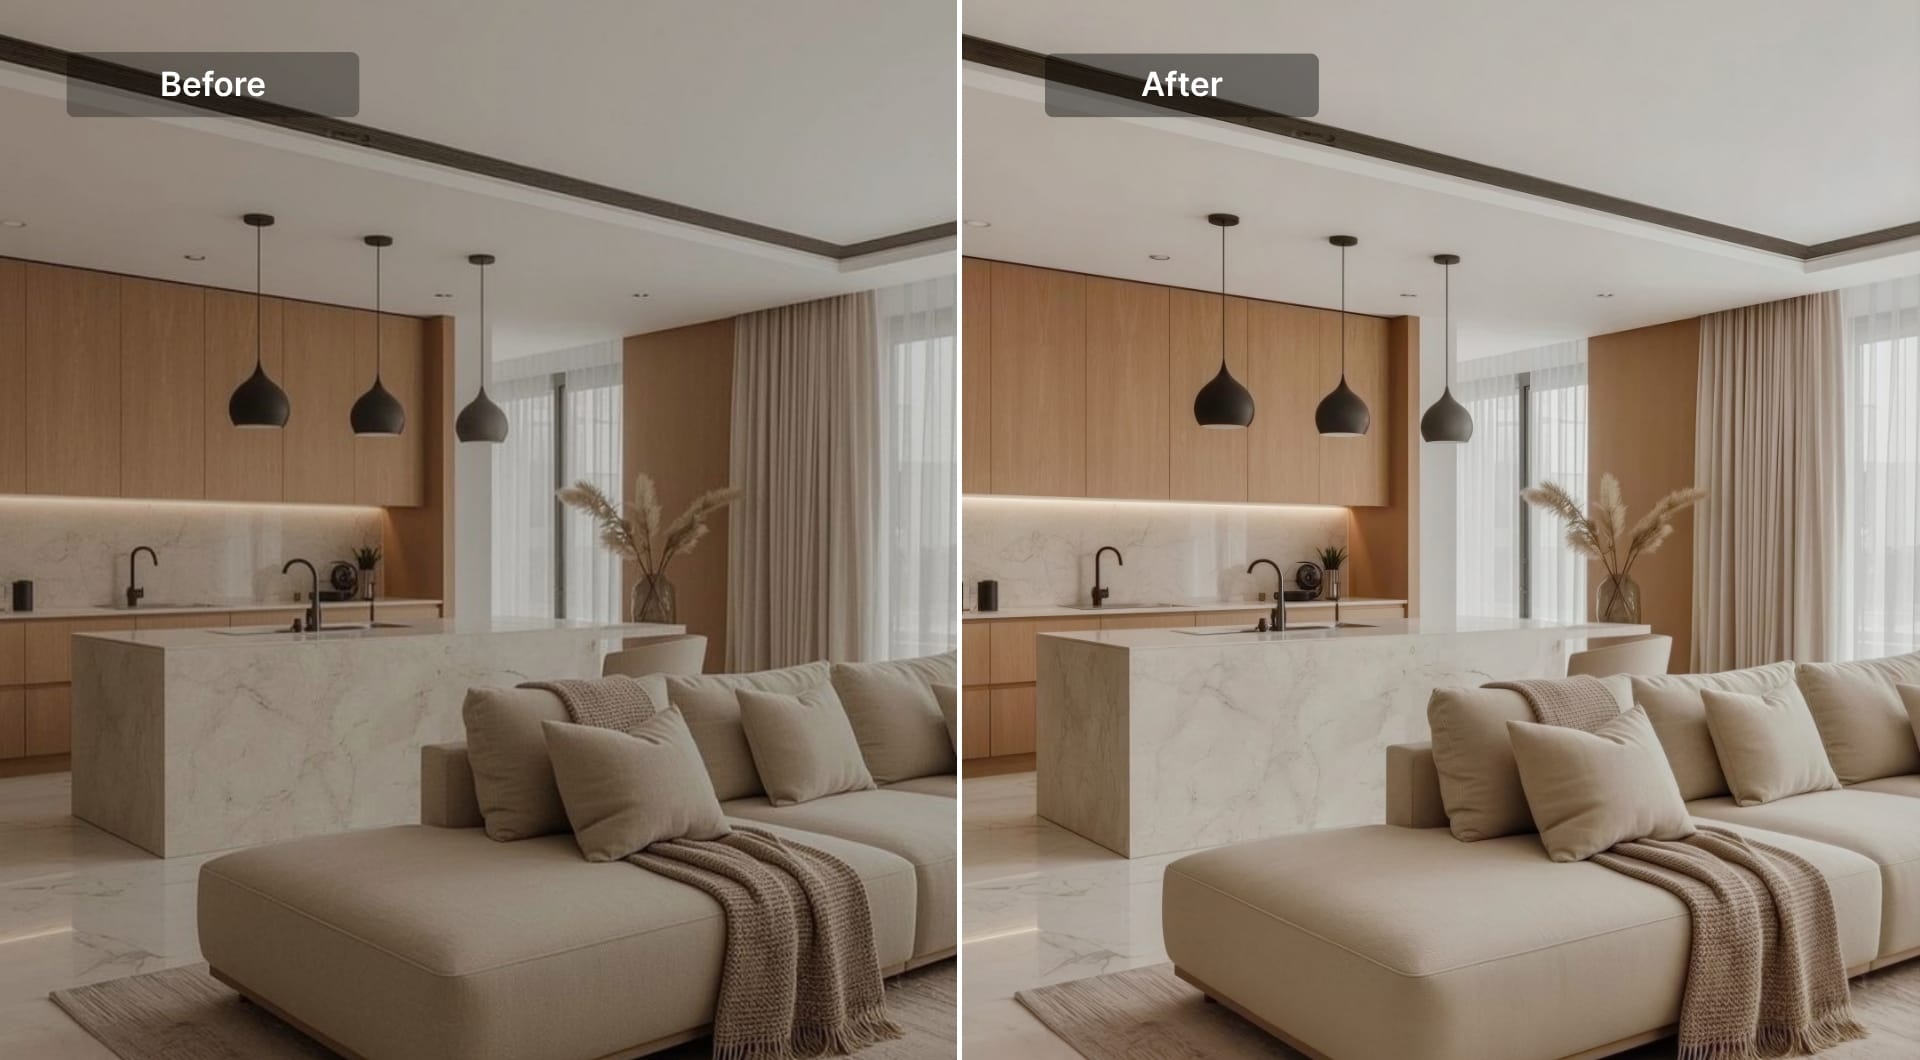
Fixing dark rooms and exposure problems with Light AI
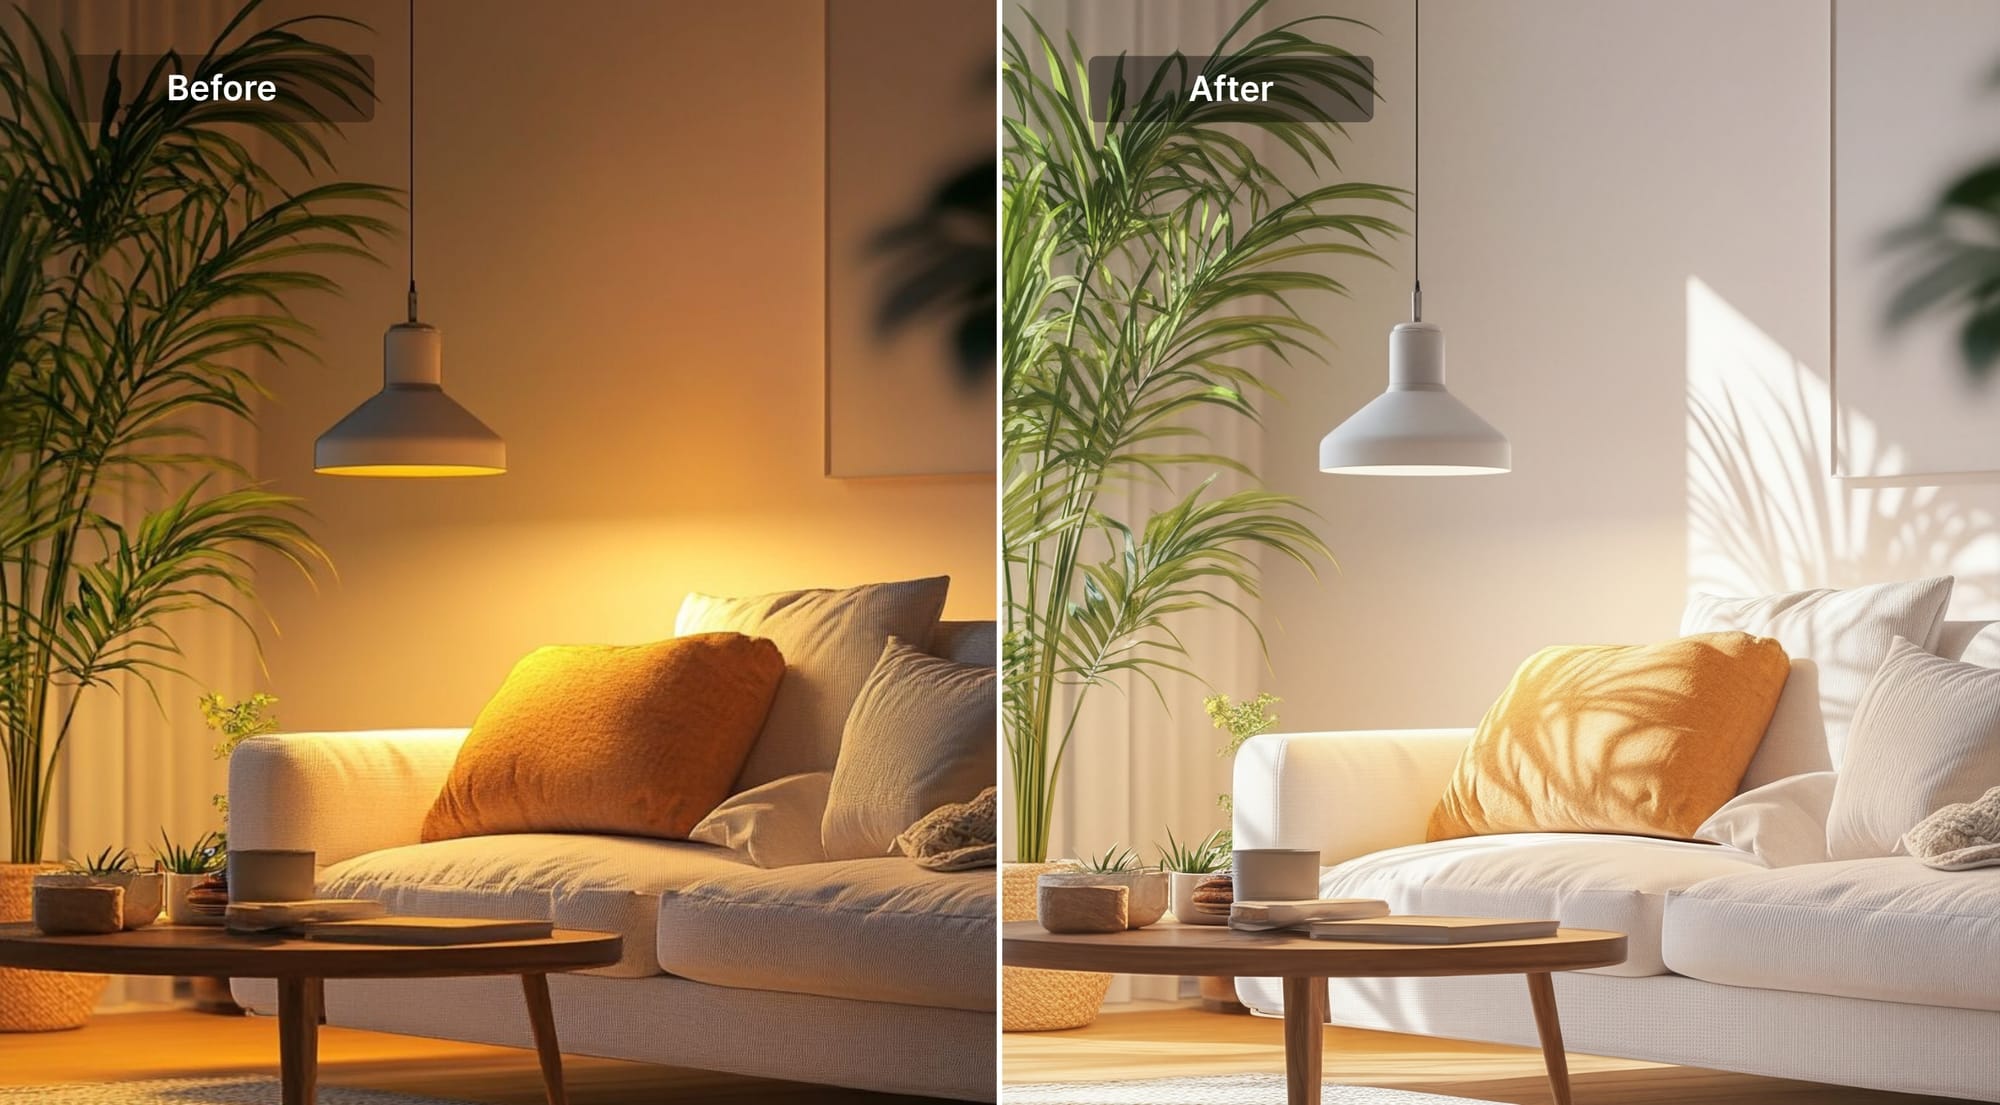
Most interiors that look dark in photos aren't actually dark. The problem is between the brightest and darkest parts of the scene. A phone or entry-level camera captures a fraction of what the human eye perceives. So a bright window next to a shadowed wall looks fine to you standing there, but the camera has to choose: expose for the window or expose for the room.
Let's Enhance's Light AI is a toggle-on feature trained specifically to correct highlights, balance shadows, fix white balance, and adjust contrast automatically. It was built with real estate and product photography in mind, because these are the categories where bad lighting does the most commercial damage.
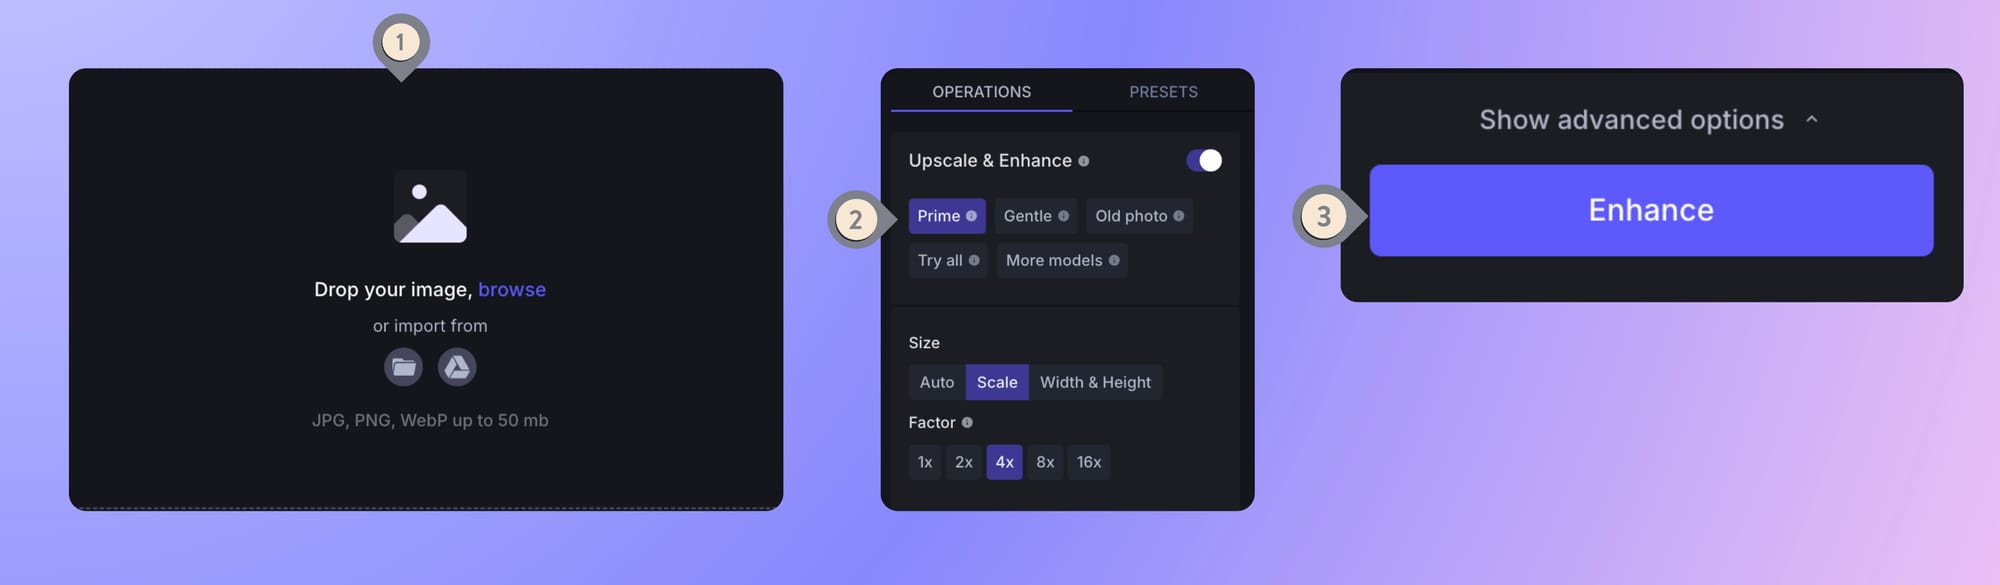
Here's how to use it
Upload a room photo that looks underexposed. Turn on the Light AI toggle in the Operations tab and adjust the intensity (0-100%) of the applied effect by moving the slider. Click Enhance and get automatic correction.
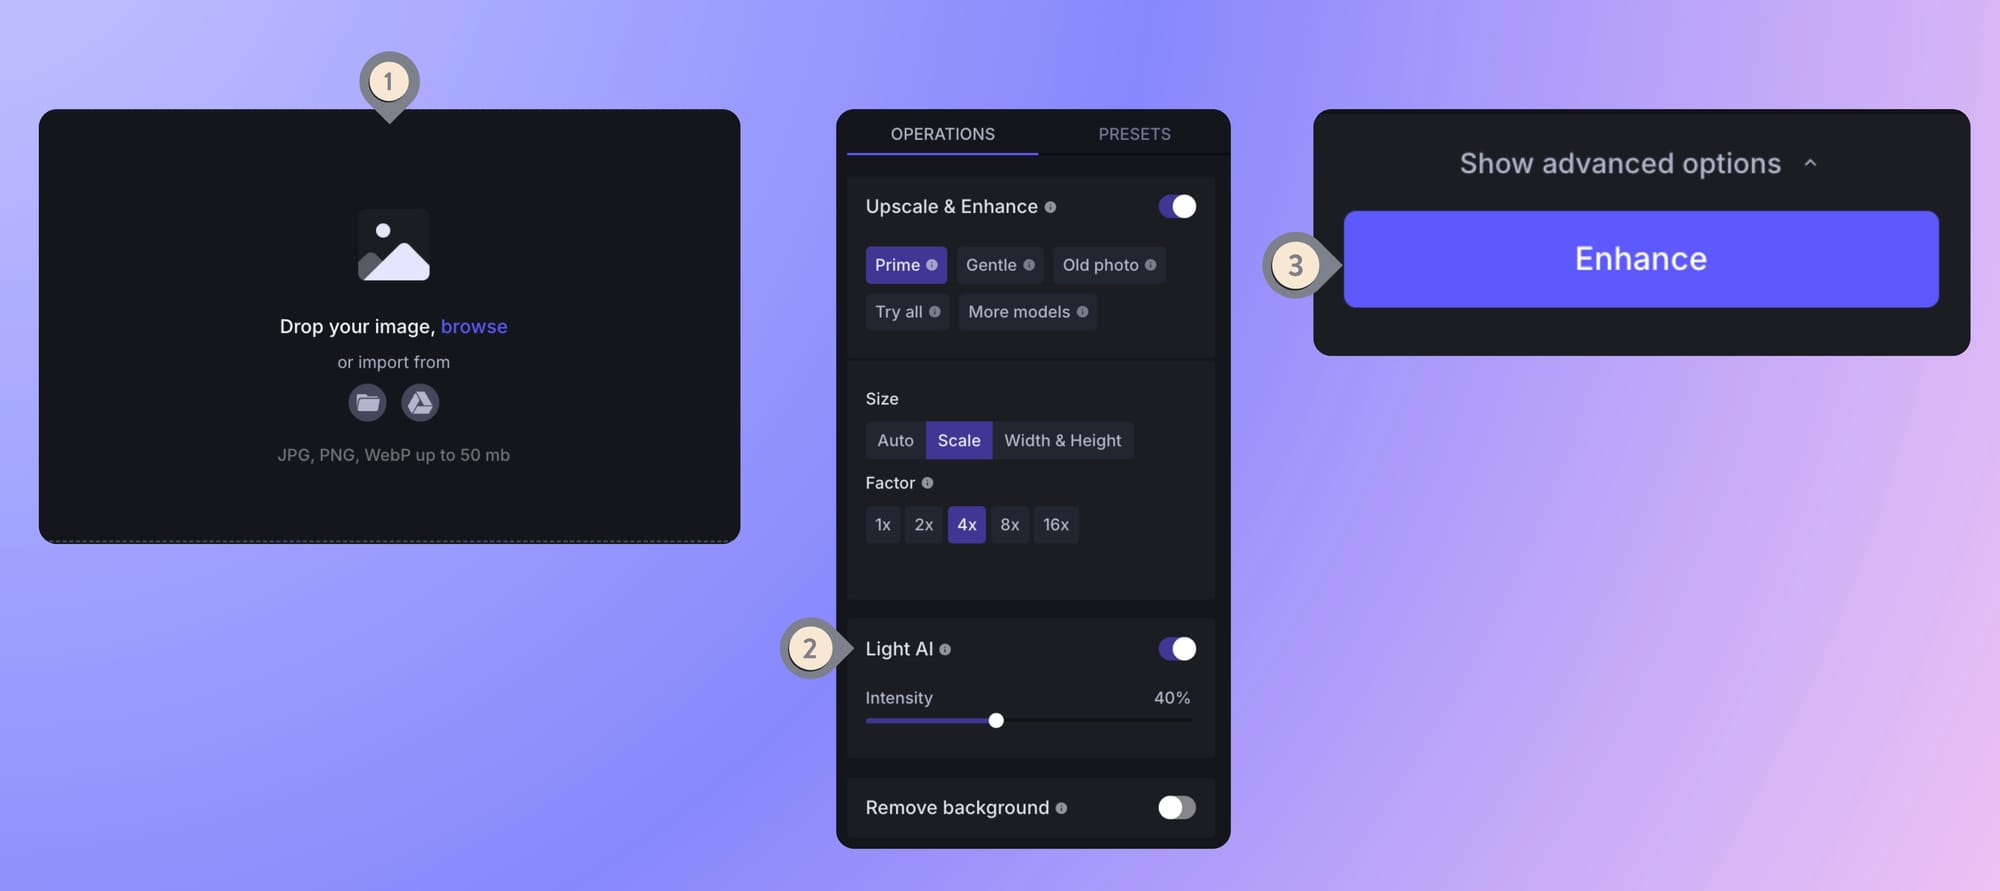
For the majority of ordinary dark-room problems (dim smartphones shots, overcast-day interiors, yellowed artificial lighting), Light AI brings the image up to a presentable level in a single step.
Fixing low resolution and pixelation
The pipeline from camera to listing is lossy. Original photos might be shot at 12MP, then compressed to meet portal upload limits, resized again for mobile display, and then pulled by an agent to use in print materials. By the time a buyer zooms in, the kitchen countertop looks smudged.
AI upscaling reconstructs surfaces, textures, and edges that makes images look sharper without losing their natural look. Let's Enhance's newest Prime upscaler is the right choice for property photos. It's built to preserve natural texture, such as wood floors, painted walls, tiled surfaces, window frames, without over-smoothing or creating plastic look.
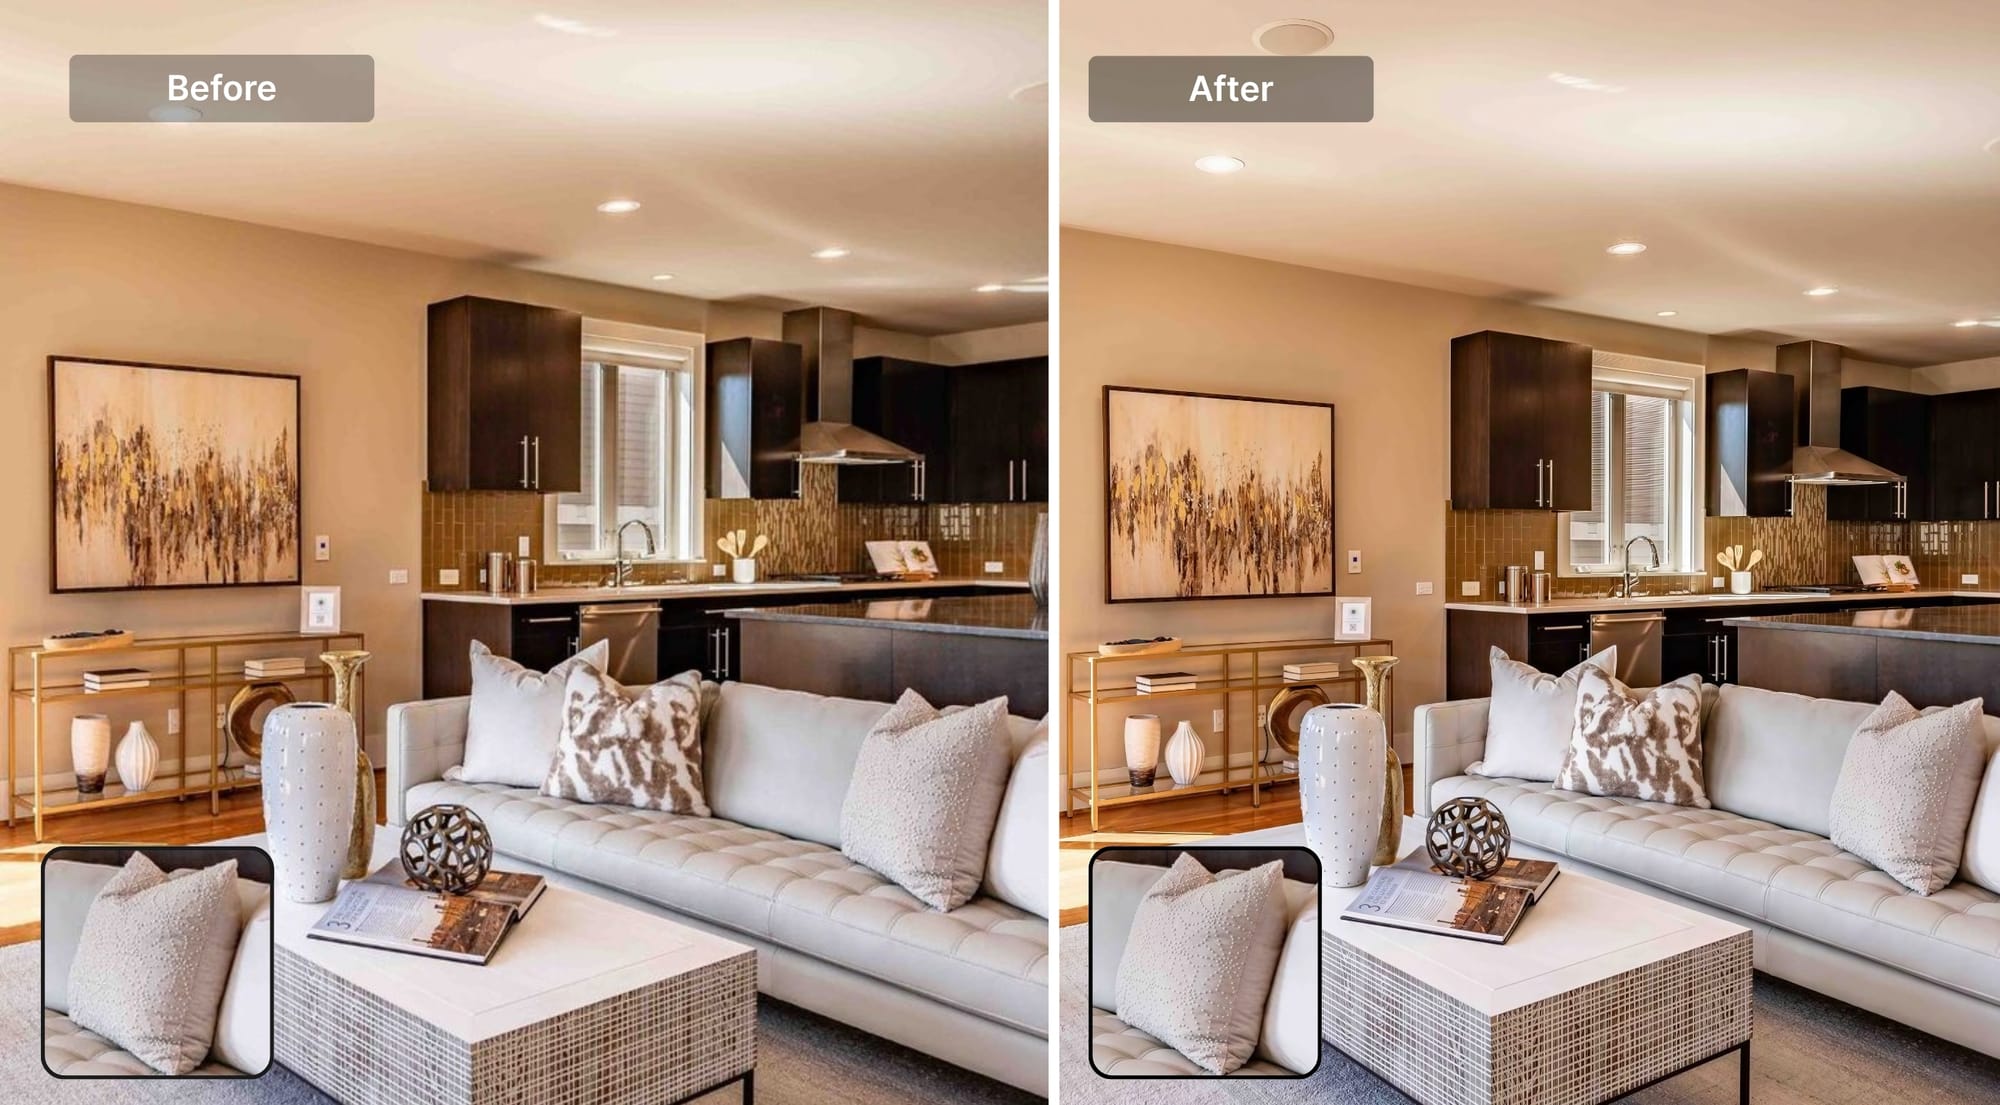
It goes up to 16x enlargement with a maximum output of 512 megapixels. In practice, most real estate upscaling jobs are 2x to 4x, which is enough to take a compressed listing photo to something that holds up on a large monitor.
Here's how to use it
Upload your low-quality image. Prime is selected by default, you just need to choose your output size (from 1x-16x), and process by clicking Enhance. There are no sliders to adjust and it makes the process 2x easier.
Fixing perspectives, clutter, and composition
The most common real estate photography regret is the angle you didn't get. Going back to reshoot is sometimes the right answer. but for many agents it isn't an option.
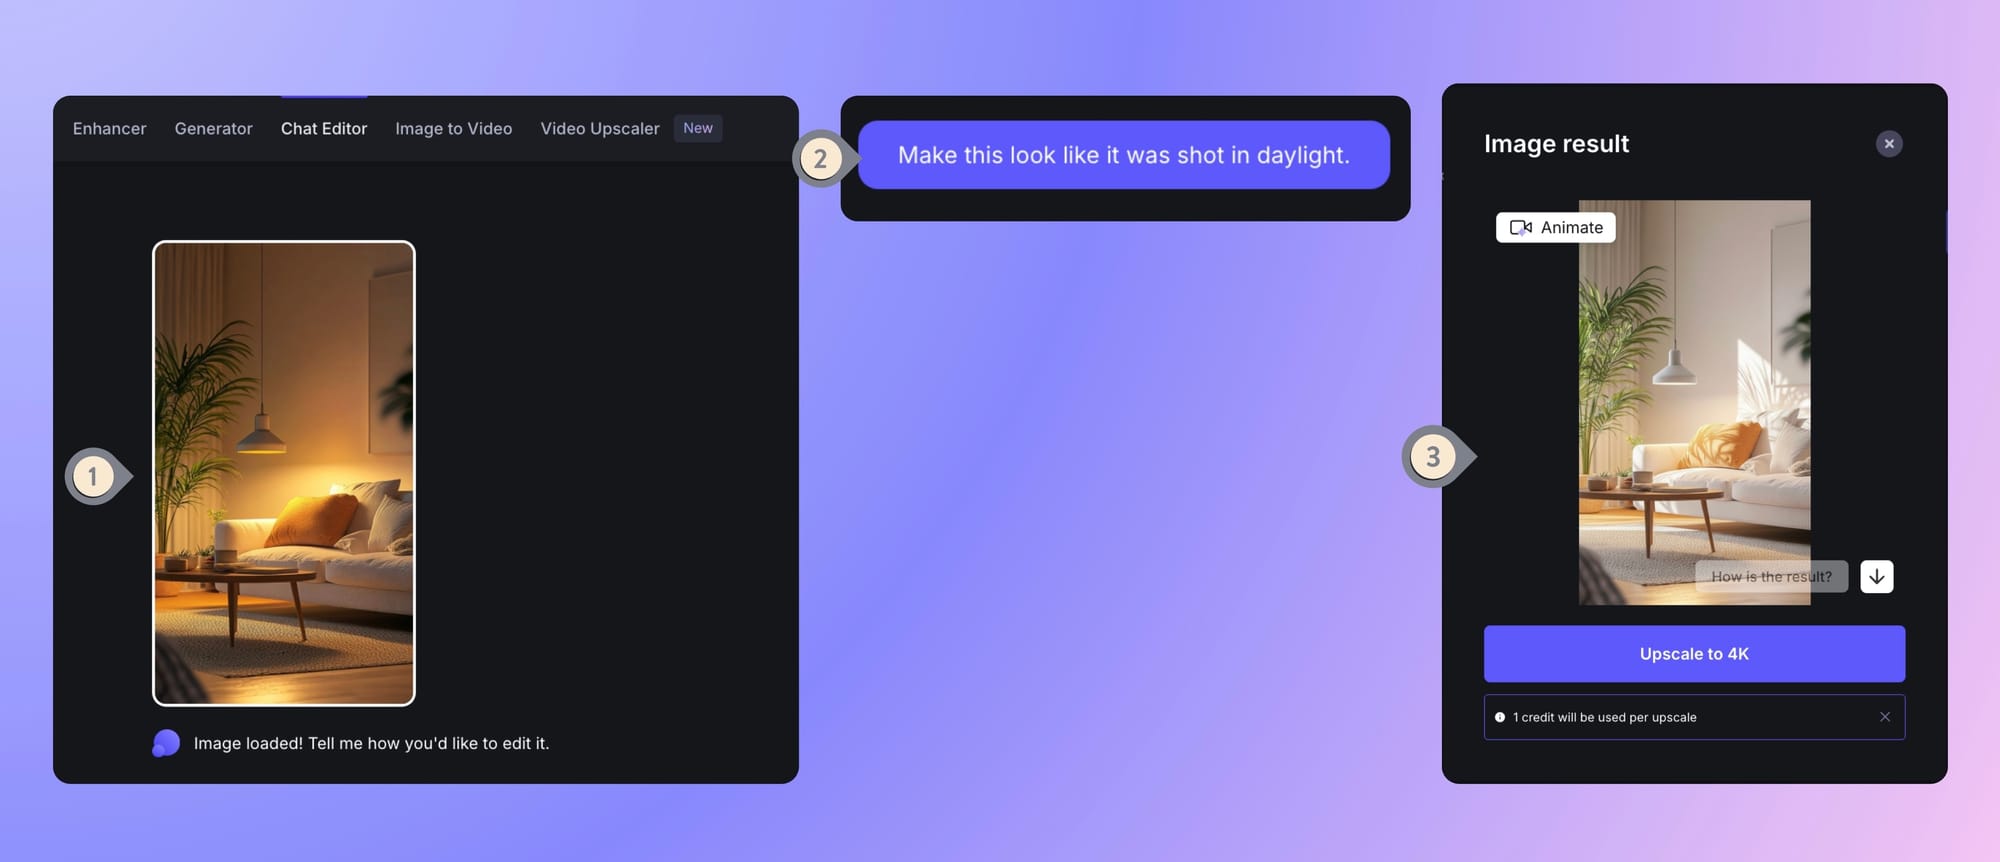
AI chat-based image editing tools like Chat Editor allows you to modify an existing photo by describing what you want. You upload the image and type an instruction: "remove the clutter from the kitchen counter," "change the wall color to warm white," "make this look like it was shot in daylight."
Chat Editor intentionally outputs at 1 megapixel, so it can edit fast and you can iterate. Once you have an edit you like, you can upscale to 4K with a second step.
Here are the steps for your reference
From photos to video: the next step for listings
Static photos are still the standard, but video content is pulling further ahead in engagement. Let's Enhance also offers image-to-video tool, where you can take a single interior photo and turn into a slow pan across a living room, a subtle push into a kitchen or a gentle reveal of an exterior.
Kitchen example showing how animation adds motion to a listing image
The practical use case for agents would be taking best photo from each room, animating each one, and making a preview reel for social media or the listing page.
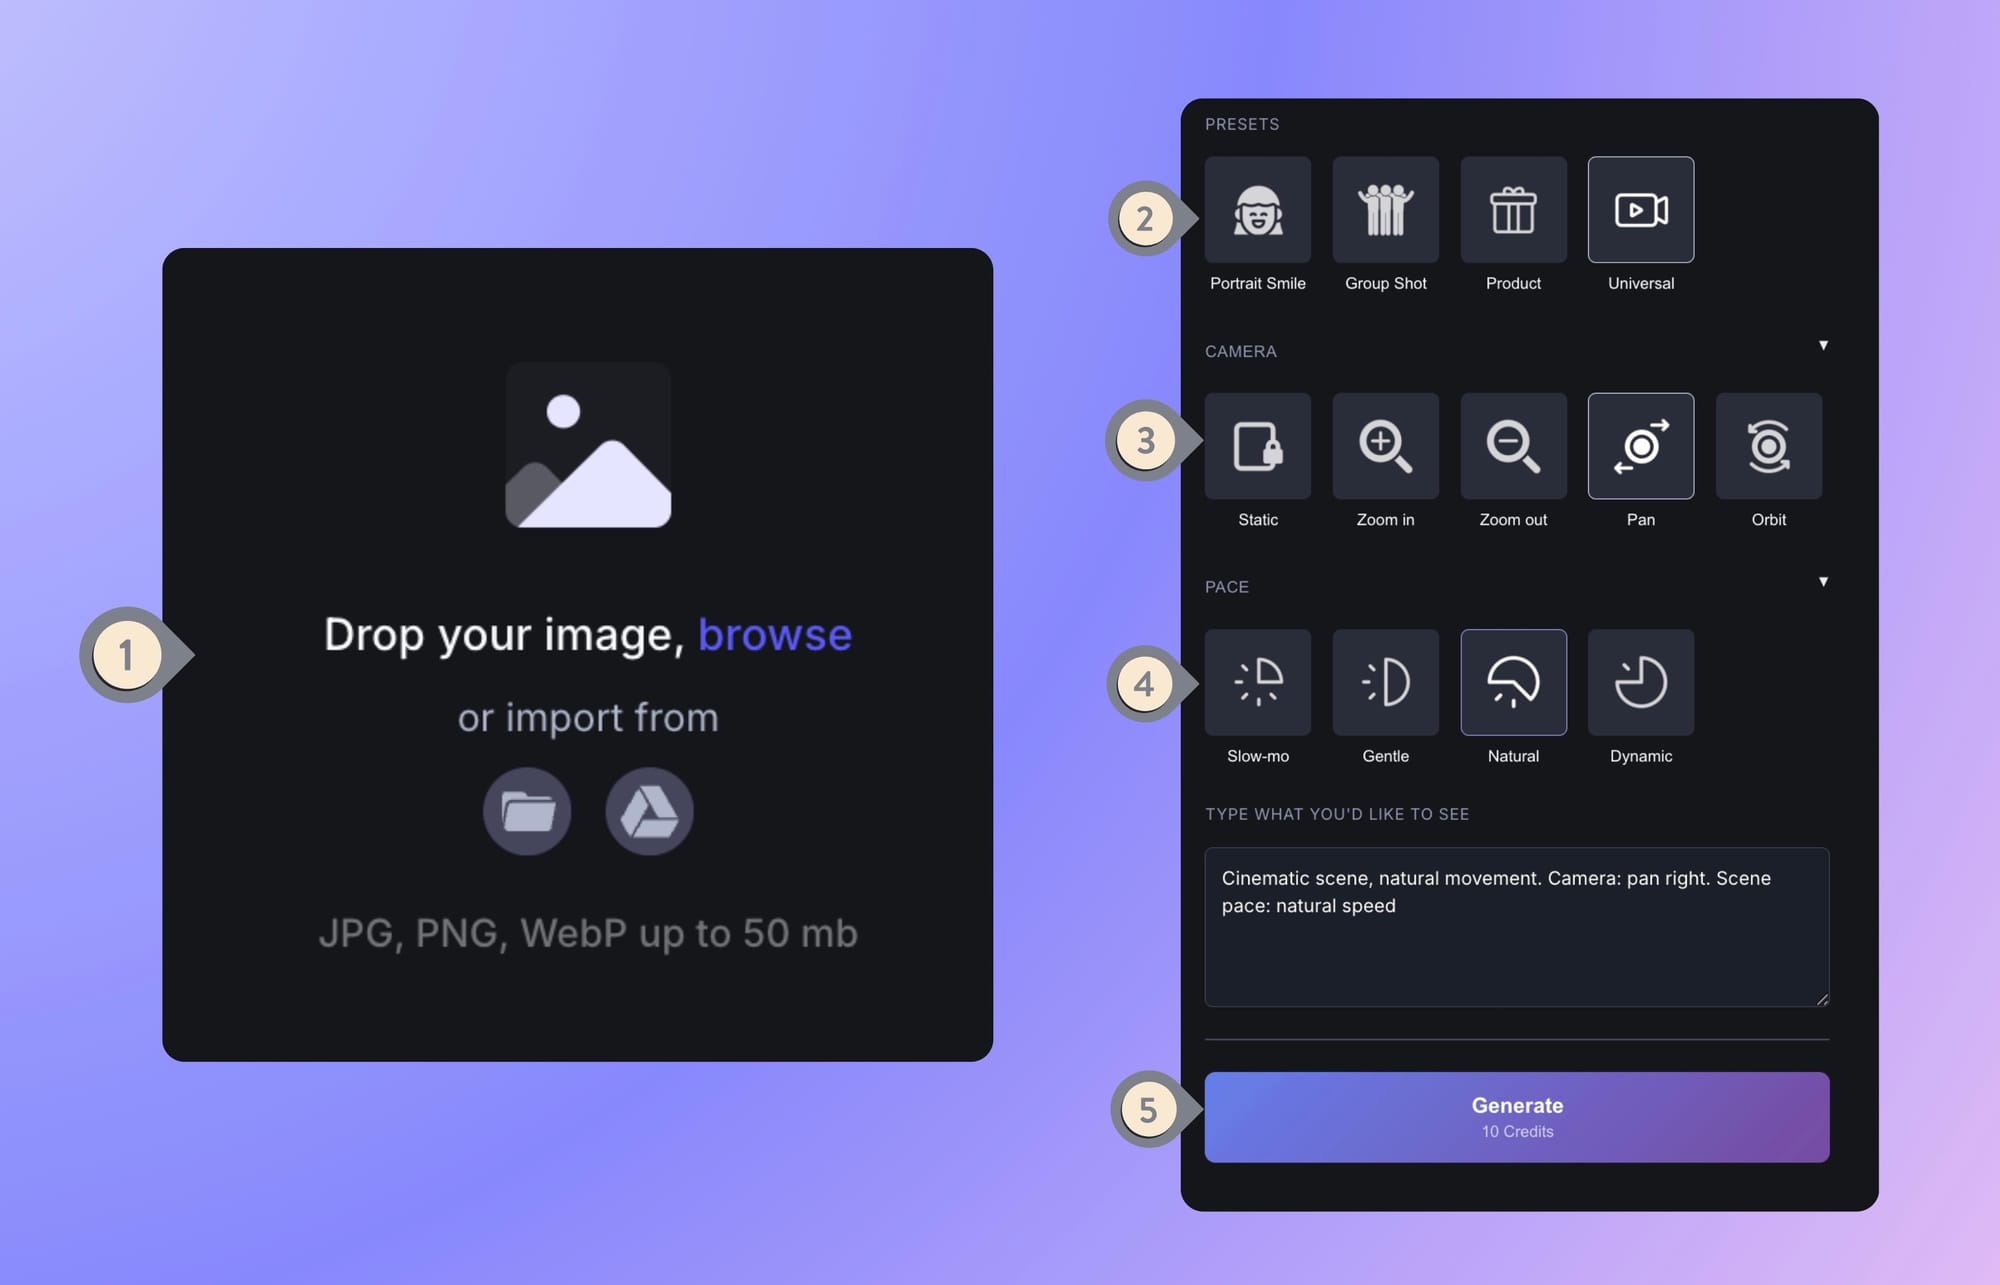
Here's how to use it
Open video generation workspace and upload your image. On the right side, you'll have different presets (portrait smile, group shot, product, universal), camera movement (static, zoom in, zoom out, pan, orbit) and pace speed (slow-mo, gentle, natural, dynamic) to choose from. If you wish to go further, you can type what you'd like to see in the prompt box.
Note that Image to Video and Video Upscaler are available only on paid plans.
Getting started with Let's Enhance
Some people are afraid that AI replaces good photography judgment. The truth is that it closes the gap between what you captured and what a buyer needs to see. AI is developing at a rapid speed and when using it costs less money and time, why not use it?
With that being said, if you're curious to test the workflow yourself, signup on Let's Enhance and get 10 free credits. That's enough to run Prime upscaling and Light AI on a handful of real listing photos and see the difference before committing to anything. Paid subscriptions start at $9/month, and there are also one-time pay-as-you-go credit bundles if you'd rather not subscribe.
For image upscaling and denoising, you can upload and process up to 20 photos at once. If you need to process images at scale, the API workflow via Claid.ai handles that without manual uploads.
FAQ
What is the biggest mistake in real estate photography that AI can fix?Lighting is the most common and commercially damaging problem in listing photos. Underexposed interiors are the leading reason photos get rejected by real estate portals. AI lighting correction tools like Let's Enhance's Light AI address this by automatically balancing highlights, shadows, and white balance in a single step.
Does AI upscaling actually improve real estate photos, or does it just make them bigger?
There's a meaningful difference between standard image resizing and AI upscaling. Standard resizing interpolates between existing pixels, producing a larger but blurrier result.
AI upscaling uses a model trained on large datasets to reconstruct texture and detail at higher resolutions. It adds information based on what surfaces and materials are supposed to look like, rather than stretching what's already there. For real estate photos, this means upscaled images retain visible wall texture, floor grain, and window frame detail that a simple resize would blur.
What resolution do listing photos need to be for MLS and print use?Most MLS systems require a minimum of 640×480 pixels, but this is a floor, not a target. For a listing photo to look sharp on a modern high-resolution display (such as a Retina screen), you want at least 1500–2000 pixels on the long edge.
For print, such as brochures, property cards, window displays, you need 300 DPI at the final print size, which for a half-page image in a brochure typically means at least 2400×1800 pixels. If your original shots are below these thresholds, AI upscaling is the practical path to getting there.
What is HDR photography in real estate, and how does AI replace it?HDR (high dynamic range) photography involves shooting multiple exposures of the same scene and merging them in software to create an image that shows detail in both shadows and highlights. Professionally done, this is the gold standard for interior real estate photography because it handles the contrast between rooms and windows.
AI lighting tools like Let's Enhance's Light AI achieve a similar outcome from a single image by training on how well-balanced scenes look and applying the correction automatically.
What's the difference between noise reduction and upscaling?
Noise reduction removes grain and speckle from an image, which is the visual artifact caused by shooting at high ISO in low-light conditions.
Upscaling increases the image's resolution (pixel dimensions). Many AI enhancement tools do both simultaneously: the model that reconstructs detail at a higher resolution can also smooth out noise that would be amplified by a simple upscale.
Is it ethical to enhance real estate photos with AI?
The standard in real estate photography is that enhancements should improve image quality without misrepresenting the property. Correcting exposure, fixing white balance, removing camera noise, and upscaling resolution are universally accepted.
More substantive changes like adding furniture that doesn't exist, dramatically altering room dimensions, hiding structural problems, or replacing a property's actual view, can cross into misrepresentation and, depending on your market, may violate MLS guidelines.
