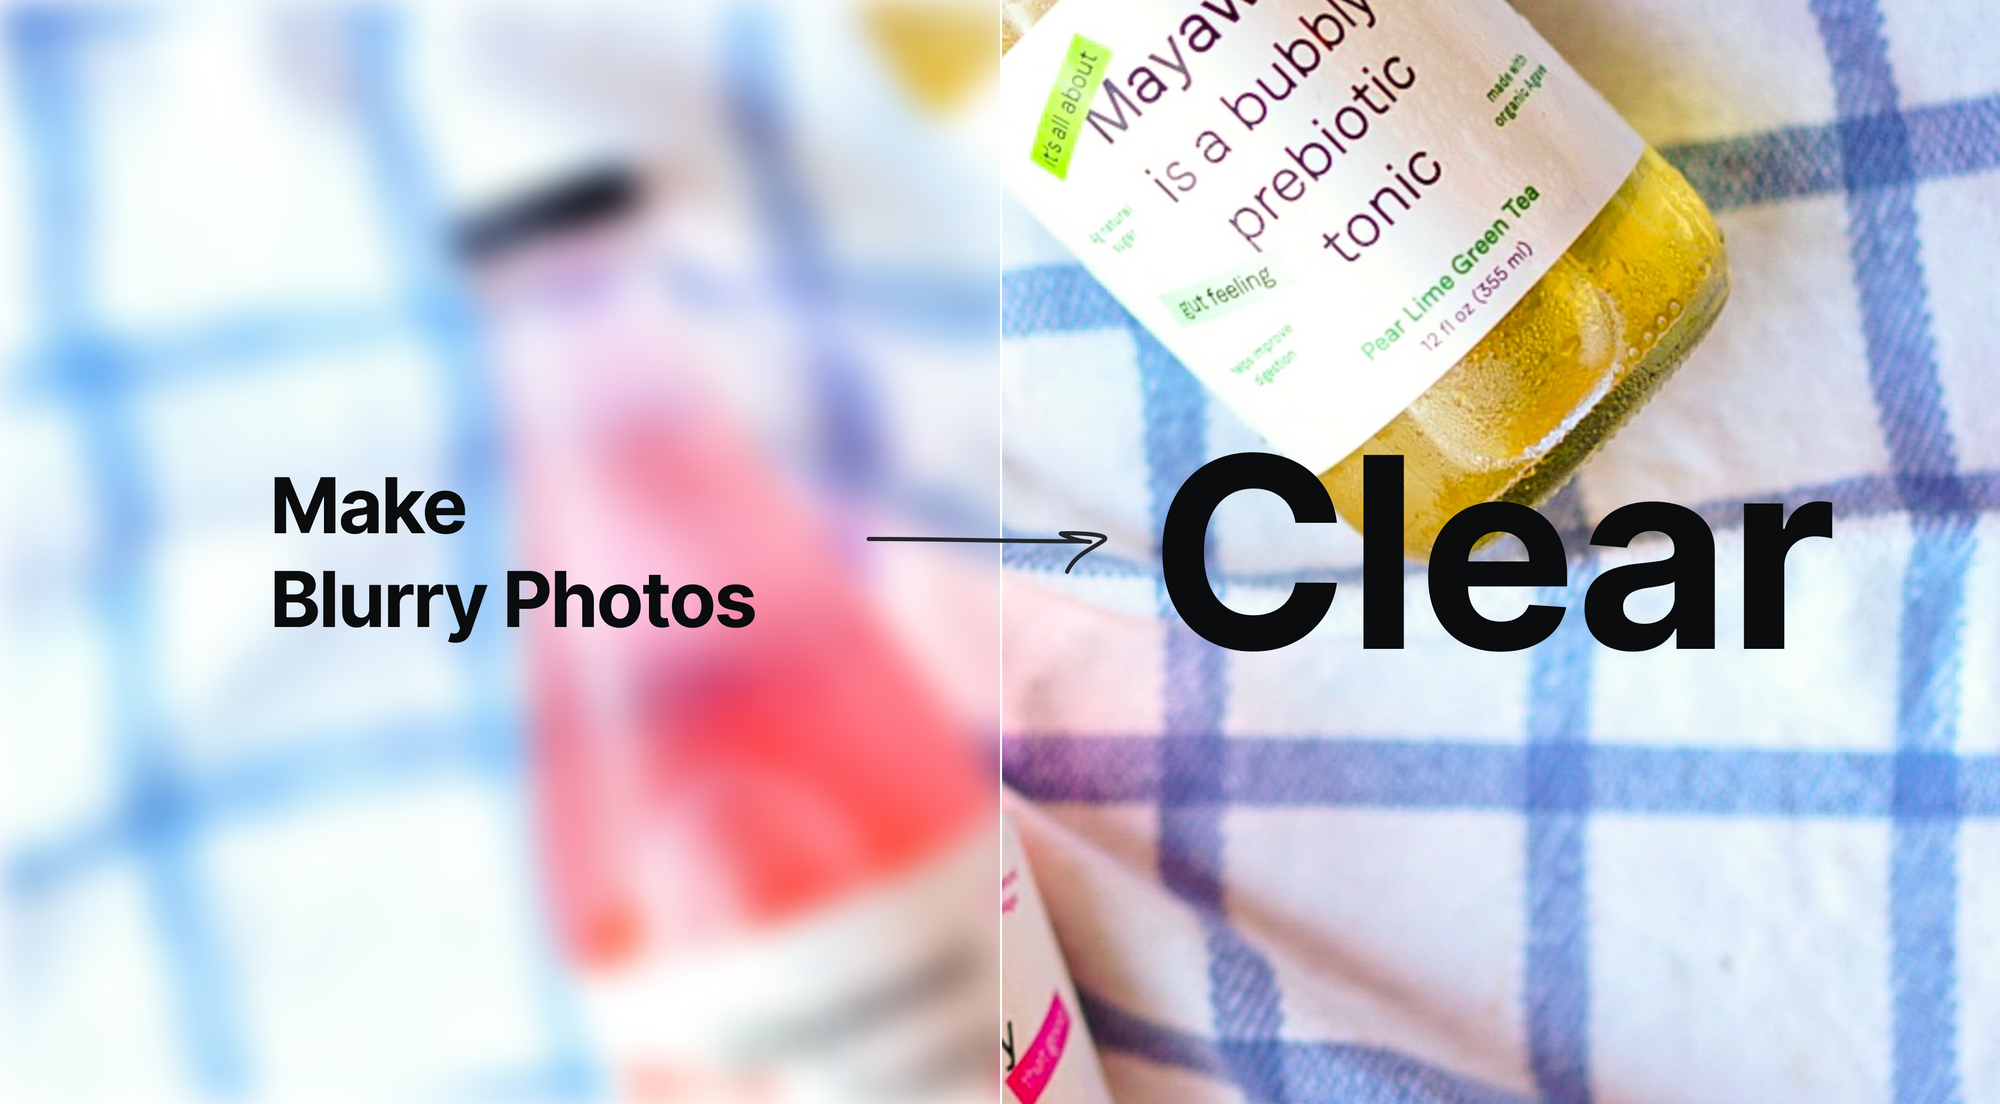
To instantly make a blurry image sharp and clear, upload it to LetsEnhance.io, select Prime enhancer, and click Enhance. Keep reading for tips on how to get the clearest results and discover alternative tools.
Takeaways
- Best tool: Use LetsEnhance.io's Prime enhancer for fast, AI unblurring.
- Backup option: You can also try Strong and Ultra modes if Prime doesn't meet your needs.
- For professionals: Photoshop offers detailed control for those familiar with photo editing.
- On-the-go solution: iPhone apps like EnhanceFox fix minor blurs.
- Limitations: Severely blurred images may not be fully recoverable.
How to fix blurry images with AI
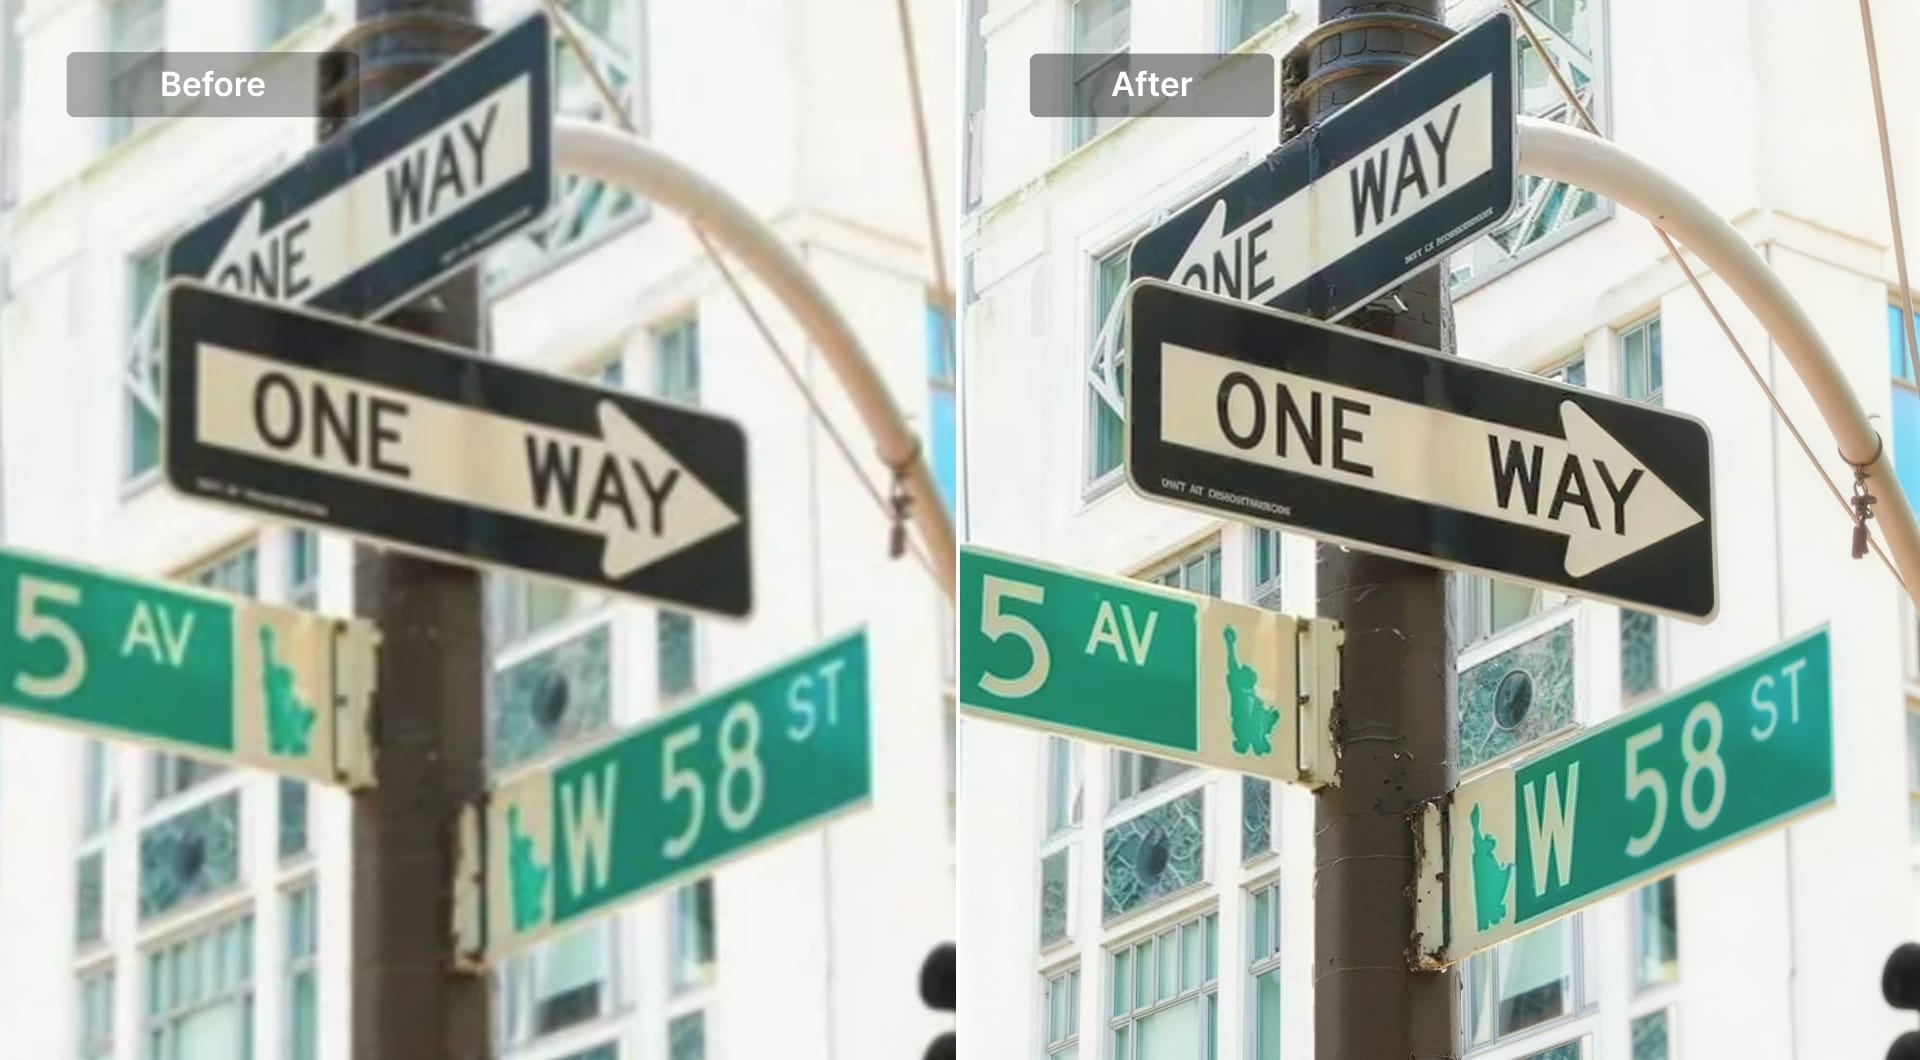
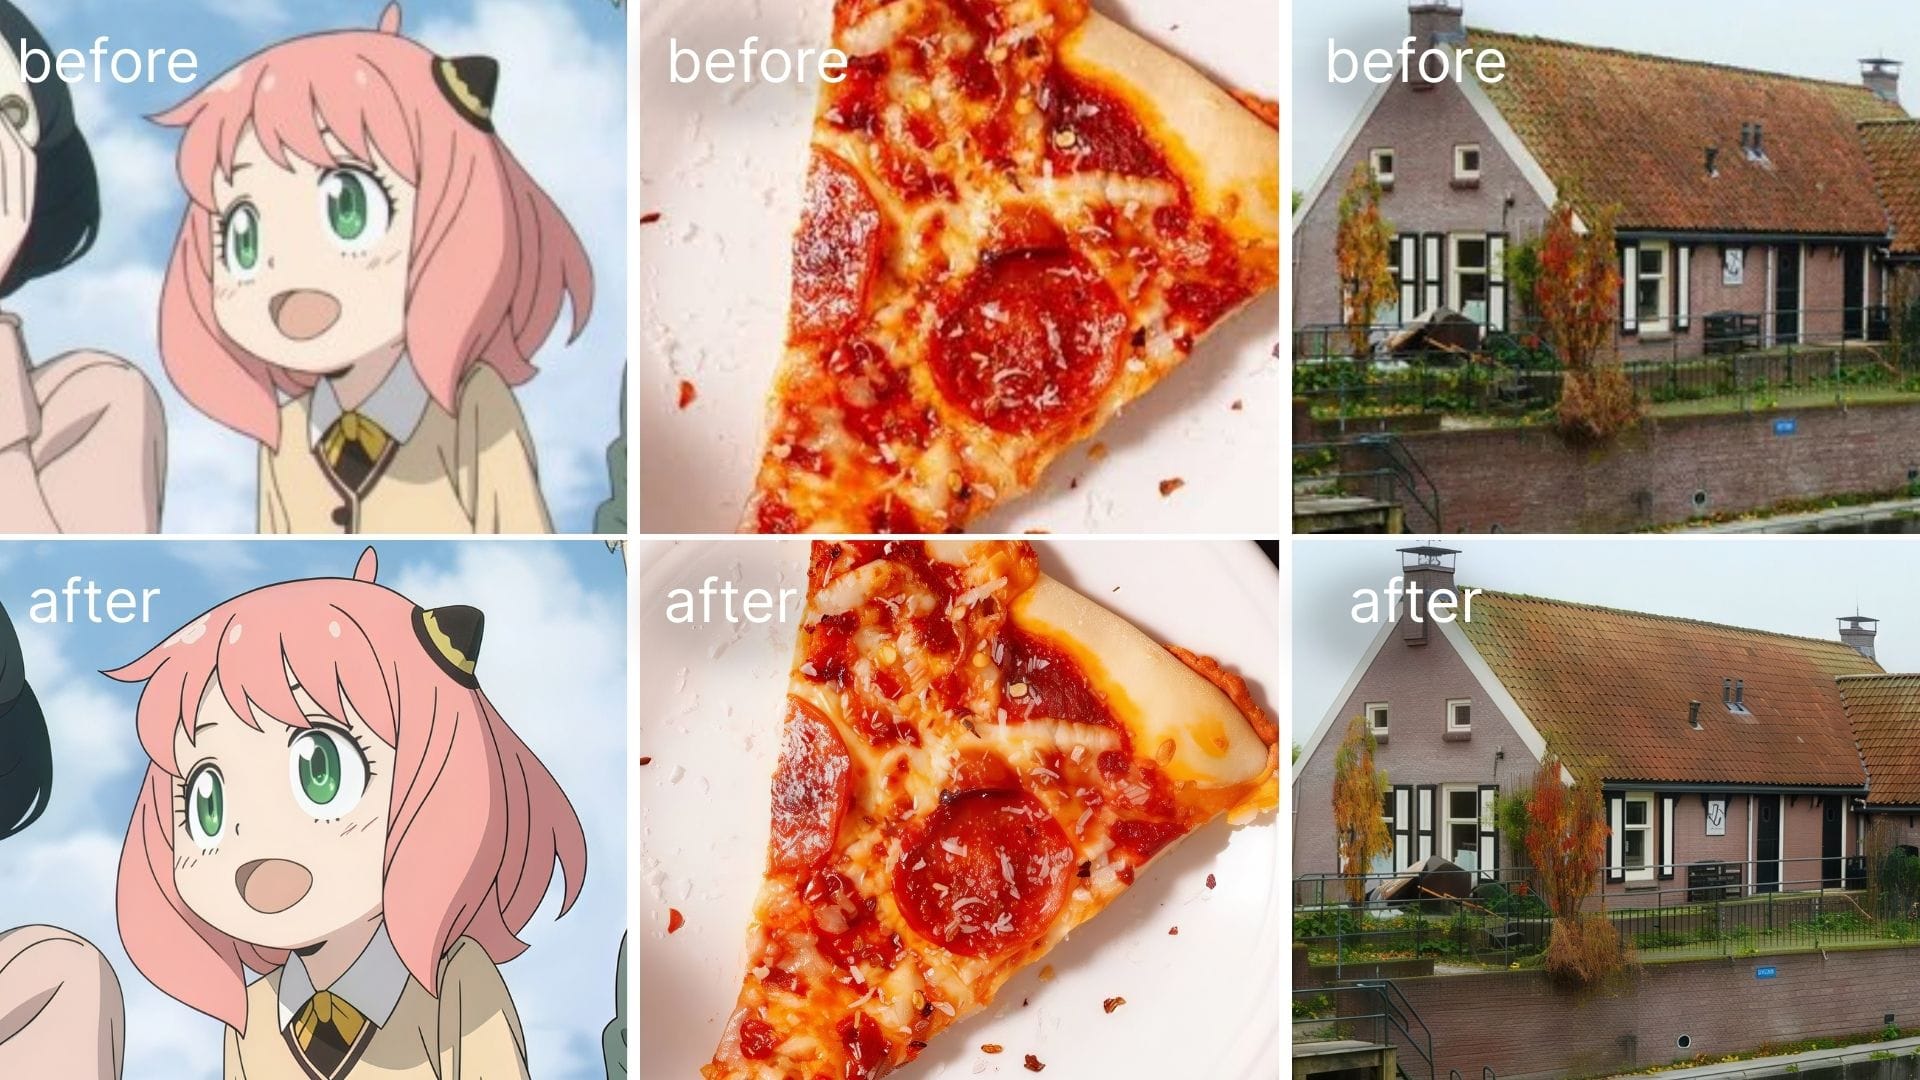
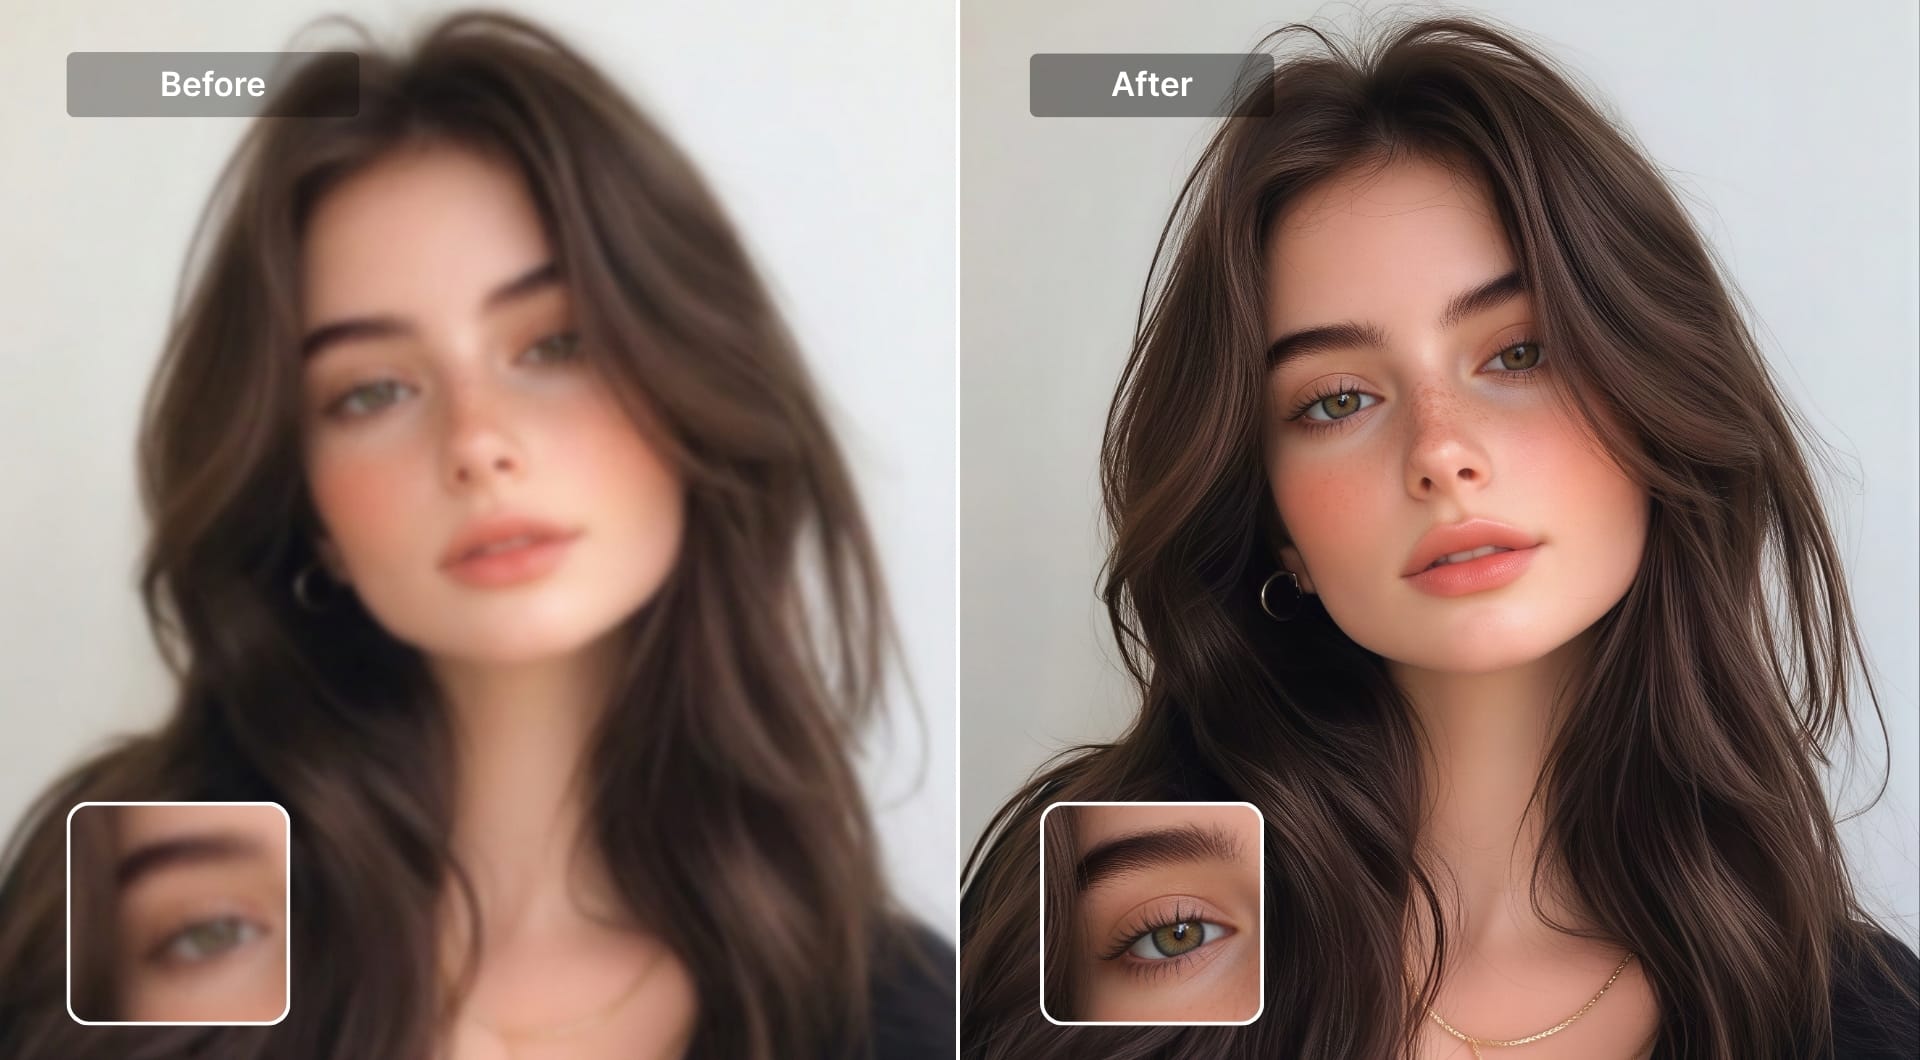
Blurry photos can be quickly fixed with LetsEnhance's Prime upscaler, the most realistic model. Designed for portraits, food, images with text, and fine textures, Prime sharpens blurry pictures and restores detail in seconds. Just like all the seven upscalers on LetsEnhance, Prime supports scaling up to 16x.
Here's how to do it.
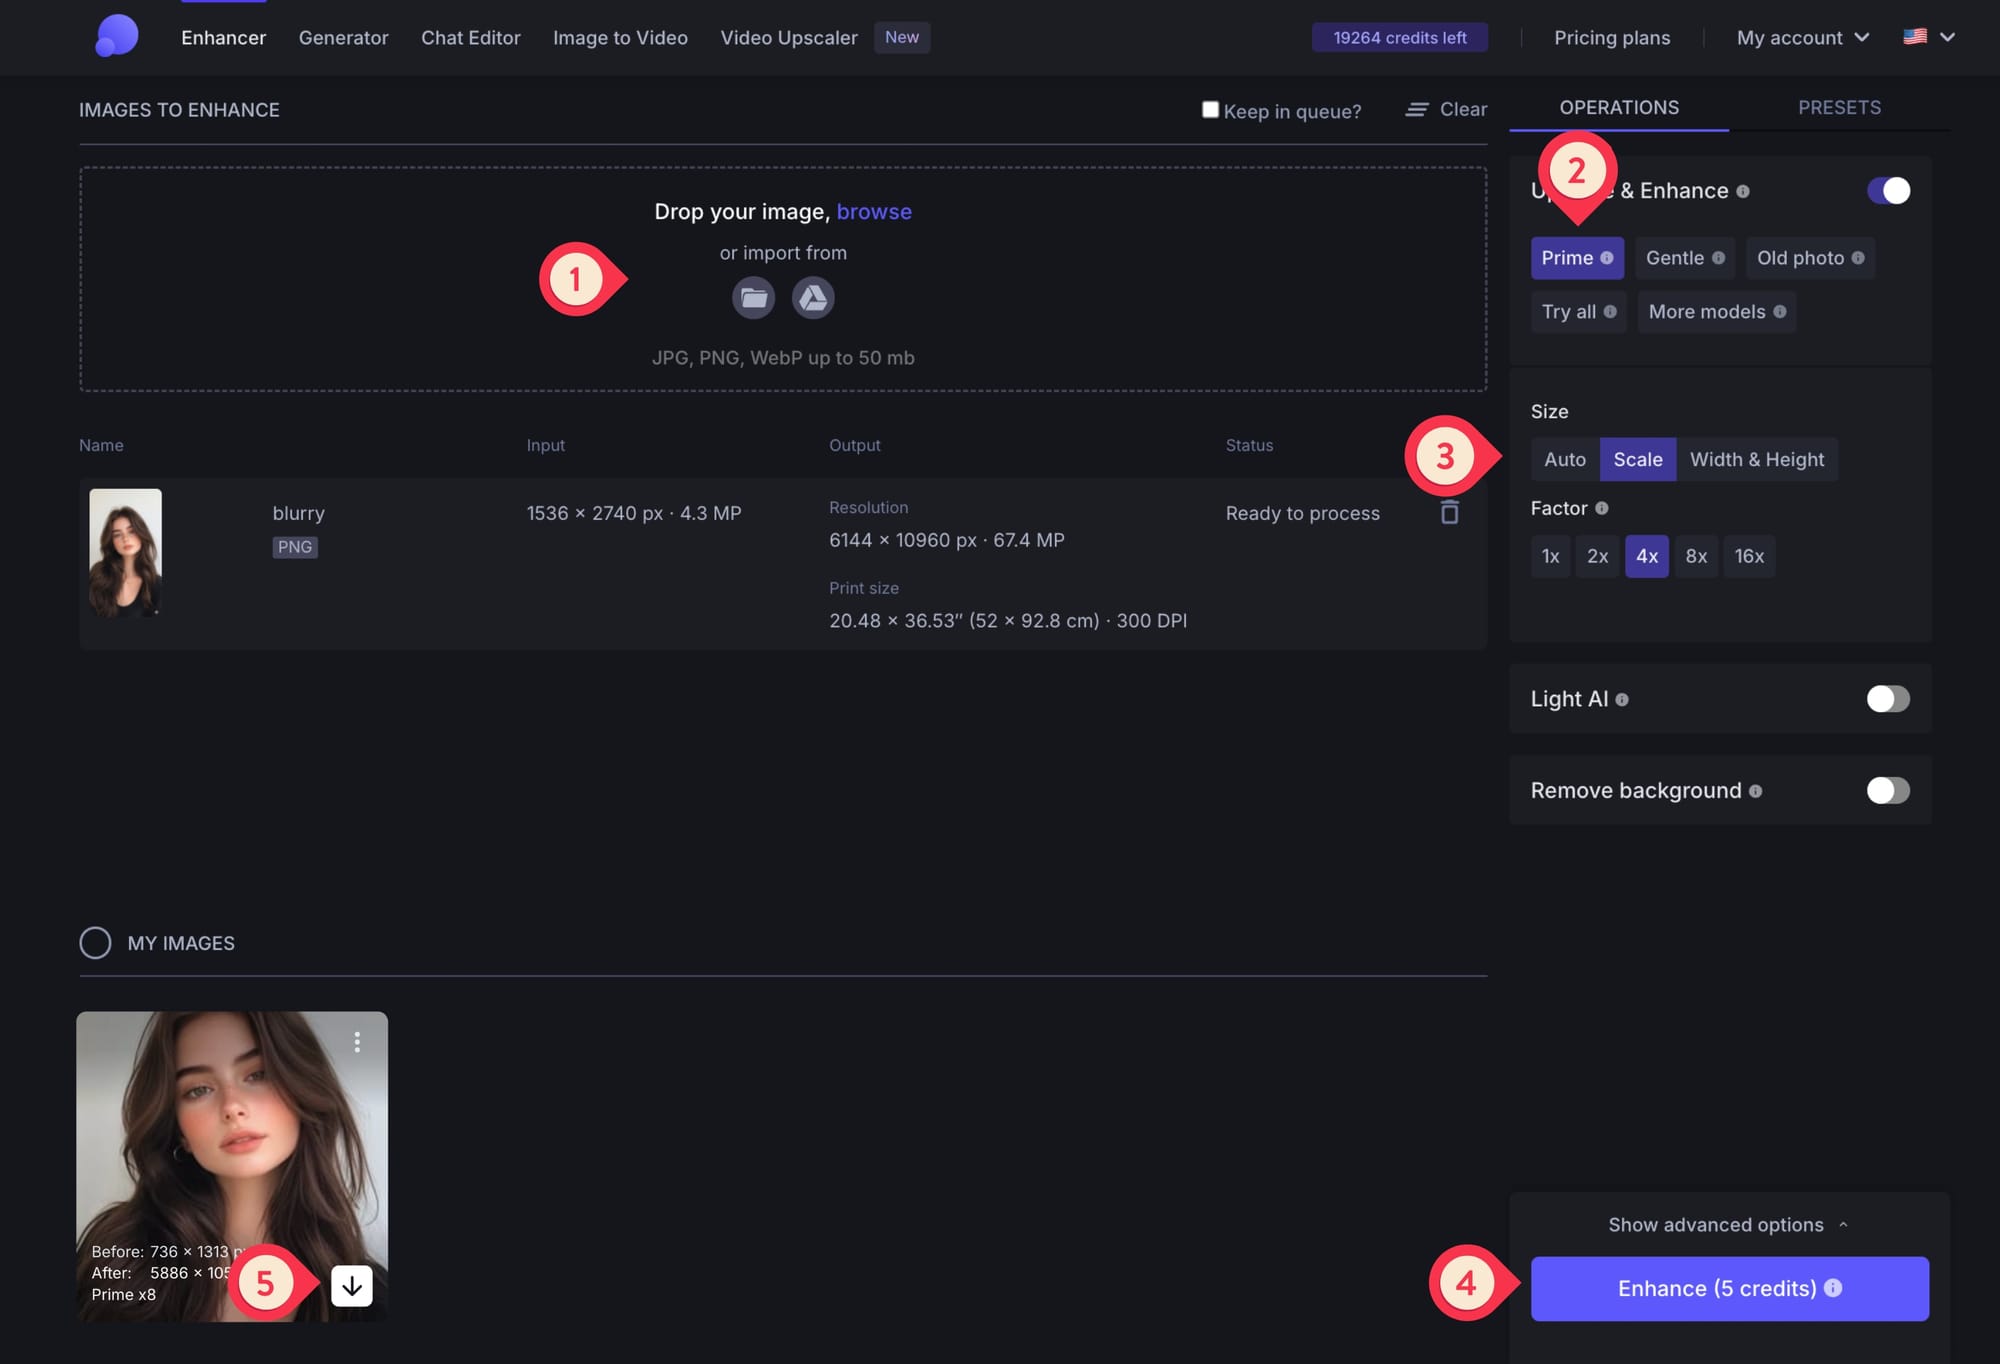
Step 1: Upload image
Upload your picture to LetsEnhance.io.
Step 2: Select Prime upscaler
Choose Prime as your upscaling method.
Step 3: Adjust settings
Set your desired output size from the Scale.
Pro tip: If your image is smaller than 800 × 800 px, use 4x scaling or higher for the best results. For images larger than 1 megapixel, even 1x (enhancement only, no size increase) can deliver a noticeably sharper result while keeping file size manageable.
Step 4: Start processing
Click Enhance and let our AI work its magic.
Step 5: Download your unblurred image
Once processing is complete, review the results and download your enhanced image.
What to try if Prime isn't enough
If Prime doesn't fully resolve the blur, here's what to try next:
Strong pushes sharpening further and is particularly effective when blur is concentrated in faces or when you need maximum crispness from a very small source image. It's more aggressive than Prime, so results may look over-sharpened on images that were already reasonably clear.
Ultra is the most transformative option. It rebuilds detail rather than just sharpening what's there, making it a strong fallback when other models fall short. Best used on images where some detail is still visible but needs significant reconstruction.
Advantages: why LetsEnhance is worth using
- Results that go beyond sharpening: Unlike traditional tools that only increase contrast at edges, LetsEnhance uses AI to reconstruct detail. Meaning, it can recover texture and fine information that simpler methods can't. For portraits, food photography, and product images, this makes a visible difference.
- No learning curve: The entire process takes under a minute. You upload, pick a model, set a scale, and click Enhance. There's no layer management, no slider combinations to memorize, no prior editing experience needed.
- Batch processing: You can process up to 20 images at once, which is a major time-saver for anyone dealing with more than a handful of photos.
- No software to install: It runs in the browser, which means it works on any device and OS without setup.
- Free to try: Upon signup, users get 10 free credits, which is enough to evaluate the quality before committing.
- API access for high-volume use: For businesses or developers processing large quantities of images automatically, LetsEnhance offers dedicated image processing API that integrates deblurring into existing workflows at scale.
Disadvantages: where LetsEnhance falls short
- It requires an internet connection: All processing happens in the cloud. If you're working offline or in a low-connectivity environment, this is a hard blocker.
- You can't isolate the deblurring effect: There's no way to apply sharpening to just one part of the image, dial in exactly how much sharpening is applied, or separate the enhancement from the upscaling. What you get is the model's best interpretation of your image.
- Paid after 10 images: The free tier covers initial testing, but ongoing use requires a subscription or credits.
Types of blur that can and can’t be fixed
Understanding what kind of blur you're dealing with helps set realistic expectations.
LetsEnhance fixes:
- Blur from upscaling: If an image looks blurry because it was enlarged with a basic method (like bicubic interpolation), LetsEnhance replaces those soft, interpolated pixels with AI-reconstructed detail. The result looks sharper and more natural at the larger size.
- Out-of-focus blur: This type of blur occurs at the very second that a photo is taken the hand shakes a bit and you have slightly blurry pics. LetsEnhance fixes this type of blur and sharpens the image.
Types of blur LetsEnhance doesn’t touch:
- Background blur or bokeh. LetsEnhance unblurs and clears up photos but doesn't touch a background blur used by photographers to get a unique visual aesthetic.
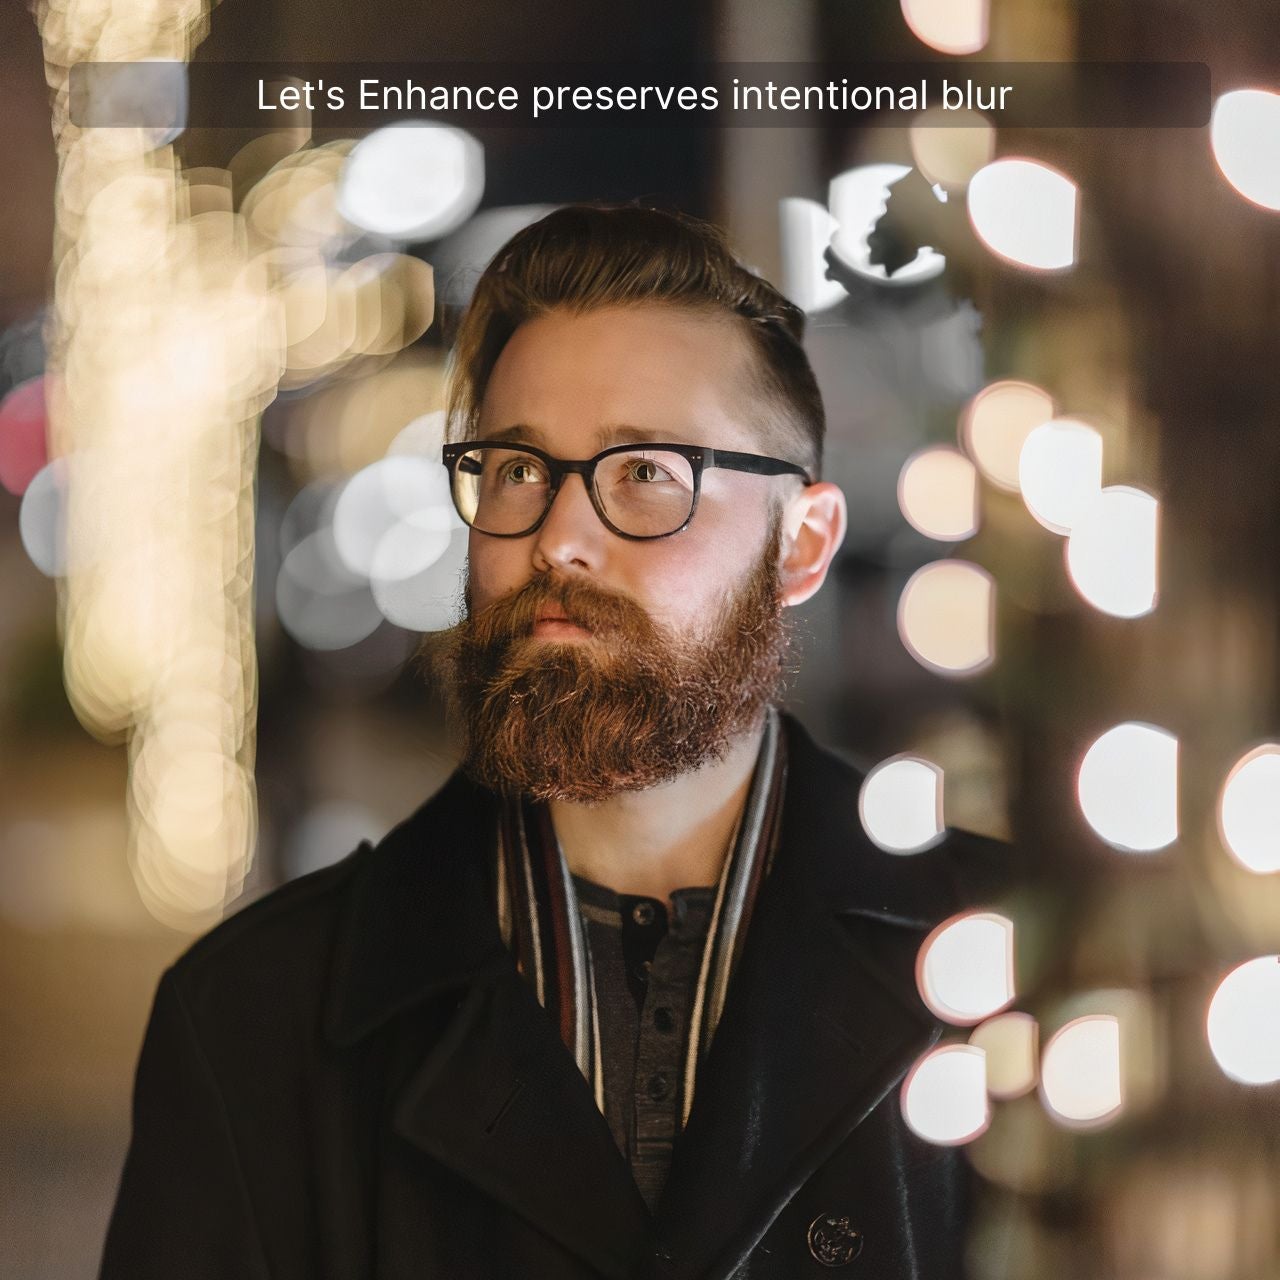
Since LetsEnhance sharpens photograph foregrounds, it doesn't fix background blur to preserve the artist’s vision.
Blur LetsEnhance can’t fix:
- Severe out-of-focus or motion blur is incredibly difficult to fix. Photos with unintentional blur are typically unsalvageable depending on the severity of the blur itself.
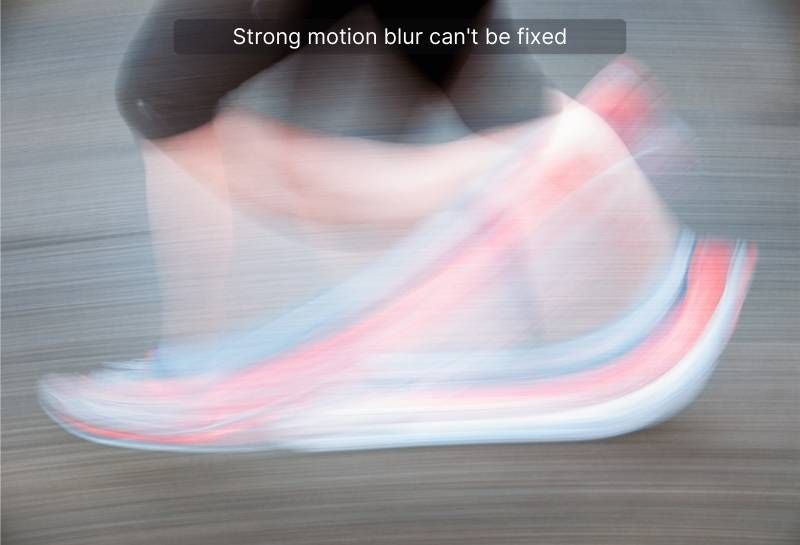
- Motion blur, for example, happens when an object moves past a lens faster than the camera’s shutter speed. In this case, the blur is very severe and almost impossible to fix. So it's best to reshoot the photo.
Image clearer API for high-volume processing
For businesses needing to process thousands of blurry photos automatically, Claid by LetsEnhance provides a powerful API solution:
- Easily integrate deblurer into your existing workflows
- Process high volumes of images quickly and efficiently
- Customize sharpening settings to match your specific needs
This API is ideal for photo printing services, real estate platforms, or any business dealing with large quantities of potentially blurry user-generated content.
Check out the Claid API to integrate automated blur removal for your business.
How to deblur image In Photoshop
Photoshop provides advanced tools for image sharpening, giving you greater control over the deblurring process. Here's how to use the two best methods.
Note: Photoshop increases the contrast and makes a picture less blurry but doesn't help with extreme blur. For adding missing details, use AI-based tools such as LetsEnhance.io.
Method 1: Using smart sharpen
Best for general sharpening needs.
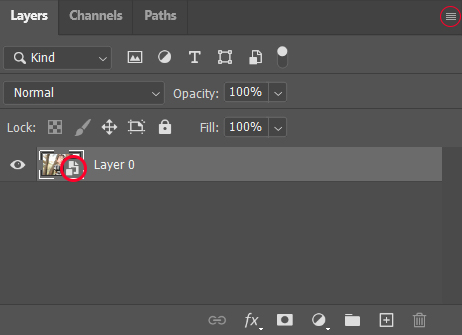
Step 1: Convert to Smart Object
Click on the little button at the top-right corner of the Layers window of Photoshop and choose Convert to Smart Object in the menu. Once a layer is converted to a Smart Object, you should see a little icon at the bottom right corner of the layer.
Without going into too many technical details, by converting the layer into a Smart Object, you can undo the changes made to that particular layer. This can be useful in case you make a mistake during editing.
Step 2: Apply the Smart Sharpen filter to the layer
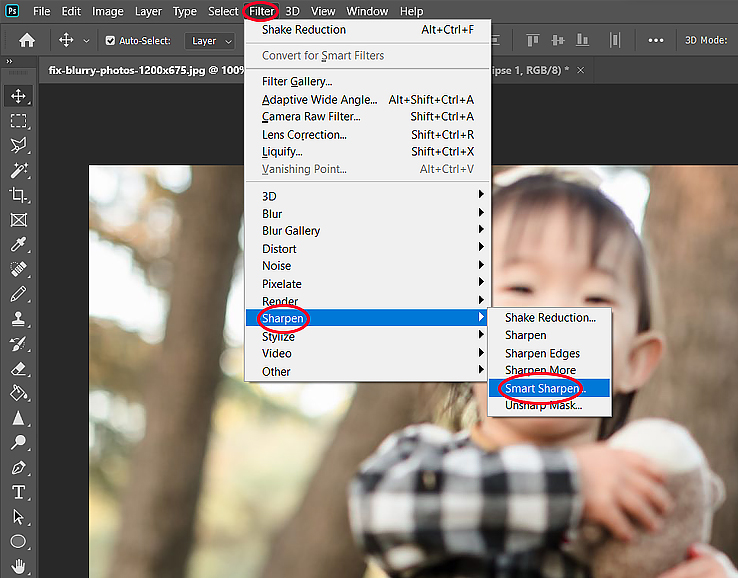
In the Menu Bar above, select Filter, in the dropdown menu navigate to Sharpen, then select Smart Sharpen with the right layer selected.
Step 3: Resize the dialog box
When the Smart Sharpen dialog box opens up, if possible, expand the window so the entire image is visible. Since the preview in the window displays your pic with a 1:1 pixel ratio to your screen, it would be a good idea to see it in its entirety, as this will give you a better idea of what the image will look like after it’s been sharpened.
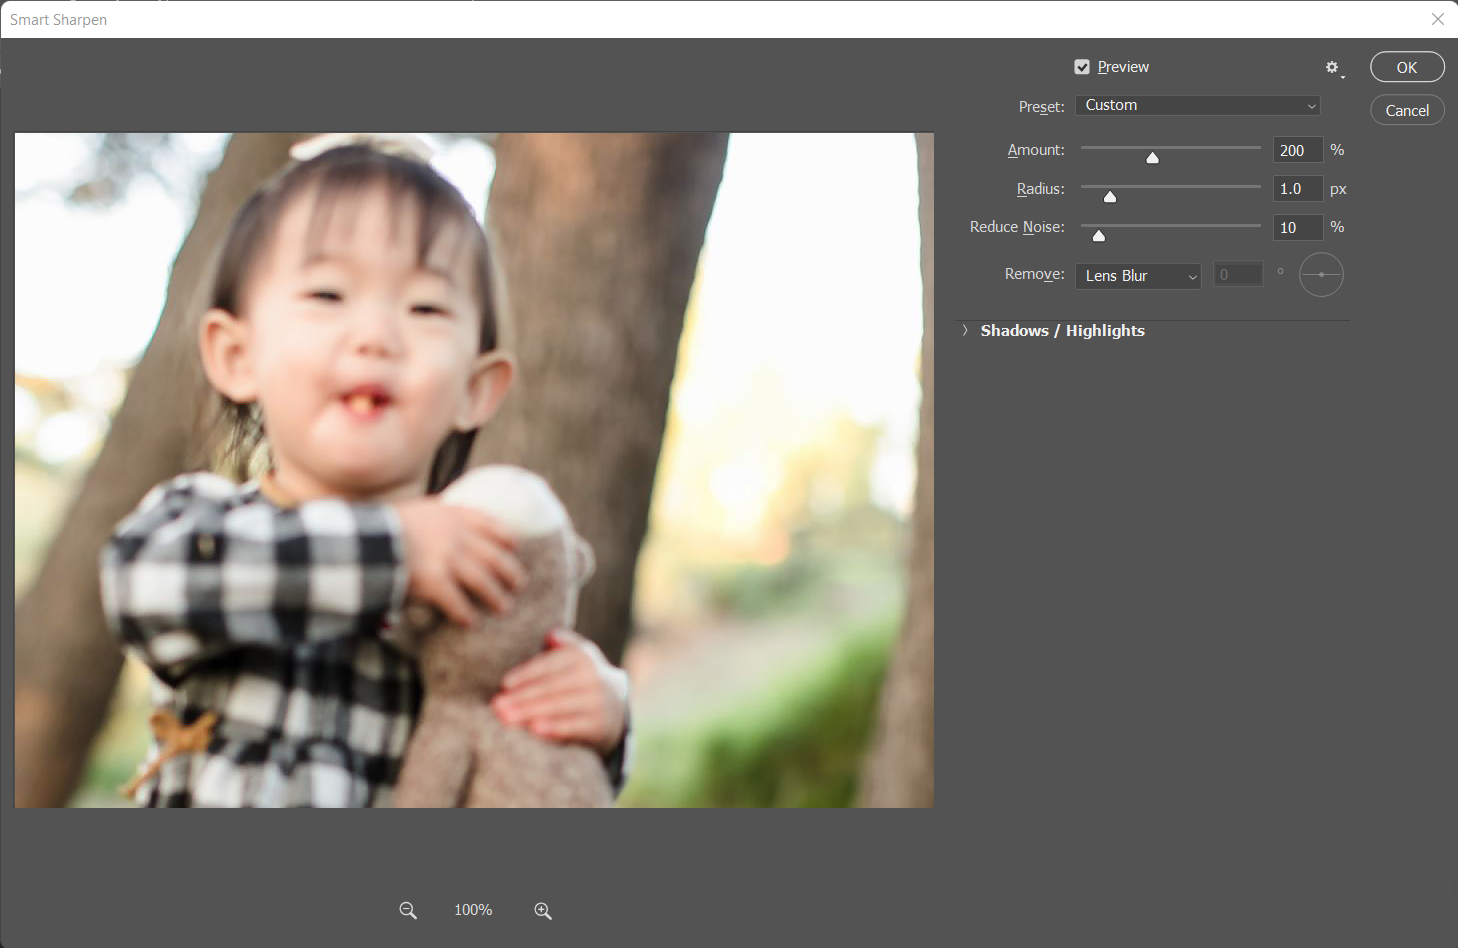
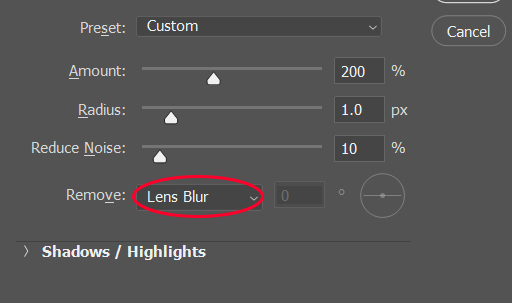
Step 4: Select Lens Blur in the Remove bar
For the filter to detect the edges (neighboring pixels with colors of contrasting brightness), the Remove bar should be set to Lens Blur.
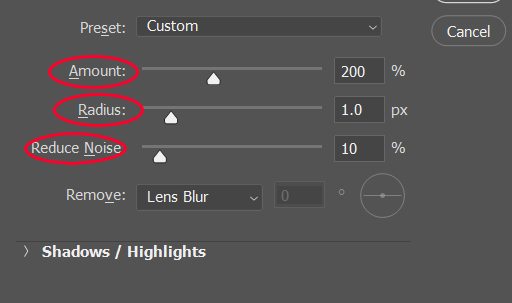
Step 5: Select desired Amount, Radius, and Reduce Noise
These are the 3 following settings for the Smart Sharpen filter:
- Amount: This slider will increase the contrast on edge pixels, making light pixels brighter, and dark pixels darker. This will increase the contrast between the two neighboring pixels and make the photo sharper.
- Radius: The radius is the size of the image edges. By default, the radius of the edge is set to 1 (2 pixels, one for the lighter pixel and one for the darker one). If you increase the radius, the edges become thicker and more pronounced.
- Reduce Noise: This slider reduces the noise (bright pixels scattered across the picture) within the image. Look at the preview as you slide the Reduce Noise slider to see the changes.
Step 6: Confirm
Click OK to confirm the changes and apply the Smart Sharpen filter to the selected layer.
The entire process takes a few minutes, especially if you use this function several times and remember all the steps needed to apply the filter.
Method 2: Using the Camera Shake Reduction Filter
Ideal for images blurred due to camera movement.
Steps:
- Open Your Image in Photoshop.
- Convert to Smart Object: Right-click on the layer and select Convert to Smart Object for non-destructive editing.
- Apply Shake Reduction Filter:
i. Go to Filter > Sharpen > Shake Reduction.
ii. Photoshop will automatically analyze the region and reduce blur. - Adjust Settings (If Necessary): In the Shake Reduction dialog box, tweak the Blur Trace Bounds and Smoothing options for optimal results.
- Confirm Changes: Click OK to apply the adjustments.
This method works best when the blur is uniform and caused by camera shake rather than subject motion. It can struggle on complex scenes or when multiple blur directions are present
Advantages: why Photoshop is worth using
- Precise, selective control: You can apply sharpening non-destructively to Smart Objects, mask the effect to specific regions, and fine-tune every parameter with a live preview. If you only want to sharpen a face without touching the background, Photoshop lets you do that.
- Camera shake reduction: This filter analyzes the specific blur pattern caused by camera movement and attempts to reverse it.
- Already in your workflow: If you're a professional who spends most of your editing time in Photoshop, fixing blur there avoids the friction of switching tools and re-exporting files.
Disadvantages: where Photoshop falls short
- It sharpens, it doesn't reconstruct: Photoshop works by amplifying contrast at detected edges. It can make a photo look crisper, but it doesn't add back detail that was never captured. For recovering actual image information, AI tools produce meaningfully better results.
- Steep learning curve: Getting good results from Smart Sharpen requires understanding what Amount, Radius, and Reduce Noise actually do. Set Radius too high and you get obvious halos around edges. There's no one-click path to a good result.
- Not practical for batches: Each image has to be processed manually.
- Expensive: Photoshop requires a Creative Cloud subscription. If deblurring is your only use case, it's hard to justify the cost.
iPhone and Android apps that make pictures clear
Doing a quick search on the App Store or Google Play Store, you’ll find a ton of photo editing apps that come with a variety of useful tools and functions. Certain apps, however, focus entirely on deblurring.
EnhanceFox is one of the most popular image sharpener apps and can easily clear up blurry photos.
Advantages
- 7-day free trial: Enough time to test the quality on your own photos before committing to a subscription.
- High-quality enhancements with minimal clicks: You don't need to touch any settings to get a good result. The app handles the heavy lifting.
- Beginner-friendly: No editing experience needed. If you can tap a button, you can use EnhanceFox.
Disadvantages
- Requires a subscription after the trial: Free access is time-limited, so ongoing use comes at a cost.
- Not suited for severe or specialized blur: If the photo has heavy motion blur or is significantly out of focus, EnhanceFox won't be able to recover it.
FAQ
How can I tell if an image is blurry?
Generally, it’s quite easy to spot blur, since, after looking at countless high-resolution photographs, our eyes have become accustomed to spotting blur.
But detecting a minor blur can be tricky.
The easiest way to spot blur is to
- Zoom in to find fuzzy areas.
- Look for pronounced lines and edges in the photo. If there is blur, the line wouldn’t be clear-cut, with pixels scattered all over the place.
- Test on screens with different resolutions, as the quality of the display also has an effect on how pronounced the blur is. It may look crisp on one screen, but far more blurry on another.
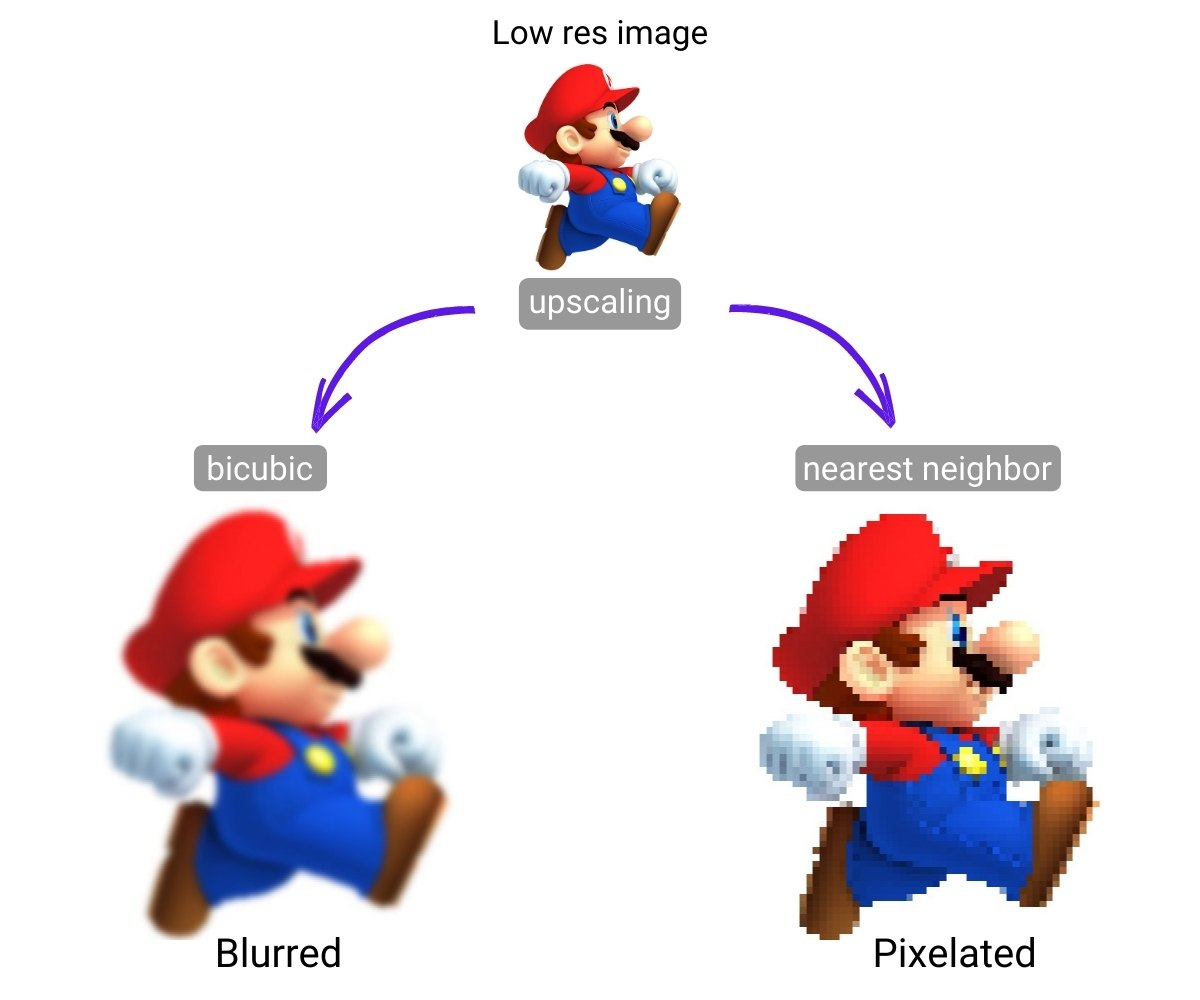
Is blurred the same as pixelated?
Pixelation and blur are different in both how they occur and how they can be fixed.
Pixelated
Pixelation occurs when:
- There is a low pixel count or resolution;
- An old camera is used;
- The image is compressed or expanded beyond its designated size.
Instead of seeing clear lines, one would see pixels instead. If you zoom into a low-resolution photo, these pixels will become more and more prevalent.
👉 Keep reading: How to fix a pixelated image
Blurry
Blur generally occurs as a result of:
- Blowing up a low res image in size with outdated methods
- Motion right when the photograph is taken (motion blur)
- Missed focus setting
- Low shutter speed
- Foggy lens
Blur can occur in pictures of any resolution, even 4 or 8K.
What causes an image to blur?
- Camera shake: Physical movement during the shot, shaky hands, vibration, shooting from a moving vehicle, causes the camera to record a smeared exposure rather than a crisp one.
- Subject motion: If the subject moves faster than the camera's shutter speed, it will appear as a motion-blurred streak.
- Missed focus: If autofocus locks onto the wrong element in the frame, the intended subject ends up soft.
- Narrow depth of field: A very shallow focus plane leaves anything outside it blurry, background and foreground alike.
- Environmental conditions: Haze, mist, lens flare, or a dirty lens can all introduce softness that reads as blur.
How to unblur text in an image?
Use the Prime upscaler on LetsEnhance. It's the most realistic model in the lineup and reconstructs fine detail, including text, better than basic sharpening tools.
Here are the steps:
- Upload your photo to LetsEnhance.
- Choose the Prime upscaler.
- Set your scale factor (2x to 16x depending on your needs).
- Click Enhance. Download when done.