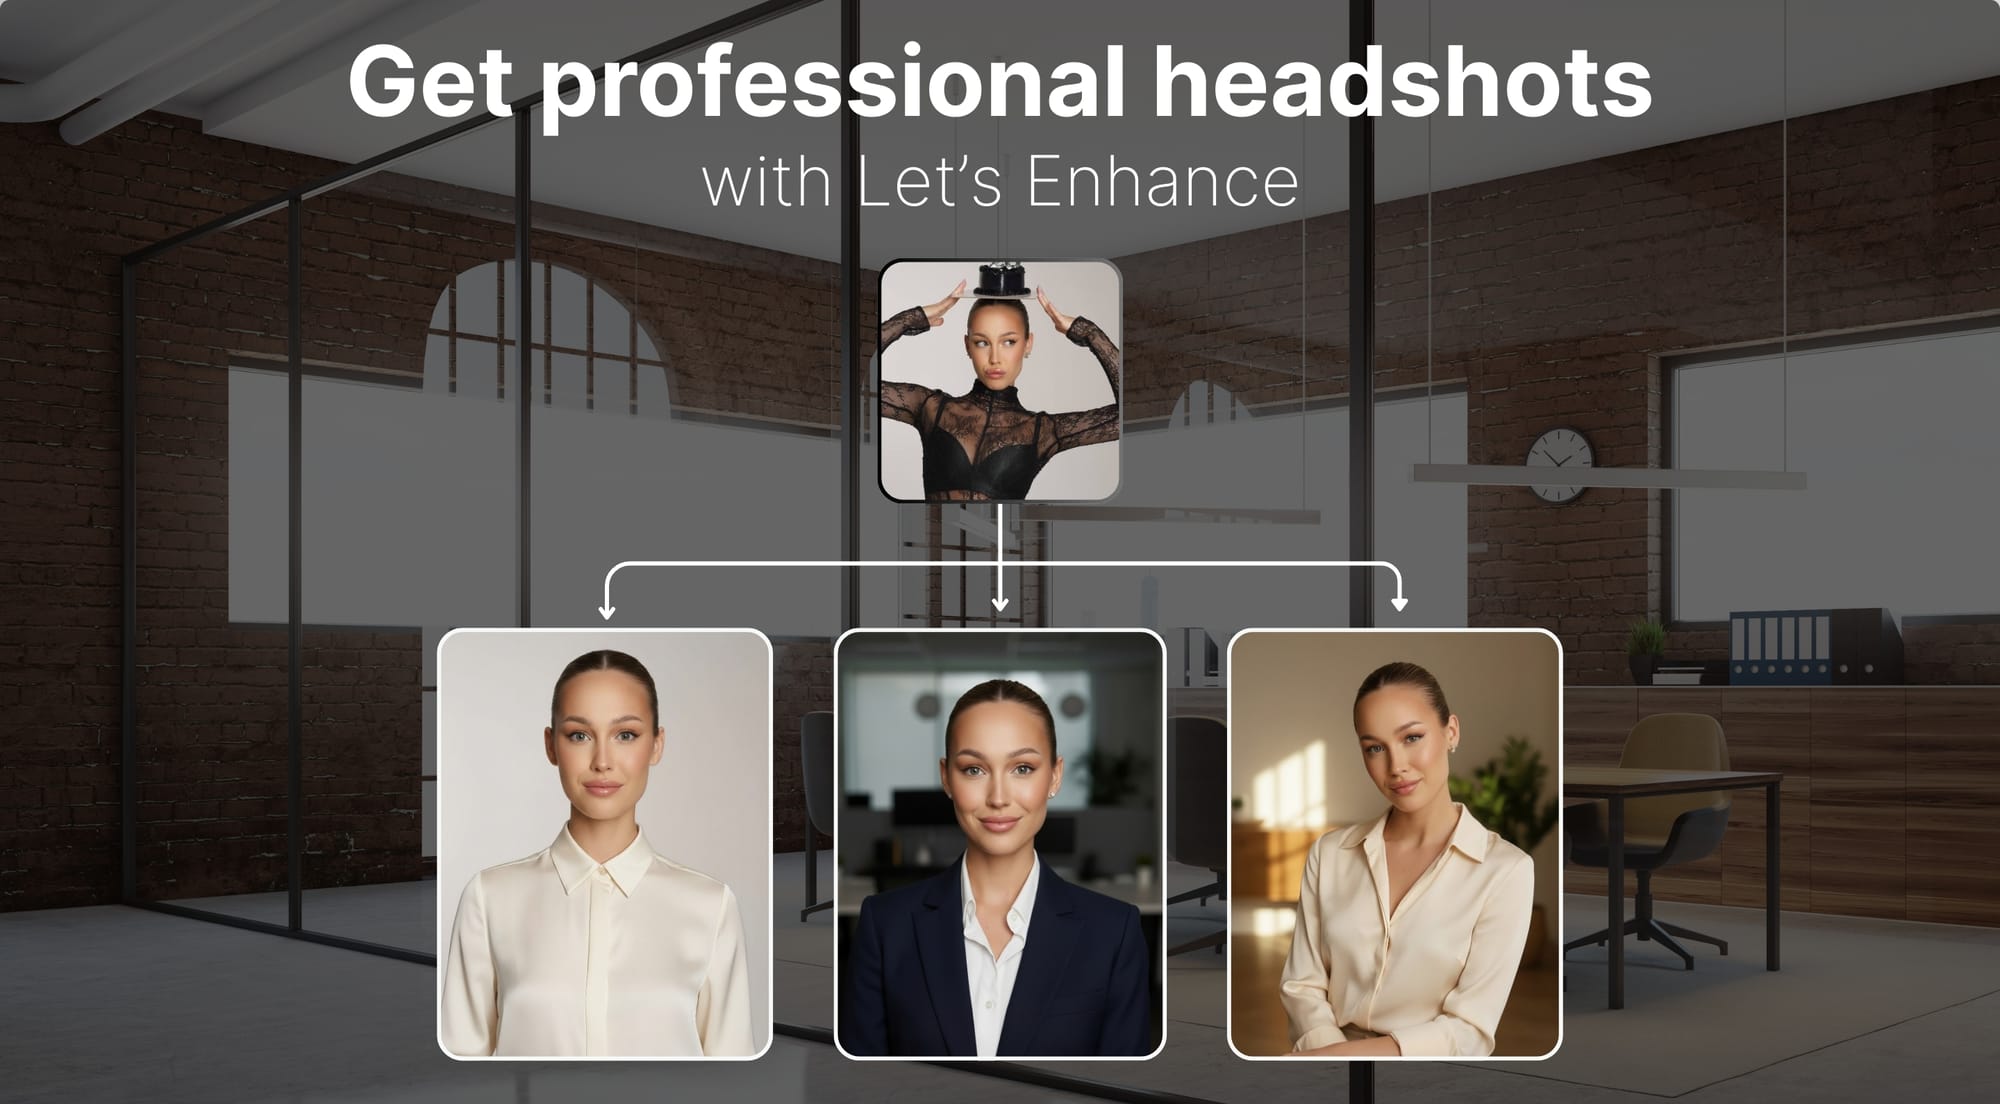
If you have a blurry birthday photo, a cropped group shot or a selfie taken in decent light, you'll need about 2 minutes to create a professional headshot with AI.
You no longer need to book a photographer, find a studio, spend $200–500 for a single session and then wait a week for edits. LetsEnhance Chat Editor allows you to upload whatever photo you have, describe the look you want in plain language and get a completely new headshot. The whole thing takes only a few minutes.
This guide walks through exactly how to do it.
Why a professional headshot still matters
A LinkedIn profile with a photo tends to get more views than one without. This is simply because first impressions happen fast, and a photo is processed before a single word of your bio is read.
The use cases keep expanding, too. LinkedIn and resumes are the obvious ones. Company website directories, Slack and Teams profiles, speaker bios, author pages, Zoom backgrounds. Almost every professional touchpoint now has a face attached to it. And the expectation for that face has quietly risen. A casual selfie or an obviously outdated photo signals a lack of attention to detail that a crisp, well-lit headshot doesn't.
What Chat Editor actually does
Before walking through the workflow, it's worth being precise about what you're working with.
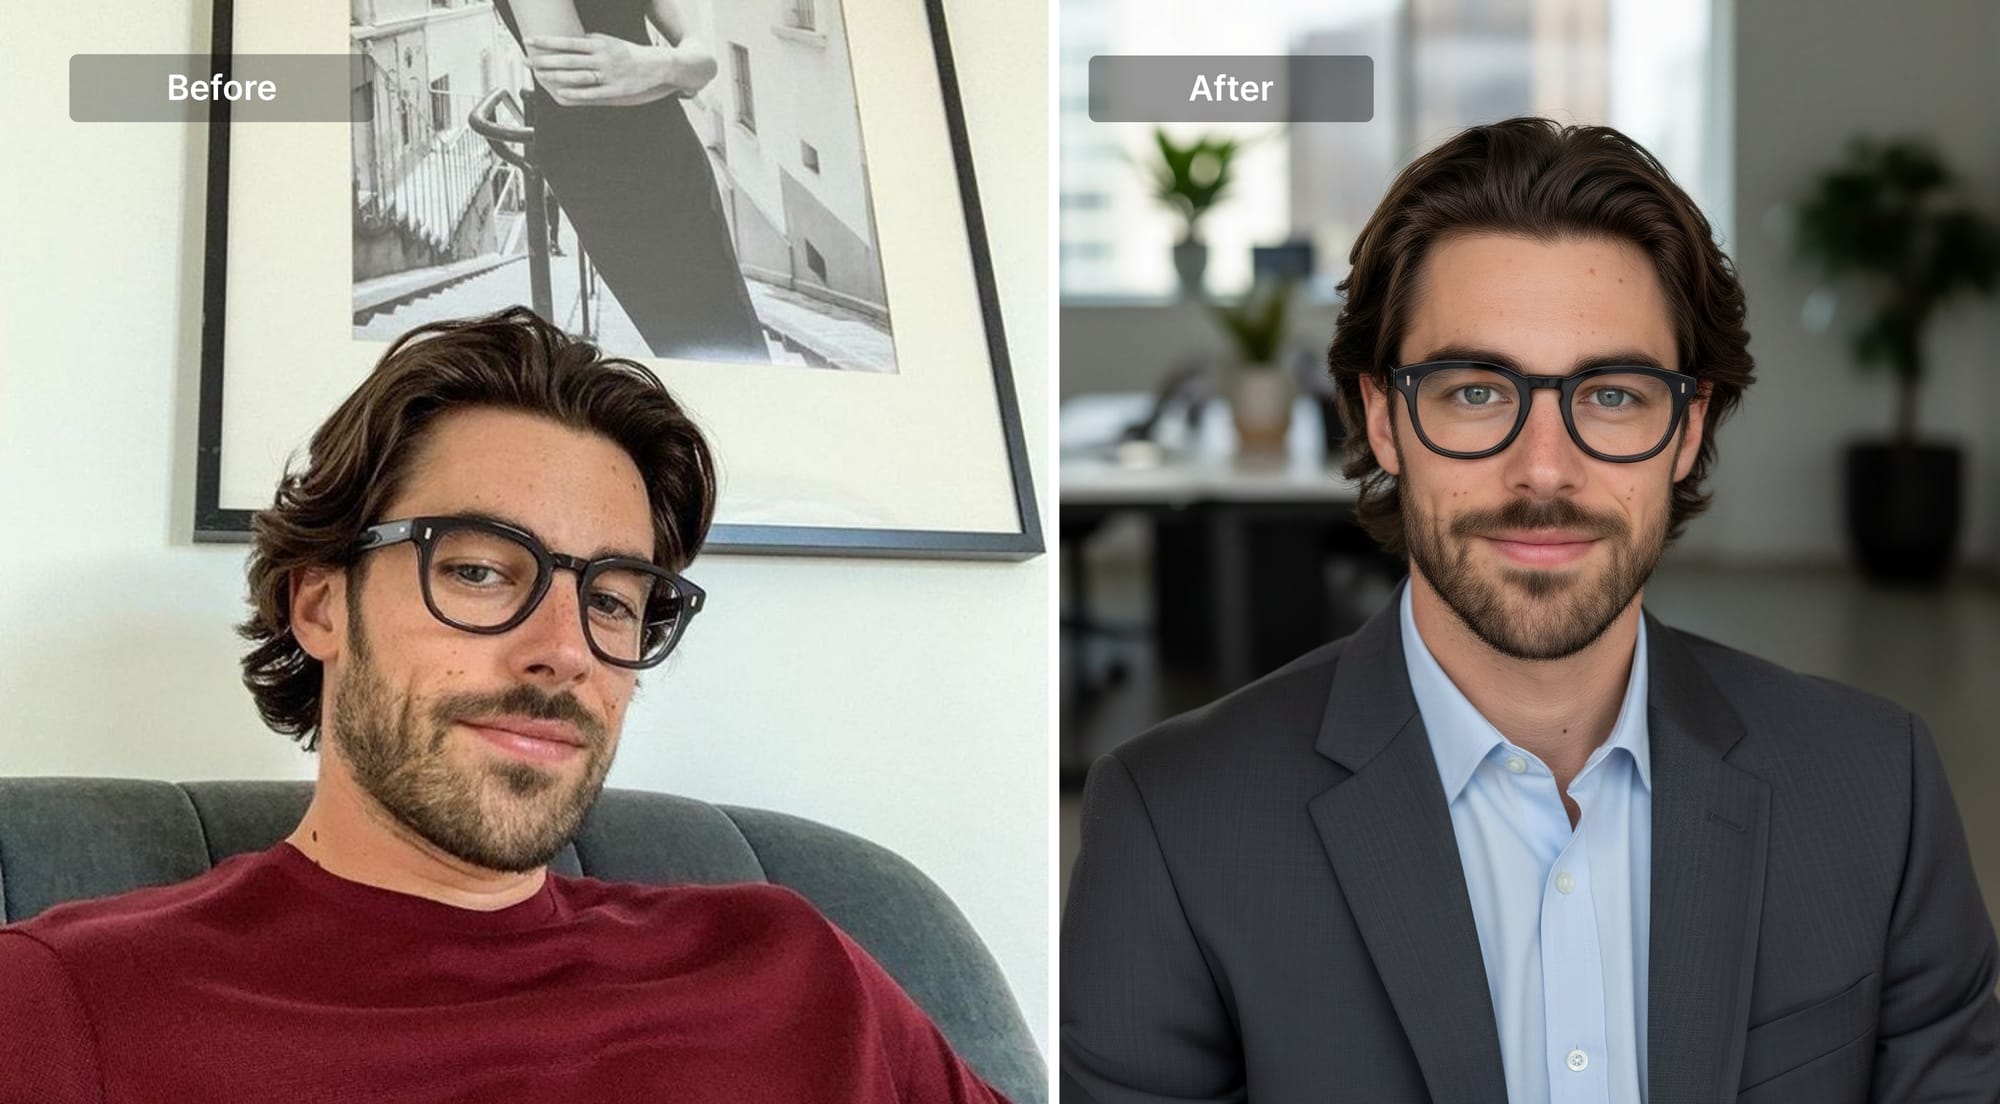
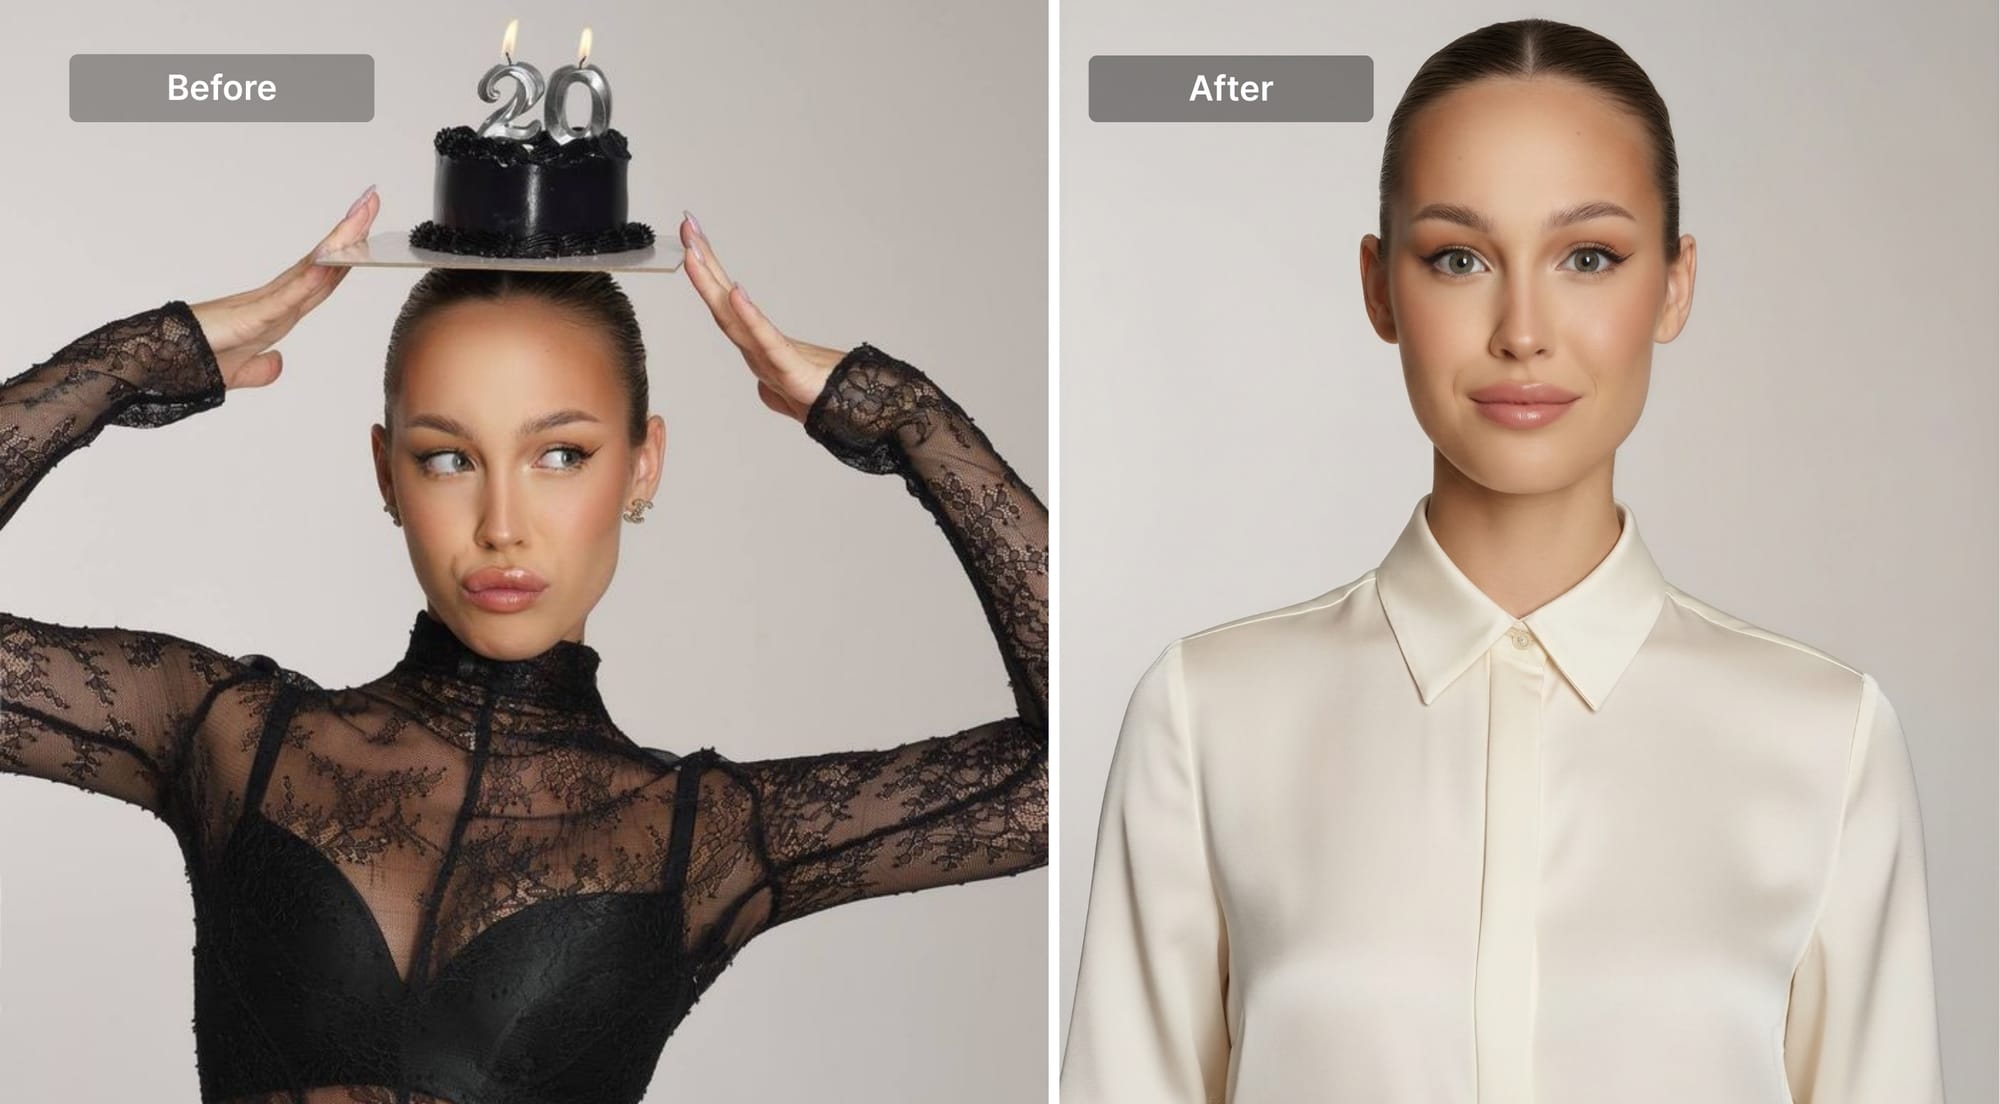
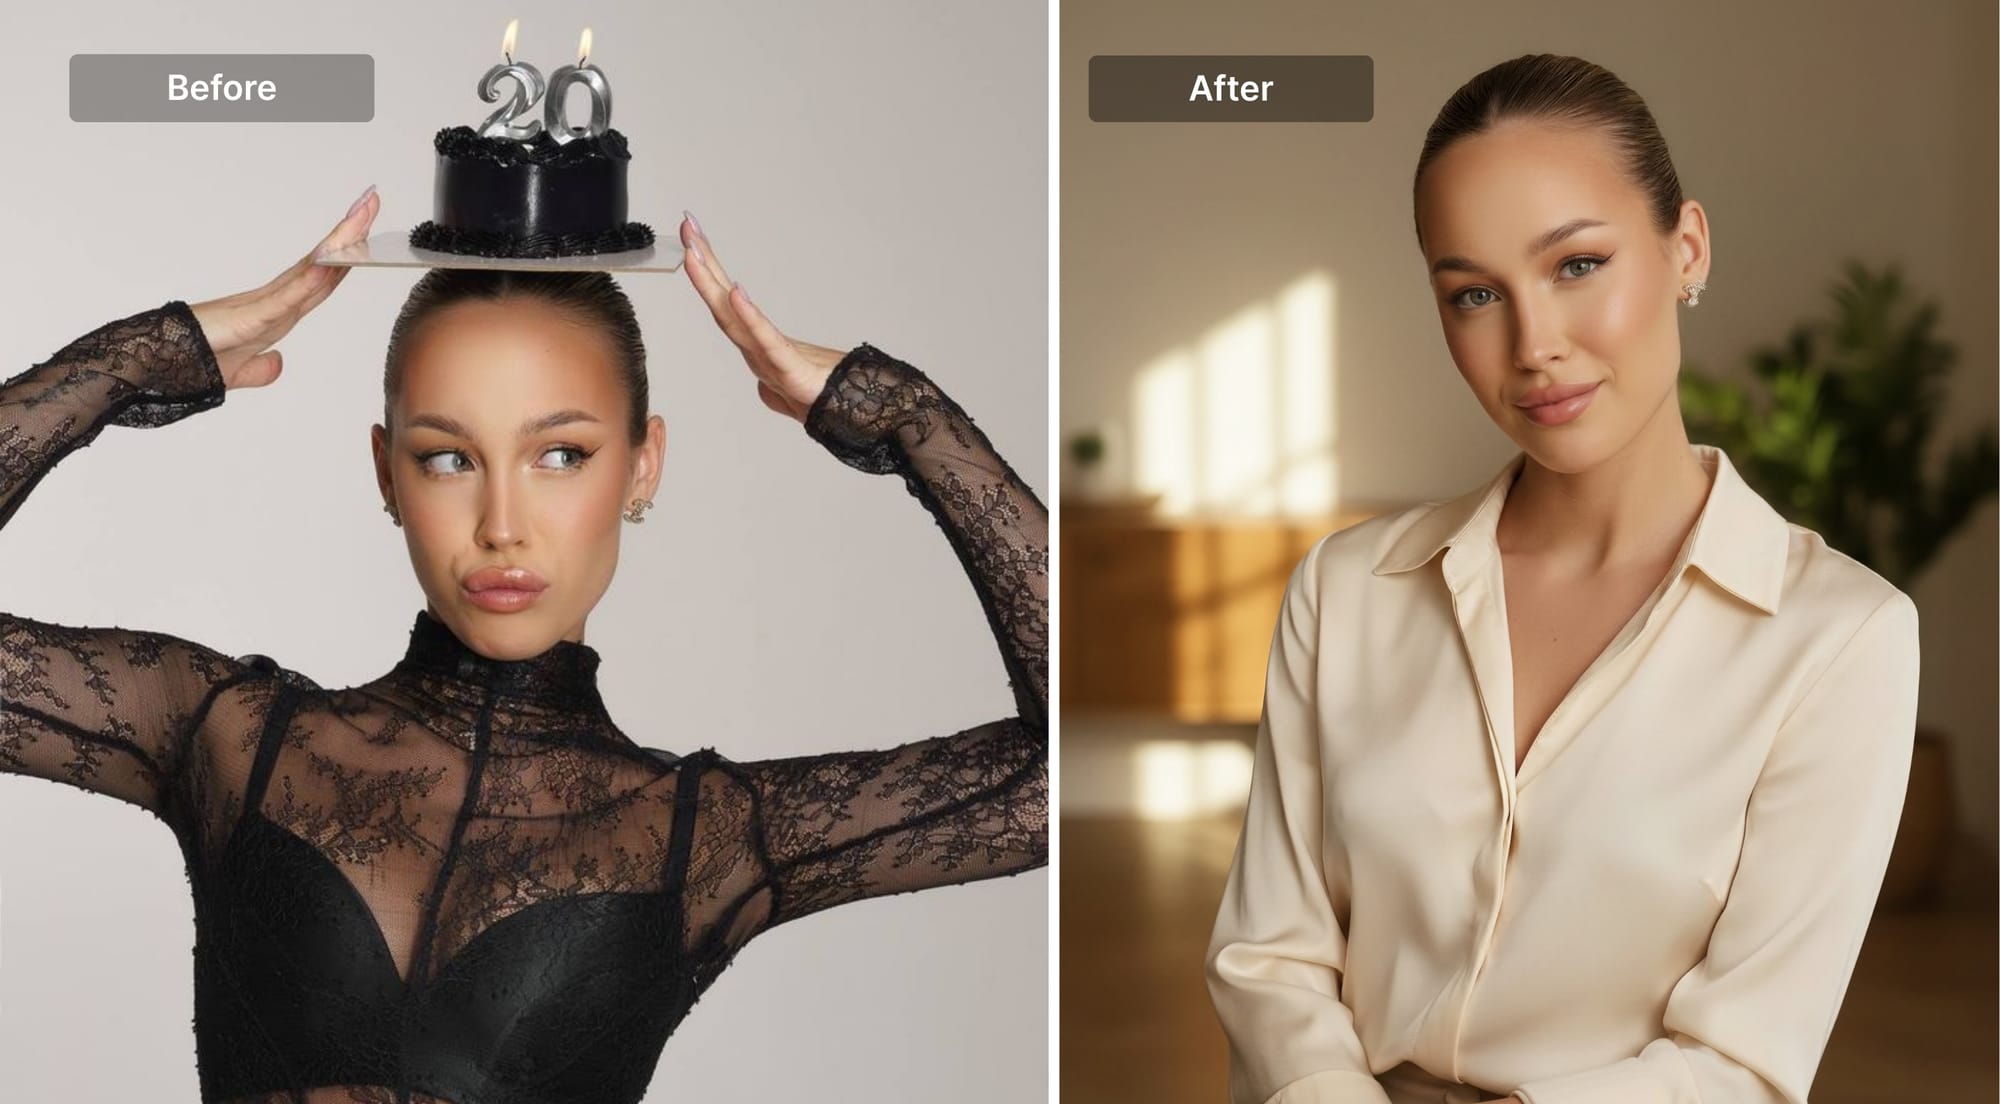
Chat Editor is an AI-powered photo editing tool that transforms existing images into professional-quality visuals using natural language instructions. It's designed to preserve your identity while editing the surrounding context, though minor variations can occur depending on the input and prompt.
The output from the editing stage is intentionally 1 megapixel. A small file processes quickly, which means you can iterate fast. Try a version with a plain grey background. Try one with soft studio lighting. Try a different jacket. Each attempt costs only one credit. Once you land on something that works, you upscale to 4K and the final image is print-ready.
Step-by-step: turn selfie into professional headshot
Chat Editor works best with a photo where your face is clearly visible and reasonably sharp. Ideal inputs:
- A well-lit selfie from the last year or two
- A candid photo where you're looking at or near the camera
- A group photo where you can crop your section
The AI can handle some image quality issues, but it can't fix a face that's out of focus, partially obscured, or too small in the frame. If you're starting from a crop, make sure your head and shoulders are the main subject.
Step 1: Upload to Chat Editor
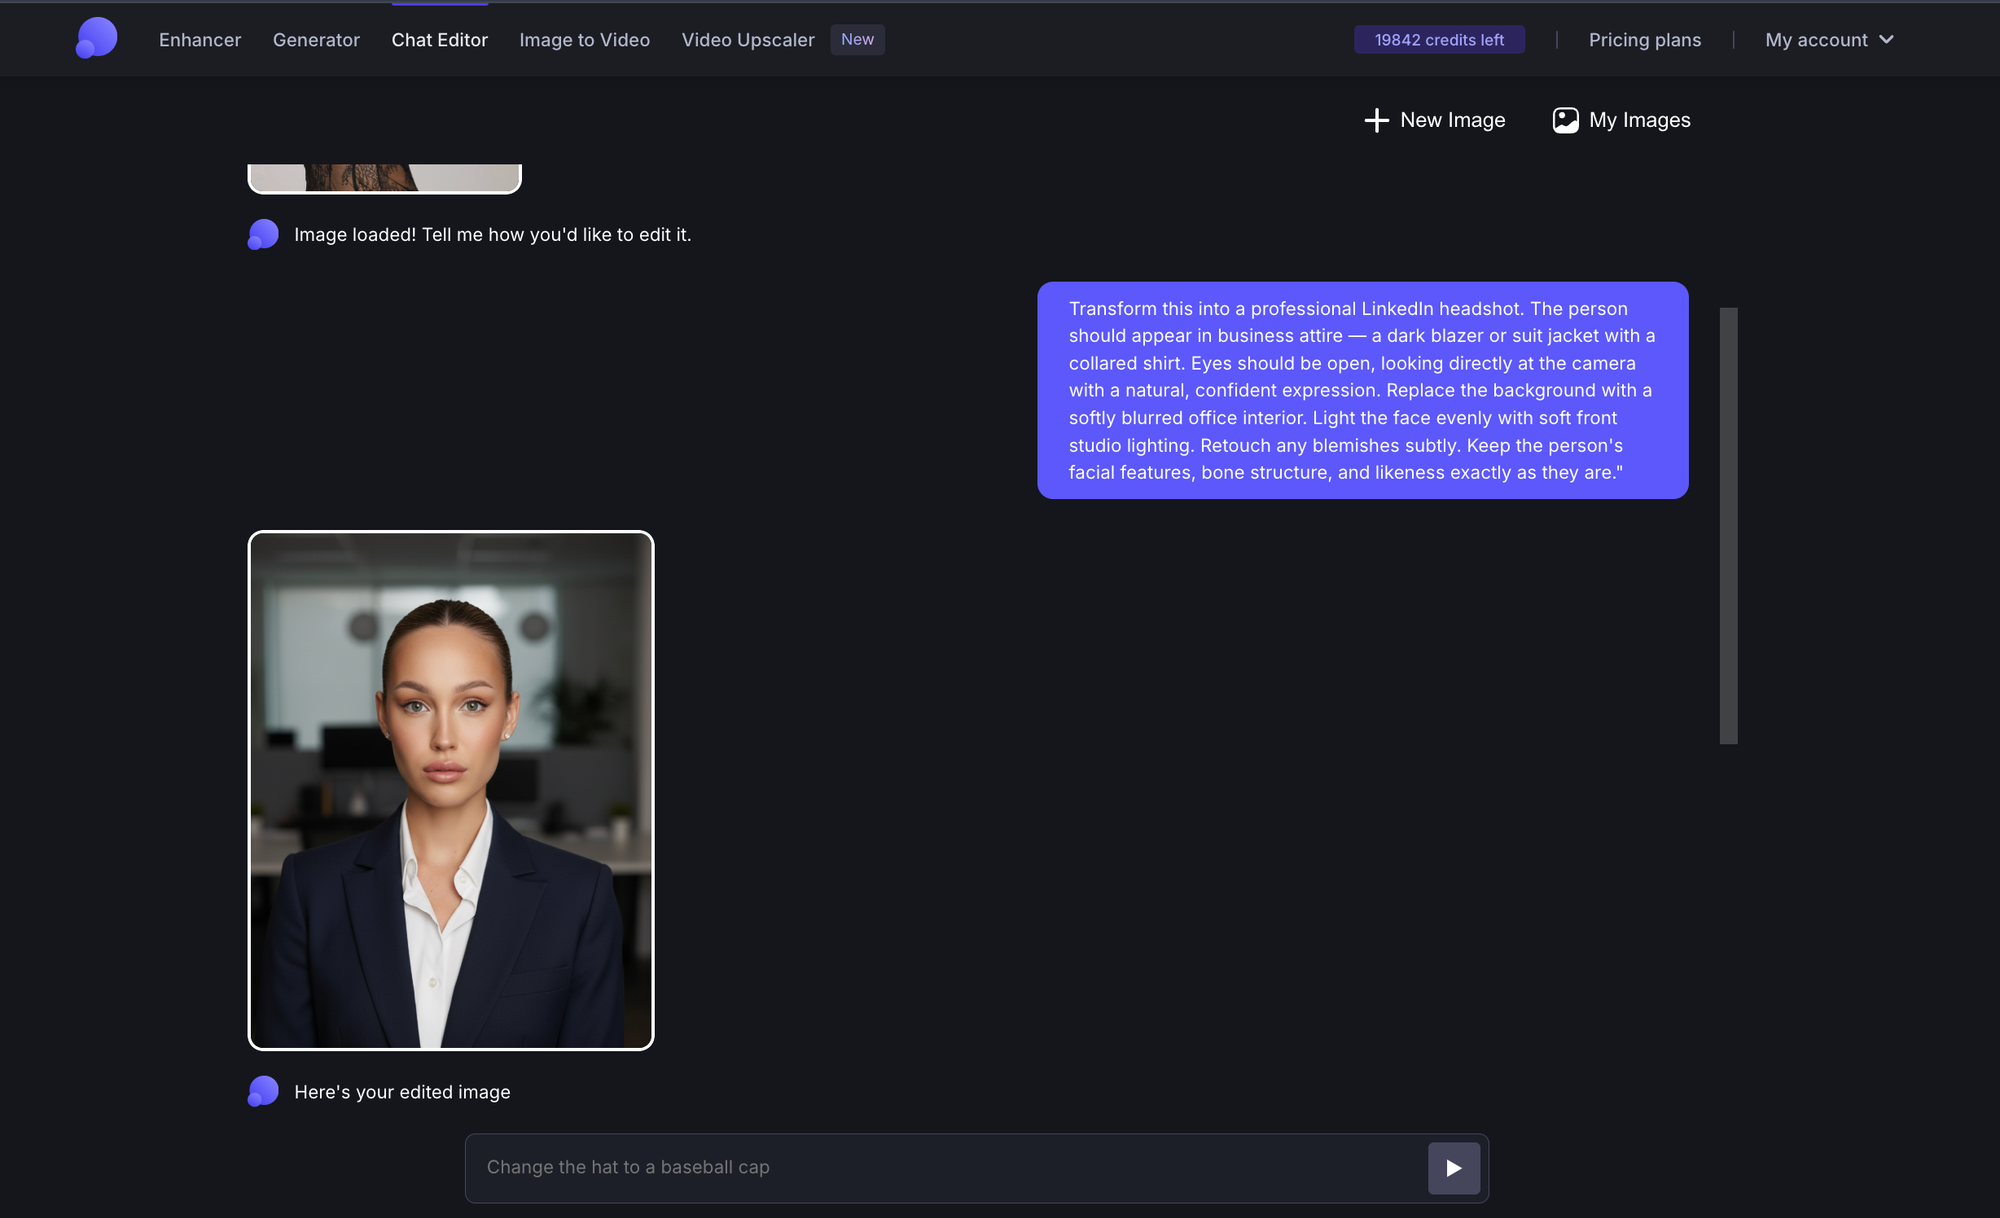
Go to LetsEnhance.io, open Chat Editor and upload your photo.

Step 2: Write your prompt
Write down what you want to change in simple language: describe the background, the overall feel, and any specific adjustments you want. If you want to learn how to write better AI image prompts, check out this guide.
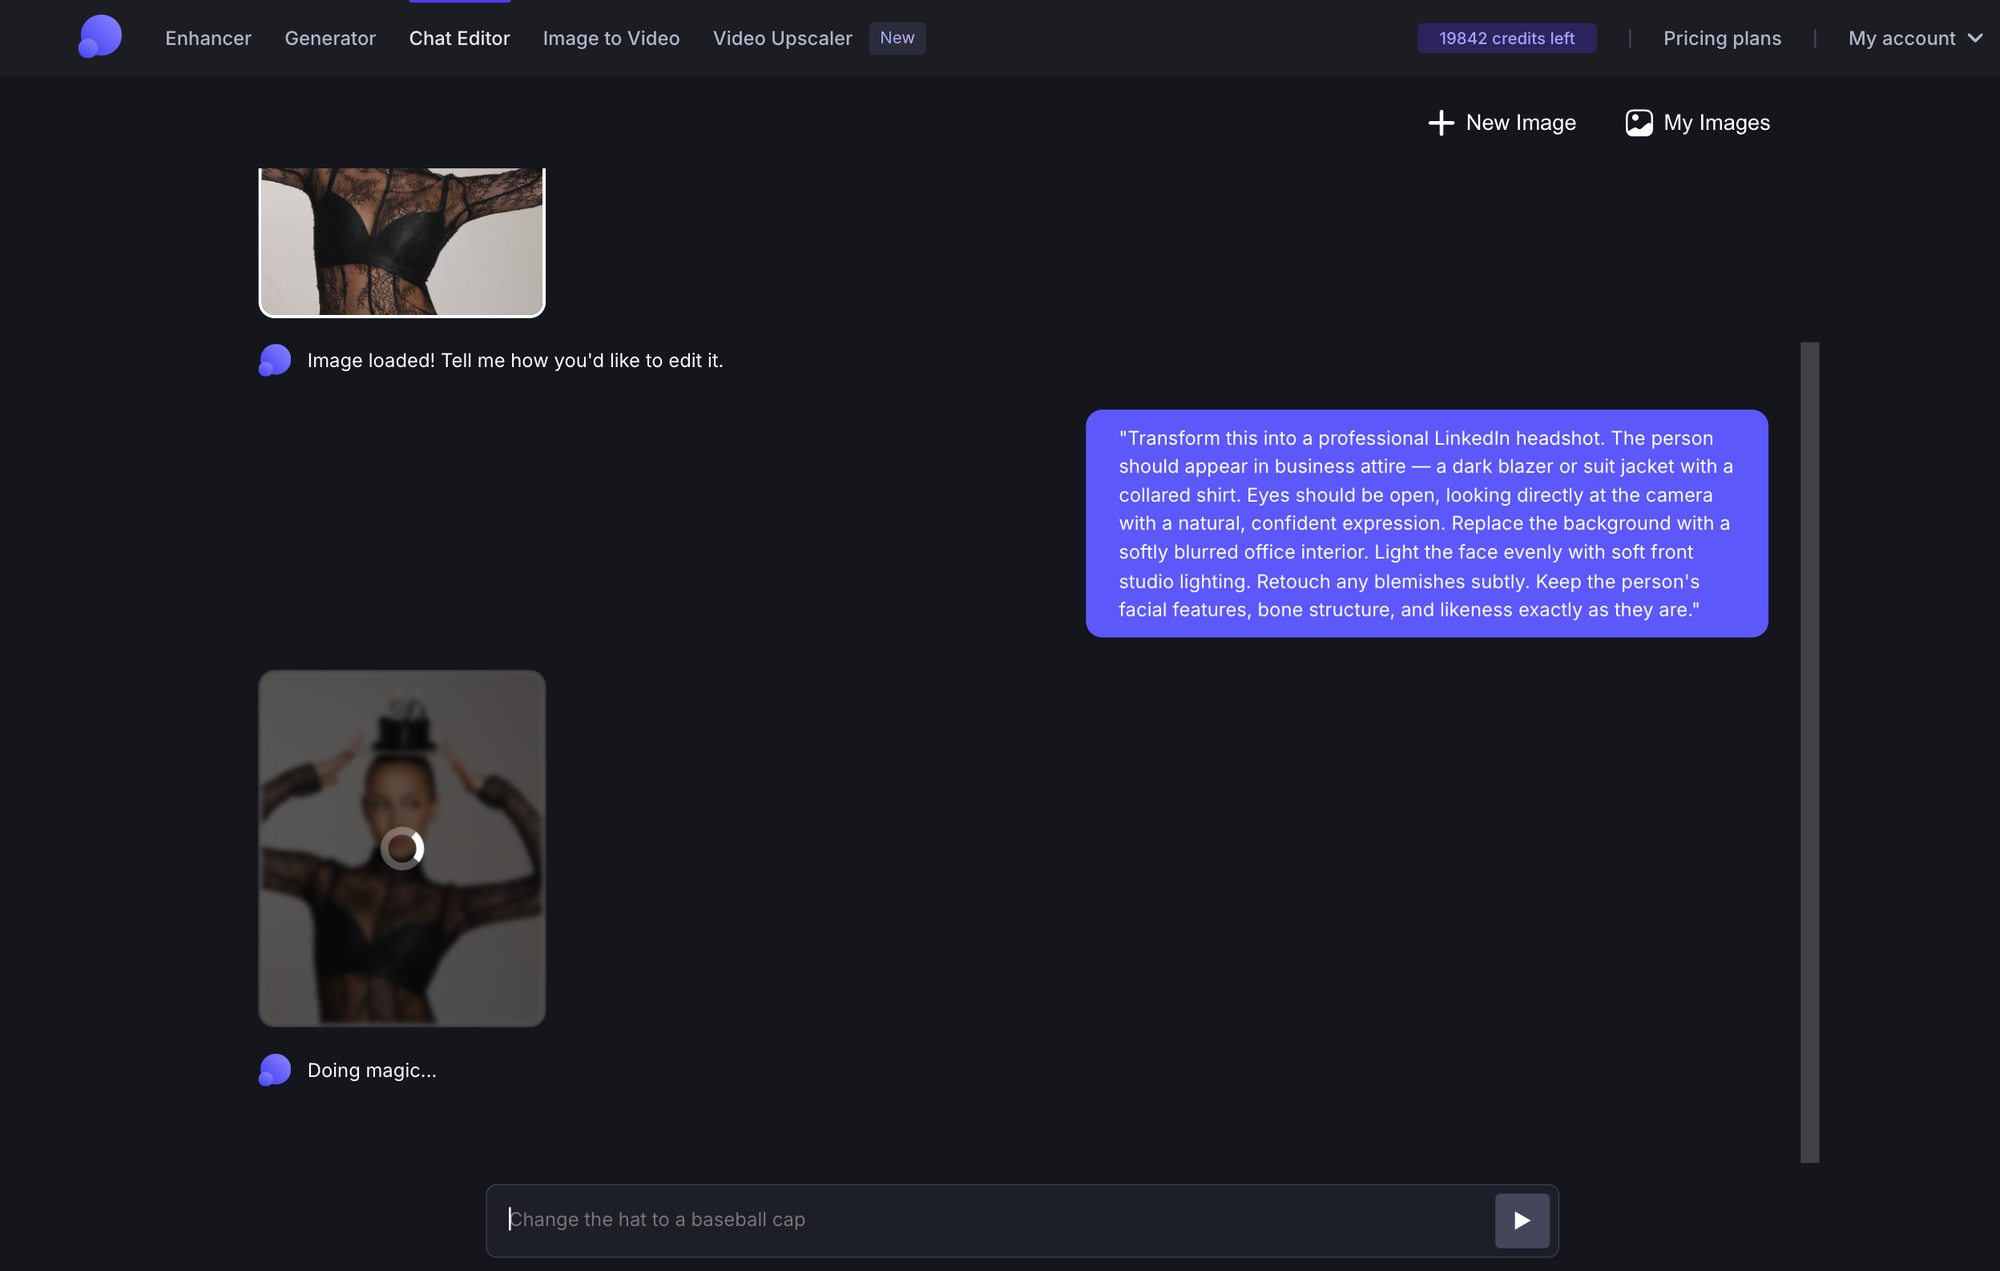
Here are some prompts that you can start with:
For a corporate / LinkedIn headshot:
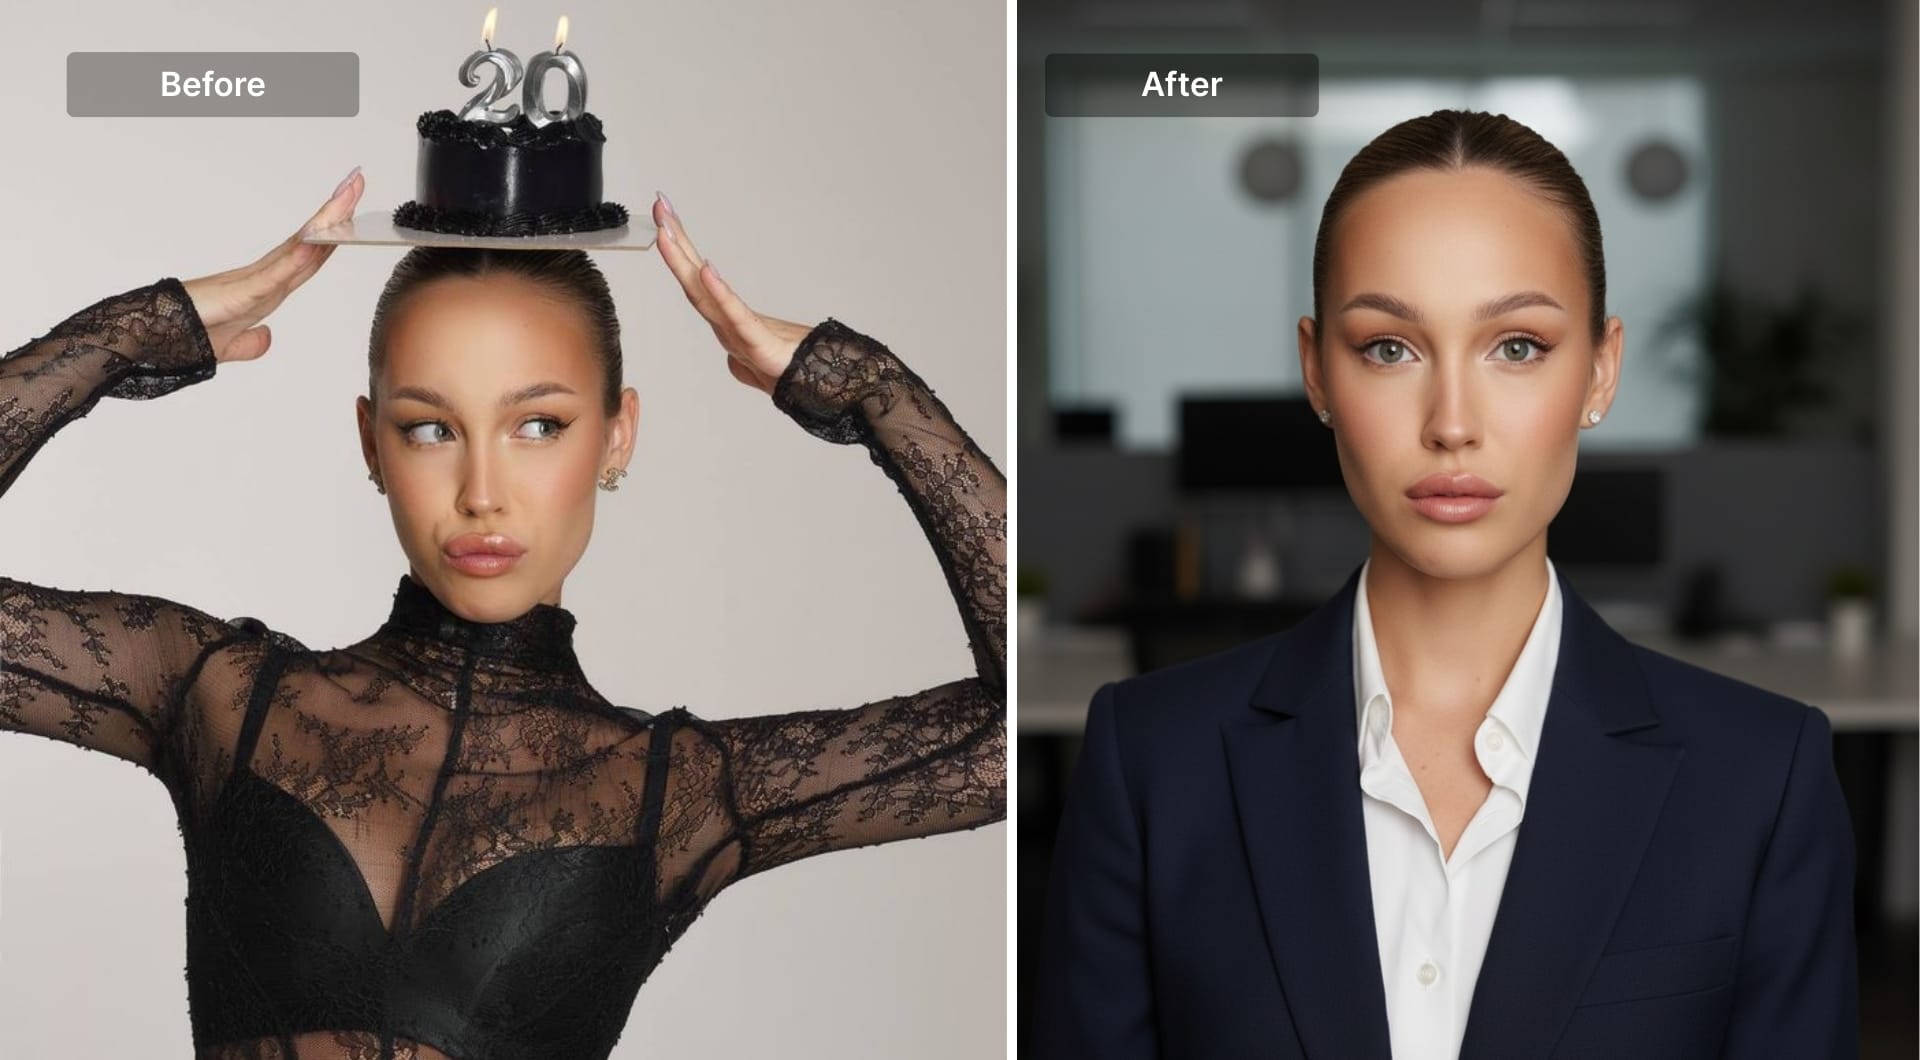
"Transform this into a professional LinkedIn headshot. The person should appear in business attire — a dark blazer or suit jacket with a collared shirt. Eyes should be open, looking directly at the camera with a natural, confident expression. Replace the background with a softly blurred office interior. Light the face evenly with soft front studio lighting. Retouch any blemishes subtly. Keep the person's facial features, bone structure, and likeness exactly as they are."
For a clean, minimal headshot:
"Convert this into a professional portrait for a company website. Dress the person in smart business-casual attire — a neat collared shirt or blouse in a neutral color. Eyes open, natural forward-facing expression. Set the background to a plain, slightly blurred light grey or off-white. Apply even, flattering frontal lighting. Remove any distracting elements. Preserve the person's exact facial features and identity."
For a warmer, approachable look:
"Edit this into a professional headshot with a warm, approachable feel — suitable for a consultant, coach, or creative professional. The person should appear in smart-casual attire: a neat shirt, blouse, or soft-collar jacket in a warm tone. Eyes open, relaxed and natural expression with a slight smile. Use a softly blurred warm background — window light, greenery, or a neutral interior. Even out the face lighting to look like natural diffused light. Keep the person's facial features exactly as they are."
A few things to keep in mind when writing your prompt:
- Be specific about the background rather than just saying "professional." "Plain grey" and "blurred office" give the AI different cues.
- Explicitly say "keep my face exactly as it is" or "preserve my facial features." This anchors the edit to your actual photo.
- Shorter prompts focused on one task at a time tend to produce cleaner results than long, multi-part instructions.
Step 3: Review and iterate
The AI returns a 1MP draft in seconds. Check if the background or clothing fit the look you want, if your face is preserved accurately or are there any artifacts or strange edges.
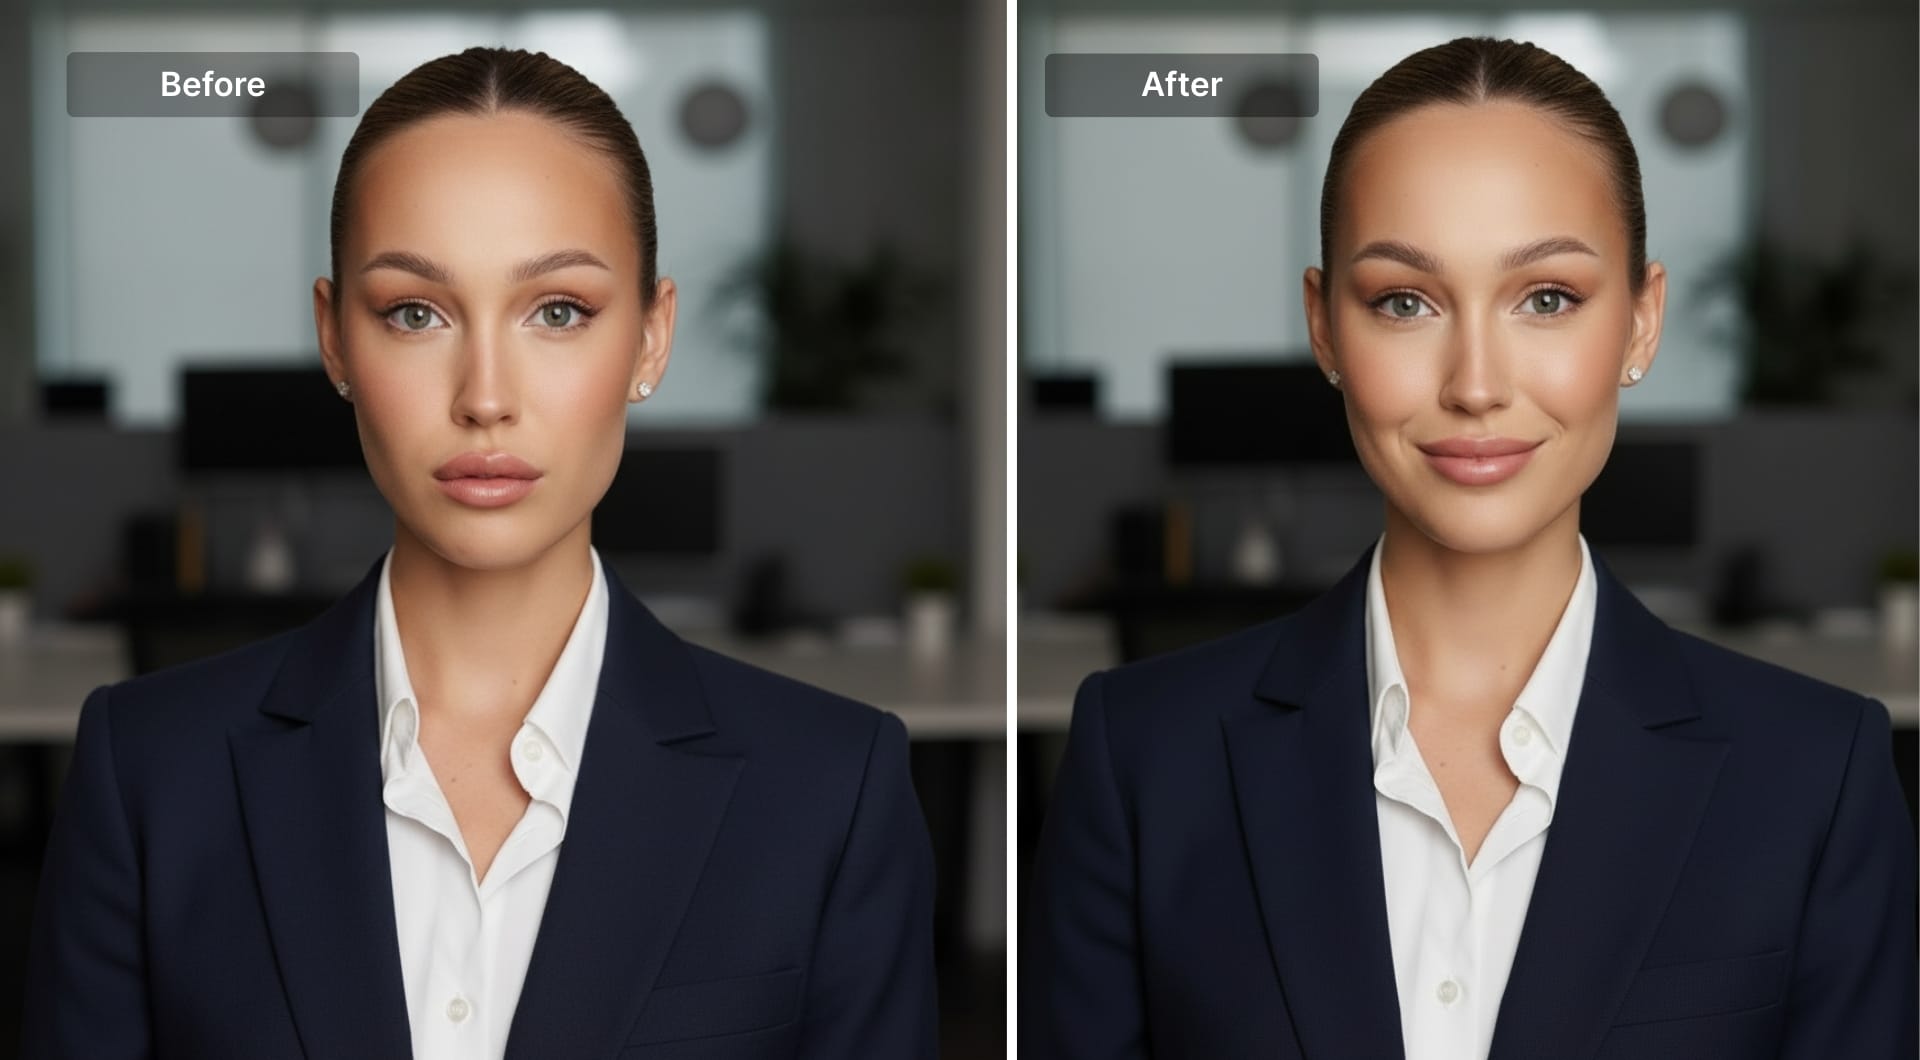
Remember that you can always type a follow-up instruction. "Make the background darker." "The lighting is too warm, cool it down." "Remove the blemish on my forehead." You can keep editing until the draft looks right.
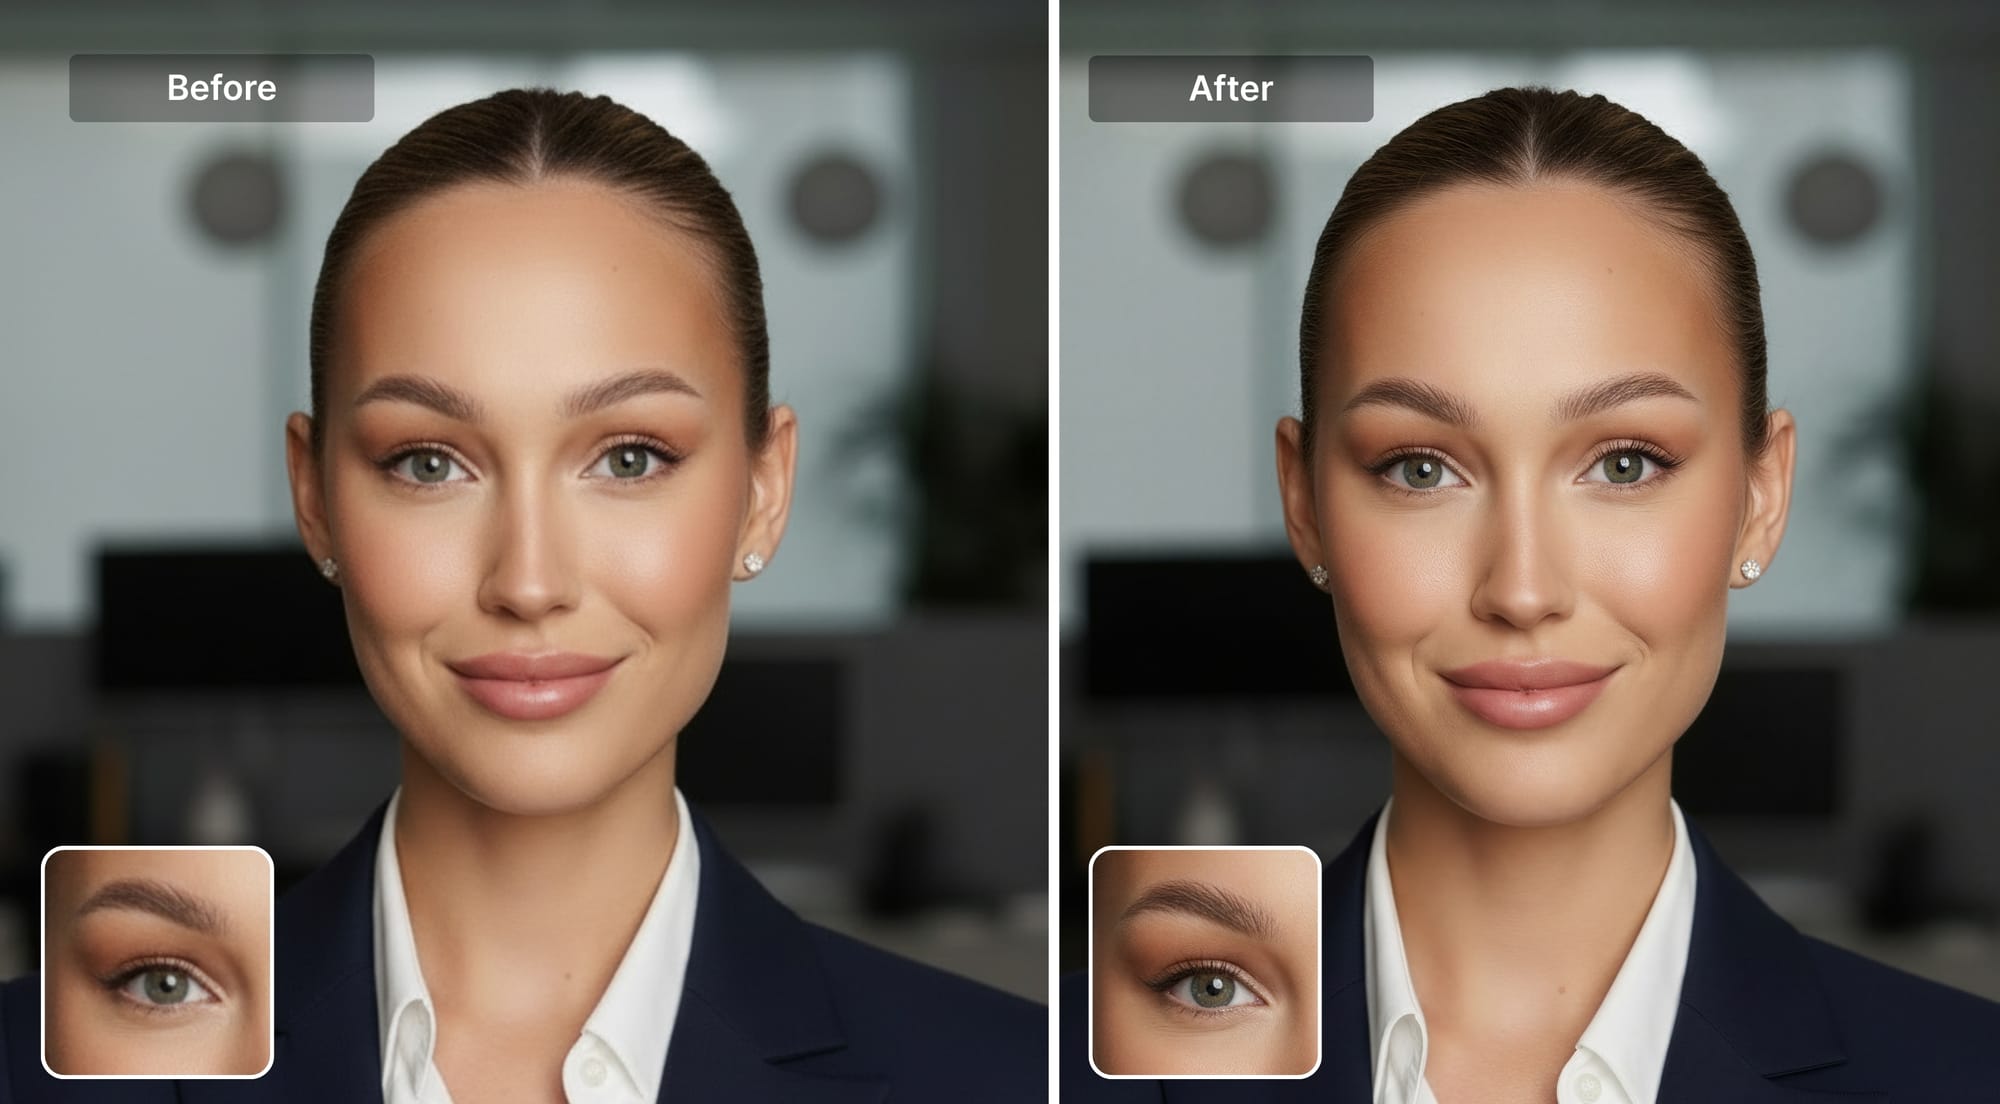
In the example below, we used a simple "Make me smile" prompt, which changed the overall mood.
Step 4: Upscale to 4K
Once the edit looks good, hit the "Upscale to 4K" button. It'll redirect you to upscaling and enhancement workspace where you'll produce a high-resolution image suitable for printing, large-format displays, or any professional context.
For headshots, the Prime upscaler is the right choice. It's built to preserve natural skin texture such as pores, fine lines, hair strands, without over-sharpening or generating artificial detail.
Here's the side-by-side comparison before and after upscaling.
If you're using the headshot for print (a speaker booklet, a conference badge, a brochure), you can set the DPI target to 300 or use the built-in print presets.
Pricing and how to get started
New users get 10 free credits on sign-up. One credit covers one edit; most typical upscales with Prime cost 1-2 credits. So you can realistically get one or two complete headshots within the free tier.
Paid plans start at $9/month for 100 credits, with unused credits rolling over month to month on personal plans. There are also one-time credit bundles if you don't want a subscription.
FAQ
Can I make a professional headshot from a selfie?
Yes. A selfie is a viable starting point as long as your face is in focus, reasonably well-lit, and the main subject of the frame. Chat Editor edits the image you upload. It can replace the background, adjust the lighting context, and clean up minor imperfections, while keeping your face as it appears in the original. If your selfie was taken in decent natural light and your face fills most of the frame, the result can closely resemble a studio portrait in many cases.
Does the AI change my face or alter how I look?
Chat Editor edits around your face, not your face itself. The underlying model is designed to preserve the subject of a photo while transforming the background, lighting environment, and surrounding context.
What resolution does the final headshot come out at?
The editing stage produces a 1MP output (approximately 1000x1000 pixels for a square crop), which is intentionally low-resolution for fast iteration. You can upscale the result to 4K which is enough for large prints, high-DPI screens, and any digital professional context.
Which upscaler should I use for a portrait?
For headshots, Prime is generally the better choice. It's built to preserve natural skin texture such as pores, fine hair detail, the subtle imperfections that make a face look real rather than digitally processed.
Can I use the headshot for LinkedIn, company websites, and resumes?Yes. Generated images are generally suitable for professional and commercial use. You can use the headshot in LinkedIn, company directories, speaker bios, author pages, conference materials, resumes, or anywhere else. LetsEnhance doesn't put watermarks on processed images on free or paid plans.
Is the editing process completely automatic, or do I need to adjust anything manually?
The entire editing workflow happens through simple prompts. You just type what you want and the AI does the rest. There are no sliders, layers, or manual selection tools. If the AI doesn't interpret your prompt the way you intended, you refine the prompt or add a follow-up instruction.
