Very frequently good photos get ruined by speckled grain, splotchy shadows, or ugly color noise. That noise appears when you push a camera sensor beyond its comfort zone: high ISO settings in low light, tiny pixels on phone cameras, or old digital files with compression artifacts.
Traditional noise reduction filters blur detail. Modern AI denoising doesn’t just blur; it reconstructs what matters while suppressing what doesn’t.
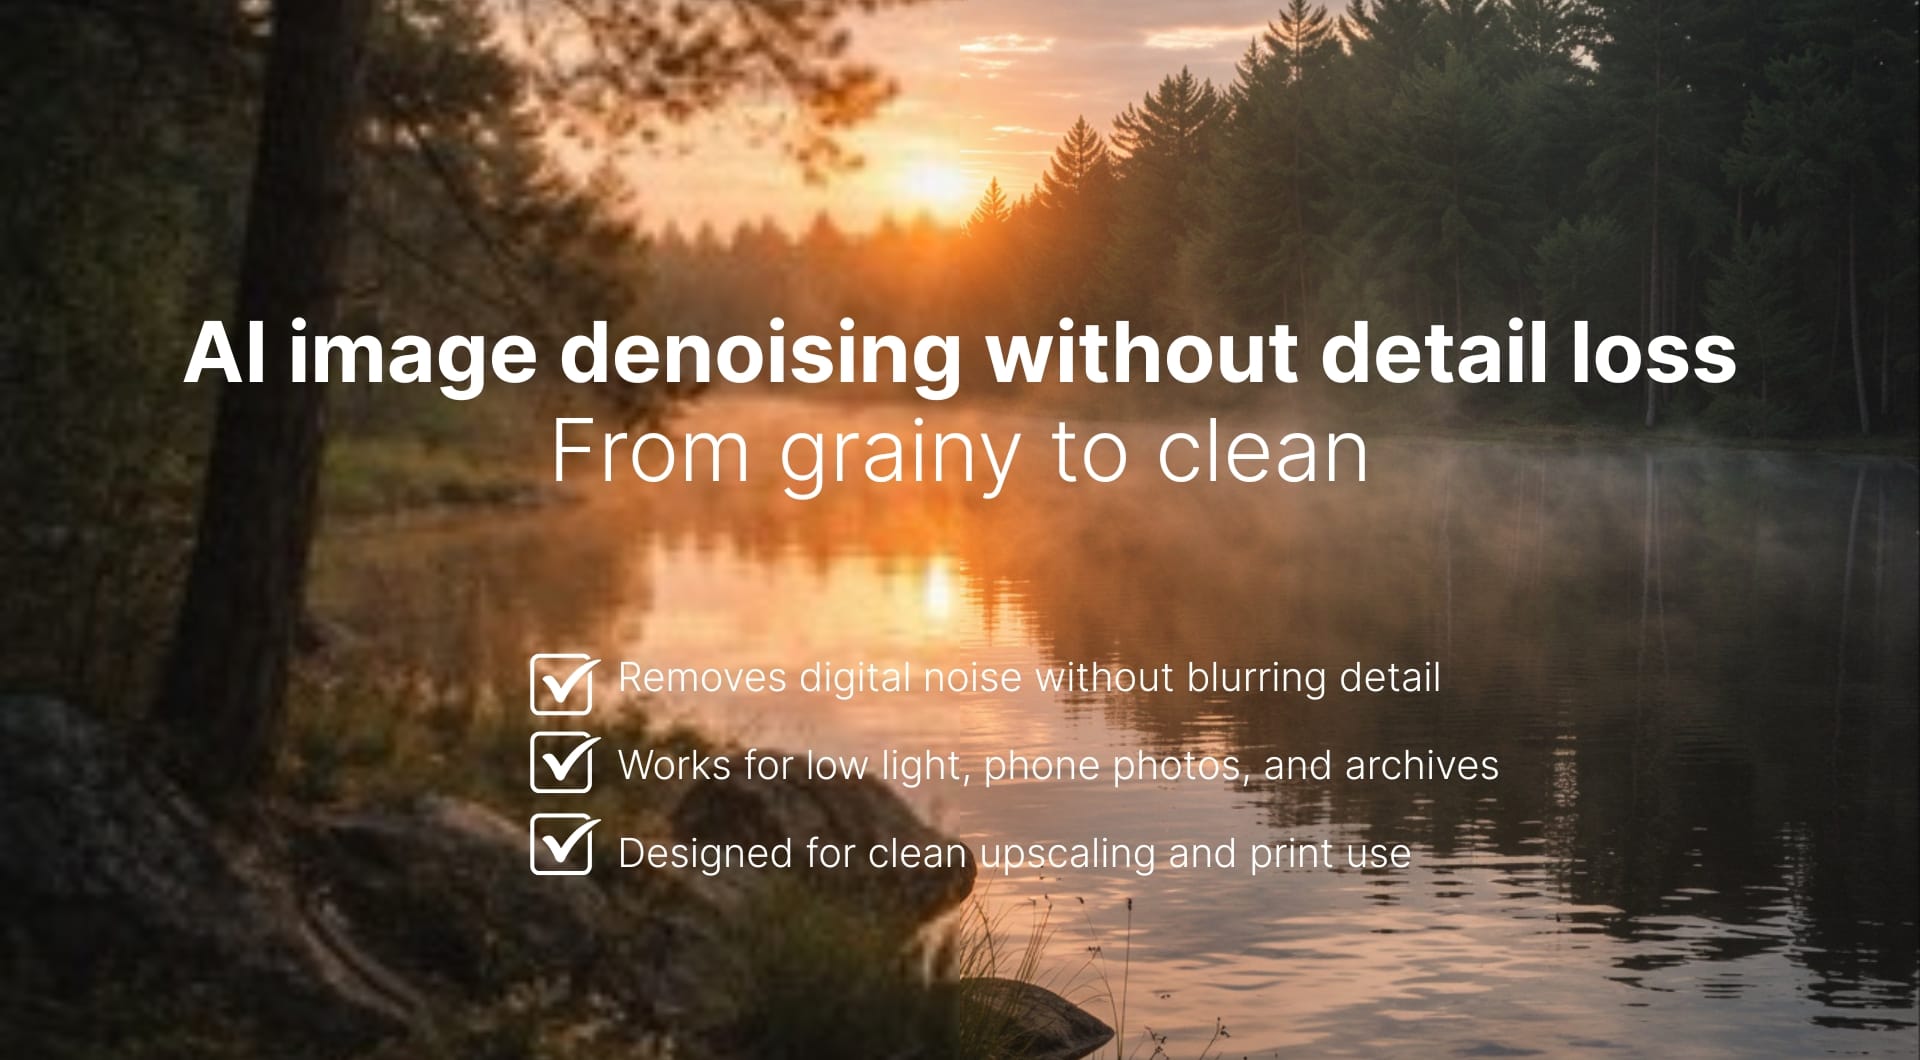
Read on to learn how AI denoising works, when it’s worth using, and how you can remove digital noise and grain with LetsEnhance.io.
What does an AI denoiser do and how does it work
AI image denoising is the process of identifying and removing unwanted visual noise such as speckled brightness, chroma (color) noise, and grain. This kind of visual noise obscures detail in a photo while leaving real edges and textures intact.
Classic denoise tools rely on local smooth filters or manual sliders; they often blur fine features because they cannot distinguish noise from detail. Modern AI denoisers are based on deep learning models trained on millions of pairs of noisy and clean images. These models learn to predict the clean signal from a corrupted one, implicitly separating random noise from underlying image structure. They do this by analyzing patterns across the entire image, not just local pixels, so they can preserve textures like hair, fabric weave, or fine print.
In practice this means an AI denoiser first “reads” the image, estimates what pixel variation is noise, and then reconstructs the pixel values to represent cleaner data. Unlike a blur filter that simply averages neighbors, AI models understand context: where edges should stay sharp, where smooth gradients belong, and what level of grain is natural versus distracting. This leads to results that look clean but still detailed, not waxy or over-smoothed.
With LetsEnhance’s, you can choose AI models (Prime, Strong or Ultra) and pair them with the Light AI enhancer to reduce color noise and restore clarity across shadows and highlights.
When should you use AI image denoising
AI image denoising is most useful when noise interferes with clarity, texture, or downstream use. Not every image needs it, but in the scenarios below, removing digital noise early prevents quality loss later. The common goal across all cases is the same: reduce unwanted grain while preserving real image information.
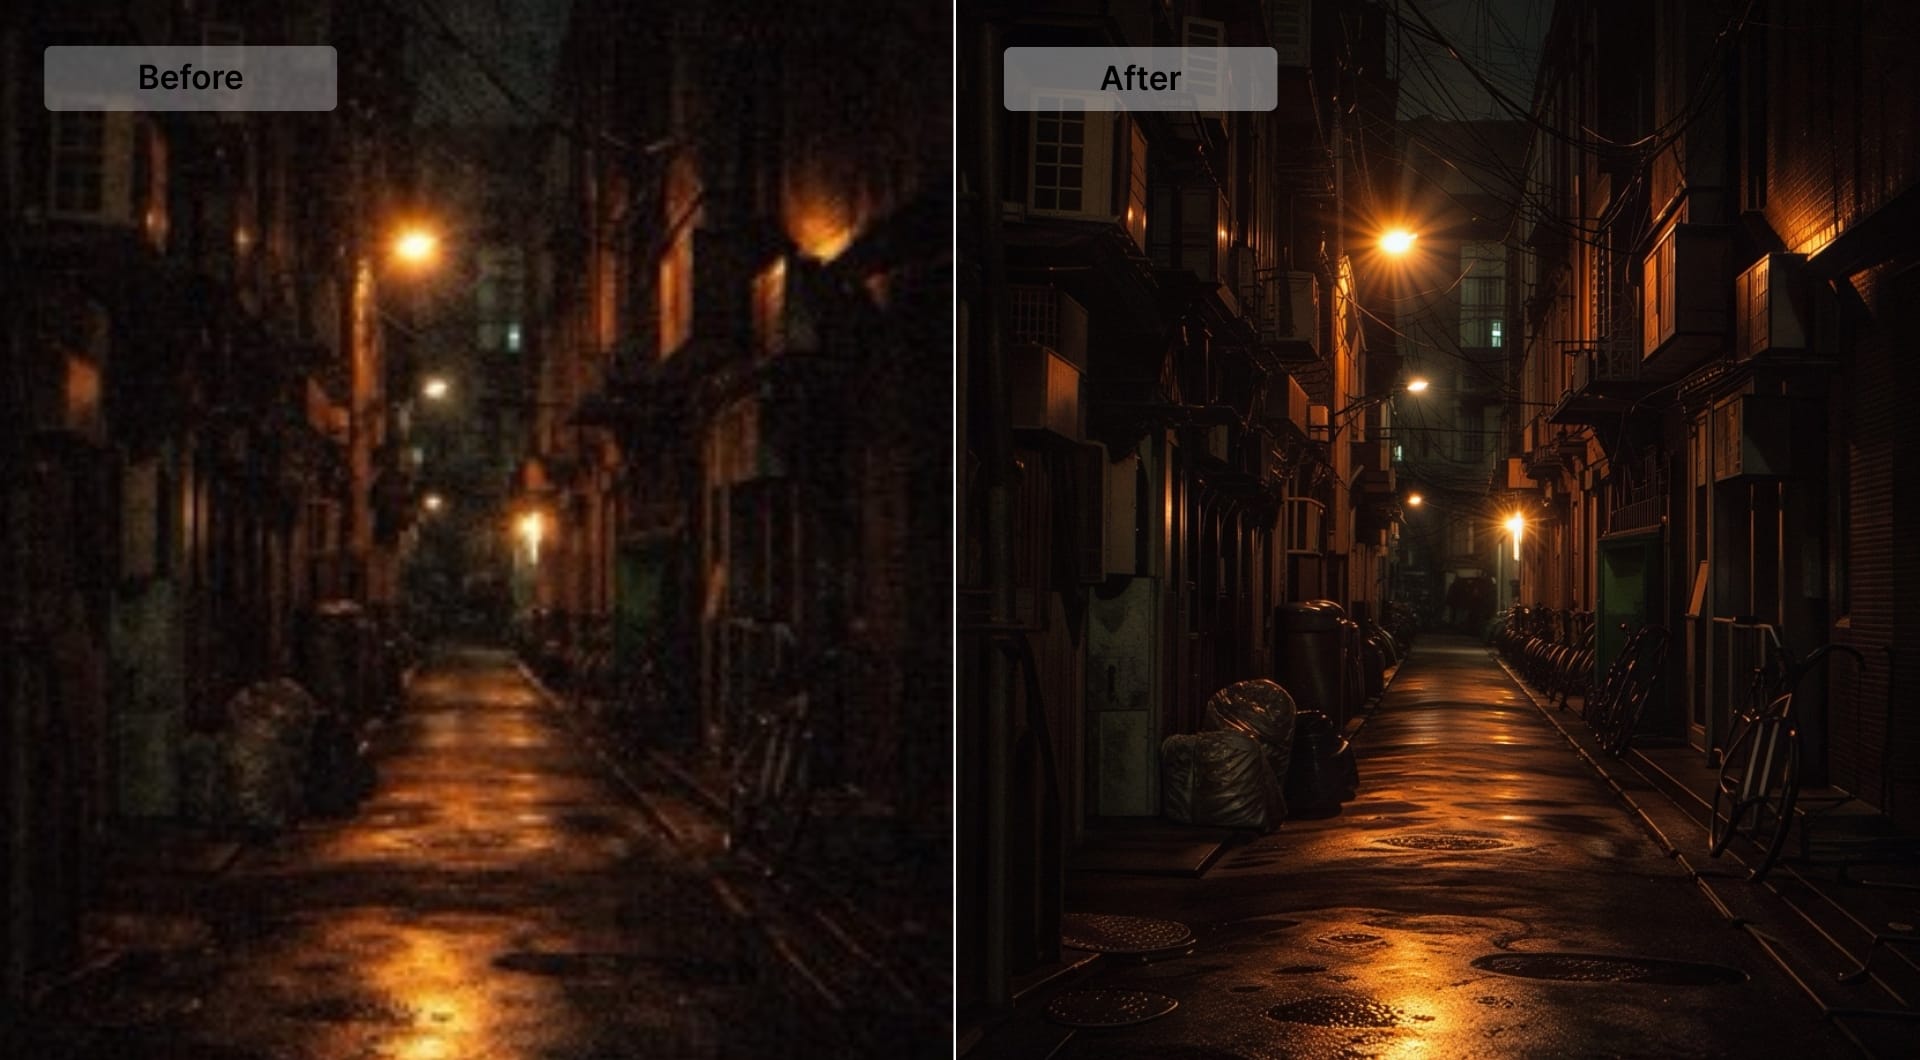
Low light photography
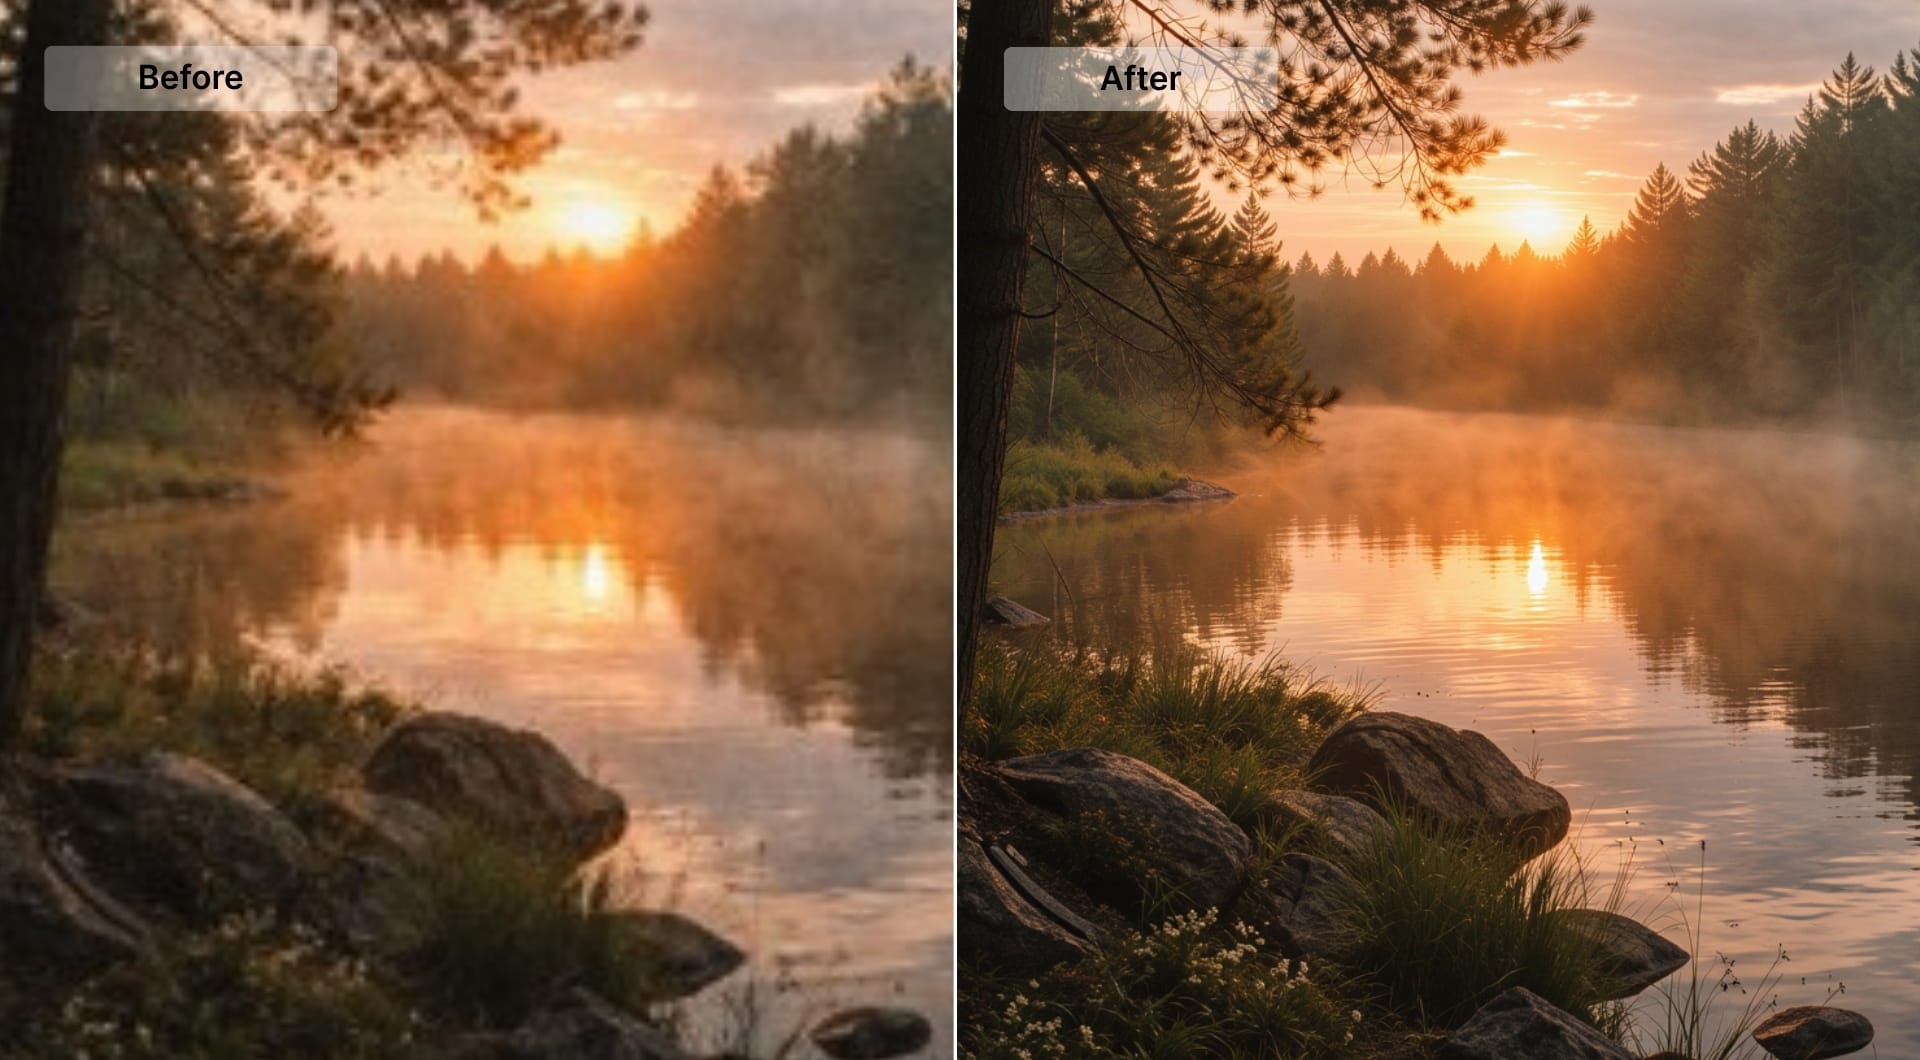
Photos taken at night, indoors, or in challenging lighting often require high ISO settings, which introduce noise. Denoising can make a nightscape or event shot look clean while preserving stars, lights, and textures.
In the example below, we used the Prime model to clean a high-ISO night photo. It suppresses noise while keeping edges, light reflections, and surface detail intact. Notice how the shadow becomes smoother without flattening the scene or softening highlights.
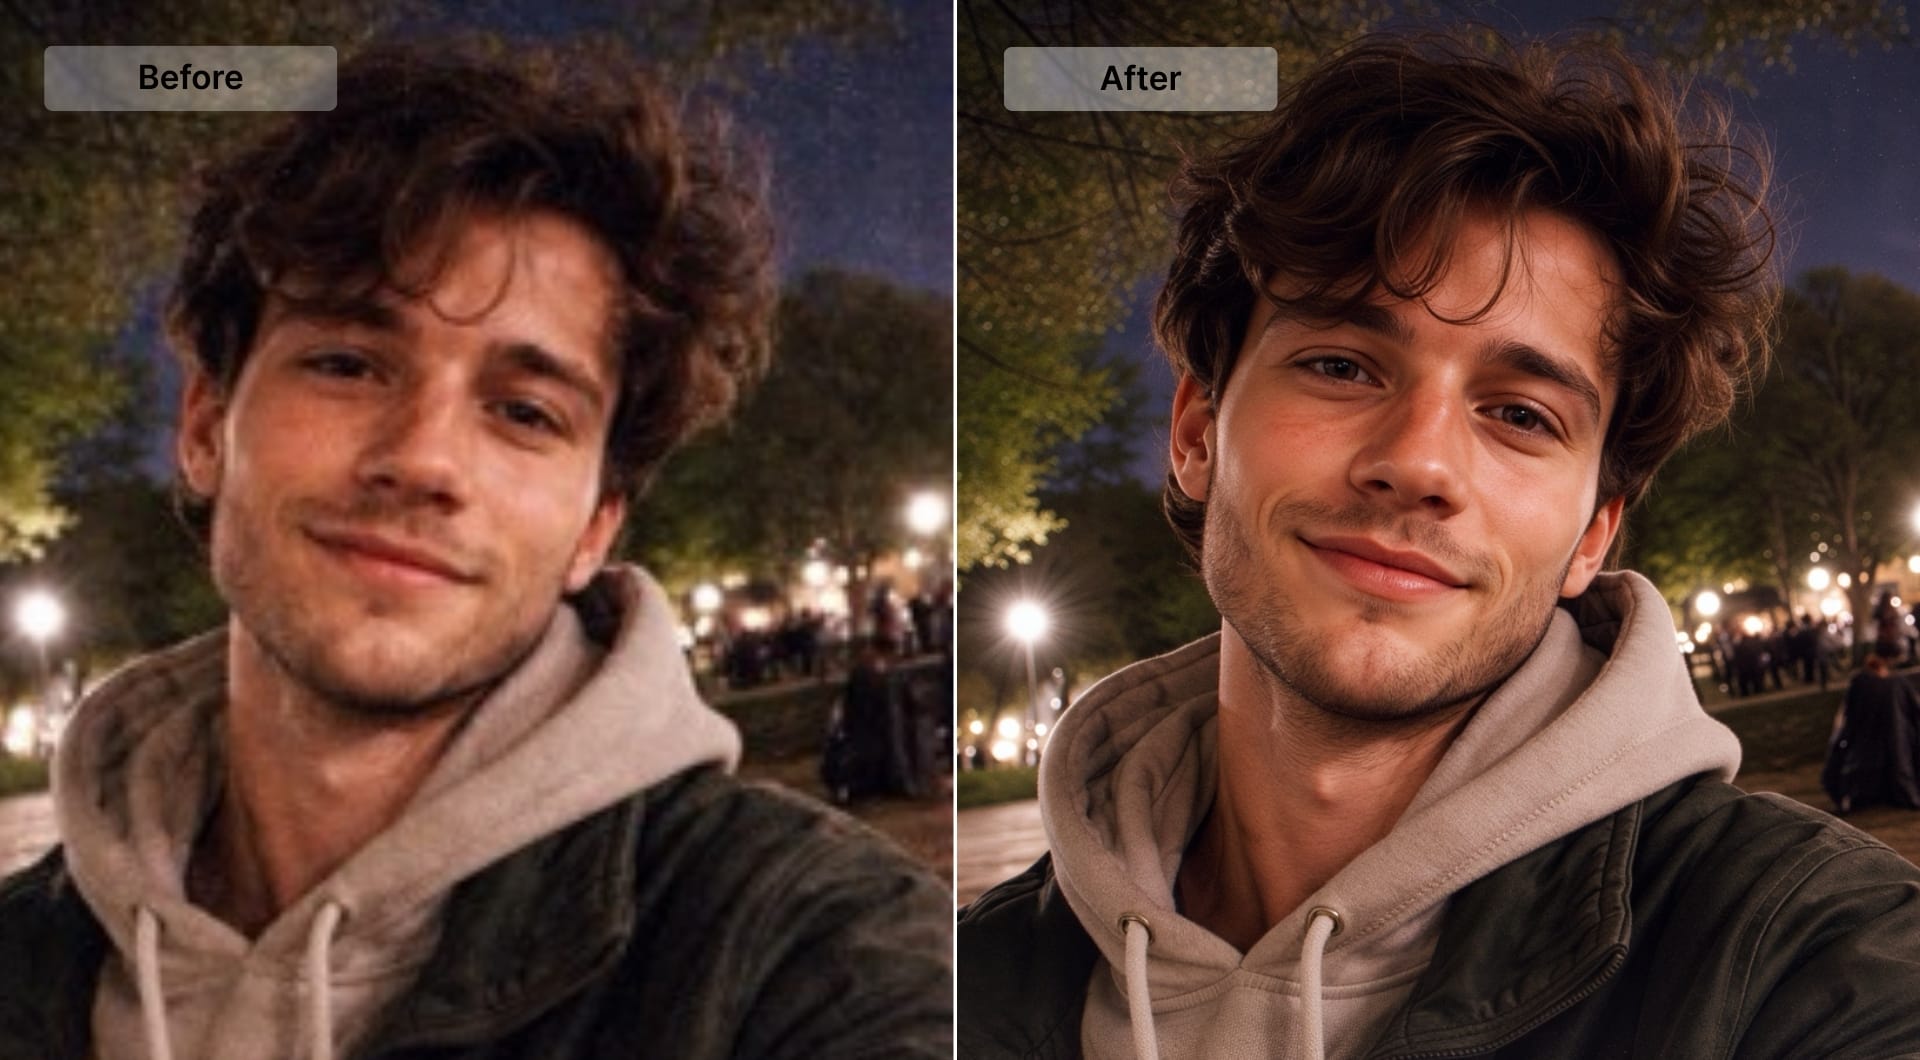
Smartphone shots and snapshots
Phone cameras rely on small sensors and aggressive in-camera processing. As a result, images taken indoors or at night often show color speckles in shadows and uneven grain across skin tones. These artifacts become more noticeable when images are viewed on larger screens.
In the comparison below, the AI reduced chroma noise while preserving facial features, hair texture, and natural skin detail. The image looks cleaner, but not artificially smooth, which is especially important for portraits and candid shots.
Old digital archives and scans
Early digital images, scans of old prints, or compressed JPEGs often have visible grain that wasn’t in the original scene. This noise is usually baked into the file and becomes more visible when images are restored, shared, or enlarged.
Let's see how AI can denoise an archival photo before further enhancement.
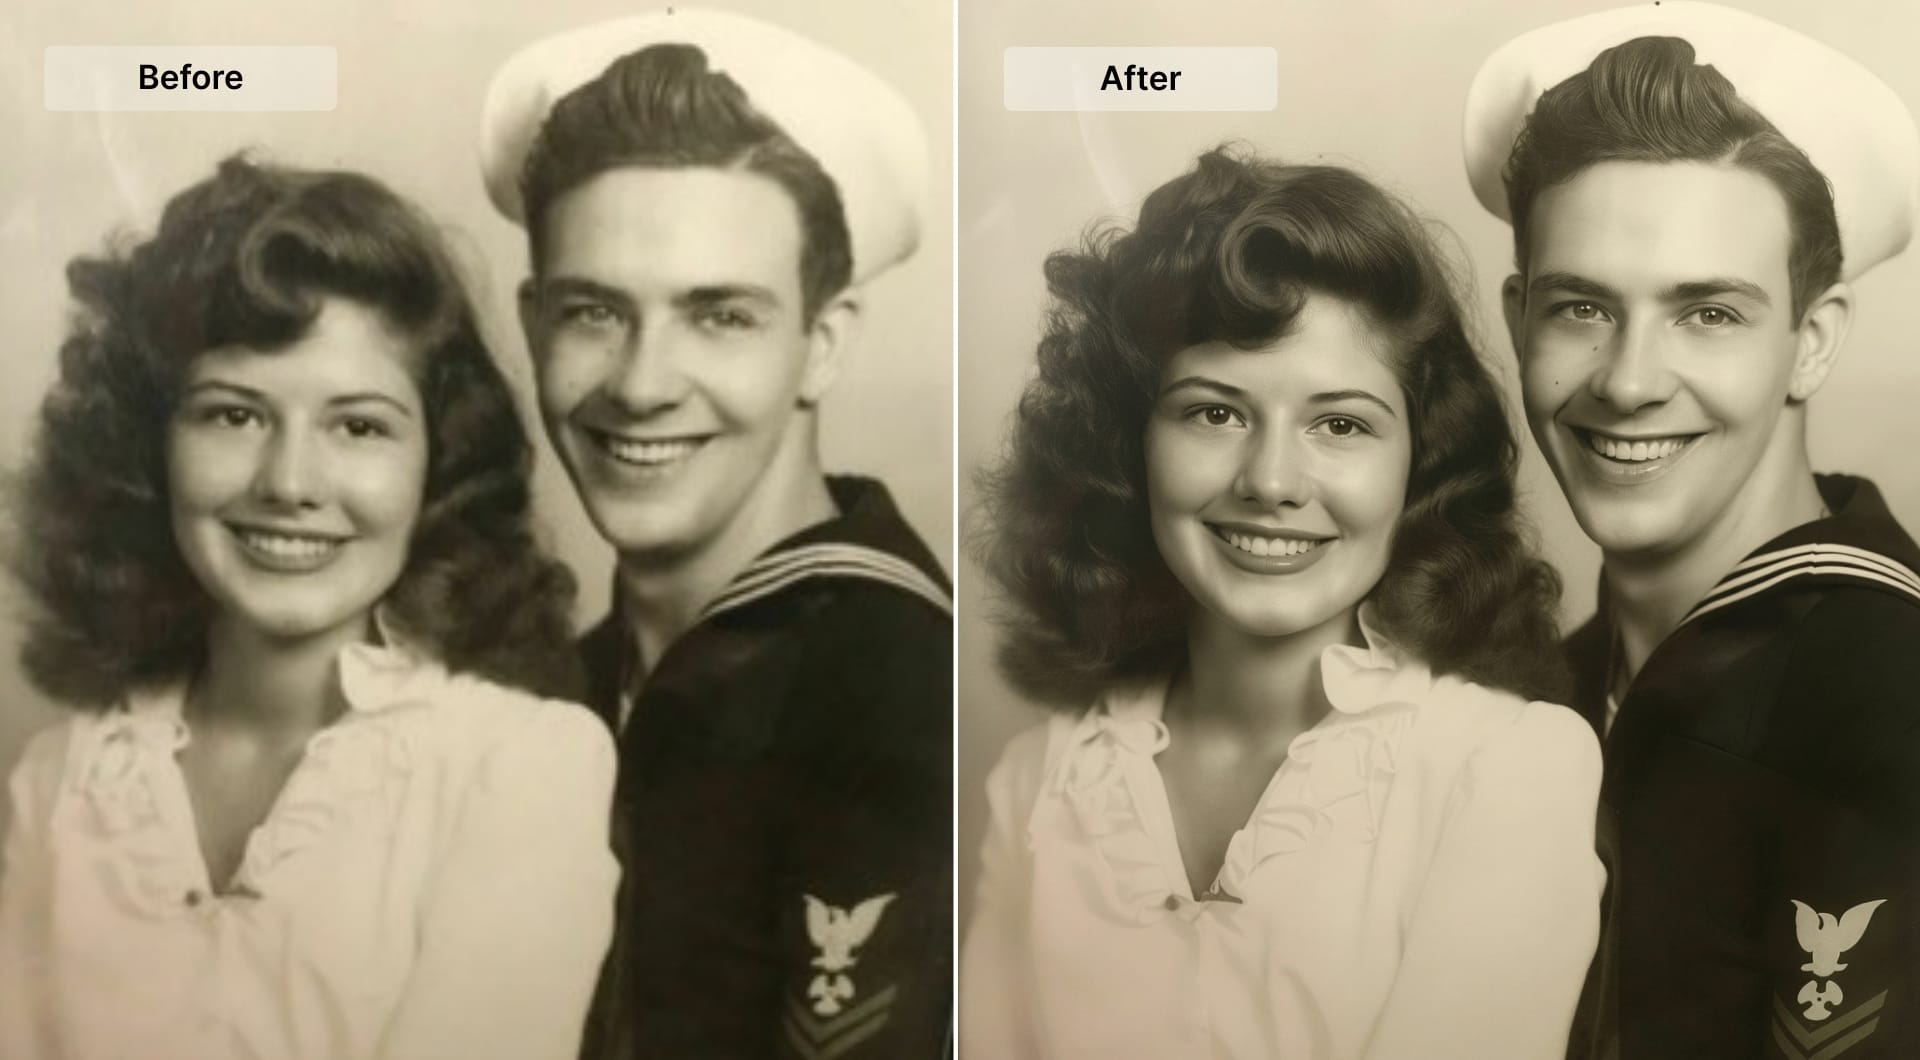
As you can see, the model removed digital grain and compression artifacts without altering facial structure or surface texture. This is critical when restoring old images, where preserving identity and natural detail matters more than aggressive smoothing.
Pre-print and ecommerce assets
Noise is easy to miss at small sizes, then it becomes obvious the moment you upscale, crop, or send an image to print. Grain that looked “fine” on a product page turns into dirty gradients, unstable shadows, and rough-looking surfaces in catalogs, lookbooks, packaging mockups, and large-format prints.
Denoising before upscaling or print preparation prevents that amplification step from locking artifacts into the final output. The key is to remove sensor noise and compression noise while preserving edge definition and surface texture, so materials like fabric, leather, and metal still look real. If the image will be reused across multiple sizes or channels, denoise early. It reduces retouching later and keeps the asset consistent.
Step by step guide for denoise images with LetsEnhance
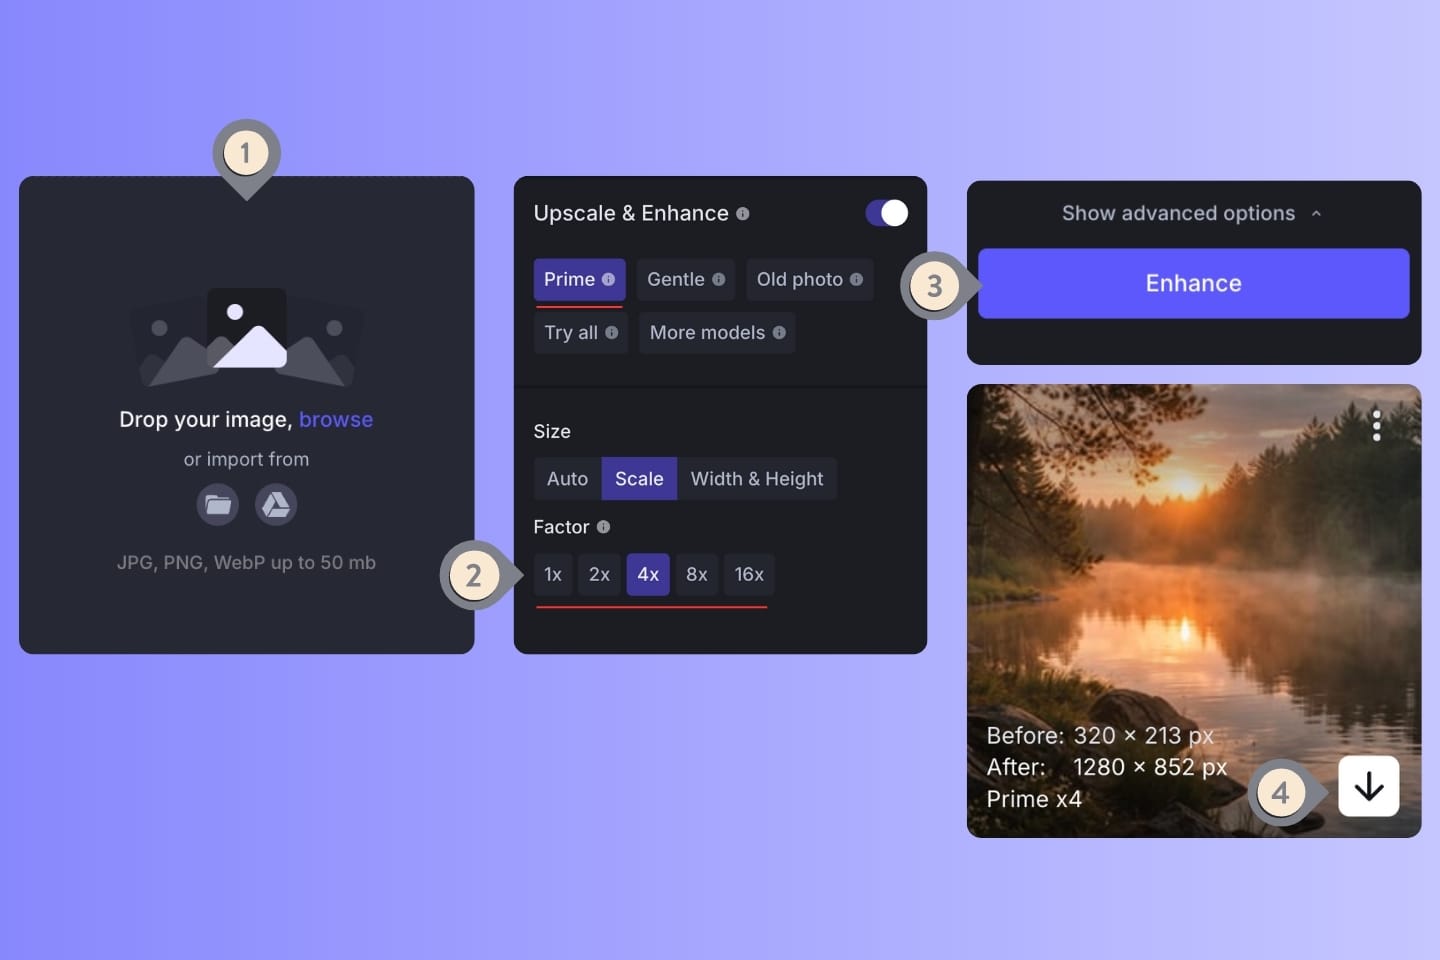
Step 1: open the workspace
If you have an account, open the enhancer workspace. If you don't, create one and get 10 free credits to start testing the tool.
Step 2: upload your noisy photo
Drag and drop the image you want to clean. Supported formats include JPG, PNG, and WebP. Uploading is simple and works entirely in your browser.
Step 3: choose the right model and strength
LetsEnhance lets you pick from different AI enhancement modes. For noise reduction, you can pick the newest Prime, Strong or Ultra models. If you also need to balance out the colors, pair it with Light AI feautre.
These models are trained to detect and suppress digital grain and color noise while keeping edges and meaningful texture sharp. The system works automatically and there are no technical sliders required.
Step 3: let the AI process the image
Once you hit Enhance, the AI model runs its analysis. You’ll see the noisy input transformed into a cleaner output. The underlying neural network distinguishes between noise and legitimate detail, mitigating grain while preserving small features.
Step 4: download your result
After processing, simply download your denoised photo. It’s now cleaner, sharper, and ready for web, print, or professional use. You can also prepare it for large prints by exporting at 300+ DPI or using built-in printing presets.
Getting started with a free trial
If you haven’t used LetsEnhance yet, you can create an account and start with 10 free credits. These credits let you test noise removal, upscaling, and other enhancement operations in real-world photos before committing to a plan. Whether you’re improving old family photos or preparing ecommerce visuals, this trial gives you a low-risk way to evaluate denoising quality.
FAQ
What exactly causes digital noise in photos?
Digital noise appears when a camera sensor amplifies its signal, typically at high ISO settings in low light. The result is random variation in brightness and color across pixels. It also occurs in long exposures or small sensors like those in phones. AI denoising doesn’t guess at what pixels “should be”; it learns to infer clean structure from millions of examples, separating noise from real image content.
Is AI denoising the same as sharpening or upscaling?
No. Denoising suppresses random speckles and color distortion. Sharpening (like an image sharpener) reinforces edges and detail contrast. Upscaling increases resolution. They are distinct operations but often used together in a workflow: denoise first, then sharpen and upscale for large output.
Will AI denoising remove fine detail like hair or fabric texture?
Good AI denoisers are trained to preserve legitimate texture patterns and only suppress noise. In real practice you may notice some softening if the noise level is extreme, but AI models like Prime inside LetsEnhance maintain fine detail while eliminating distracting grain.
Can I batch denoise many photos at once?
Yes. LetsEnhance supports batch processing. You can upload 20 images and run the denoise workflow on all of them, which is a huge time-saver for photographers and businesses with large image sets.
How does AI denoising compare to traditional noise reduction in software like Lightroom?
Traditional tools rely on sliders and manual adjustments. AI denoisers automate this by evaluating the entire image and making context-aware decisions. Lightroom and Topaz offer precise controls and pro workflows, but AI tools like LetsEnhance deliver strong results with fewer steps and no technical adjustments. If you're curious to learn about the best tools for image noise reduction, check out this article.
Will denoising make my photo look unnatural?
If over-applied, any noise reduction can make an image look flat. Modern AI models balance suppression with texture preservation, avoiding the waxy, plastic look typical of older denoise filters. Choosing the right strength setting helps maintain a natural appearance.
Does denoising work on portraits?
Yes. Portraits often suffer from color noise in shadows and skin tones. AI denoising reduces this noise while keeping eyes, hair strands, and other facial features sharp.
Can AI denoising remove compression artifacts?
Yes. Many AI models also reduce blocky compression artifacts from JPEGs, smoothing transitions while conserving detail. This is particularly useful for web photos that have been compressed multiple times.
What file formats are supported?
Common formats like JPG, PNG, and WebP are supported in the LetsEnhance interface. For best results, start with the highest quality original available.
