
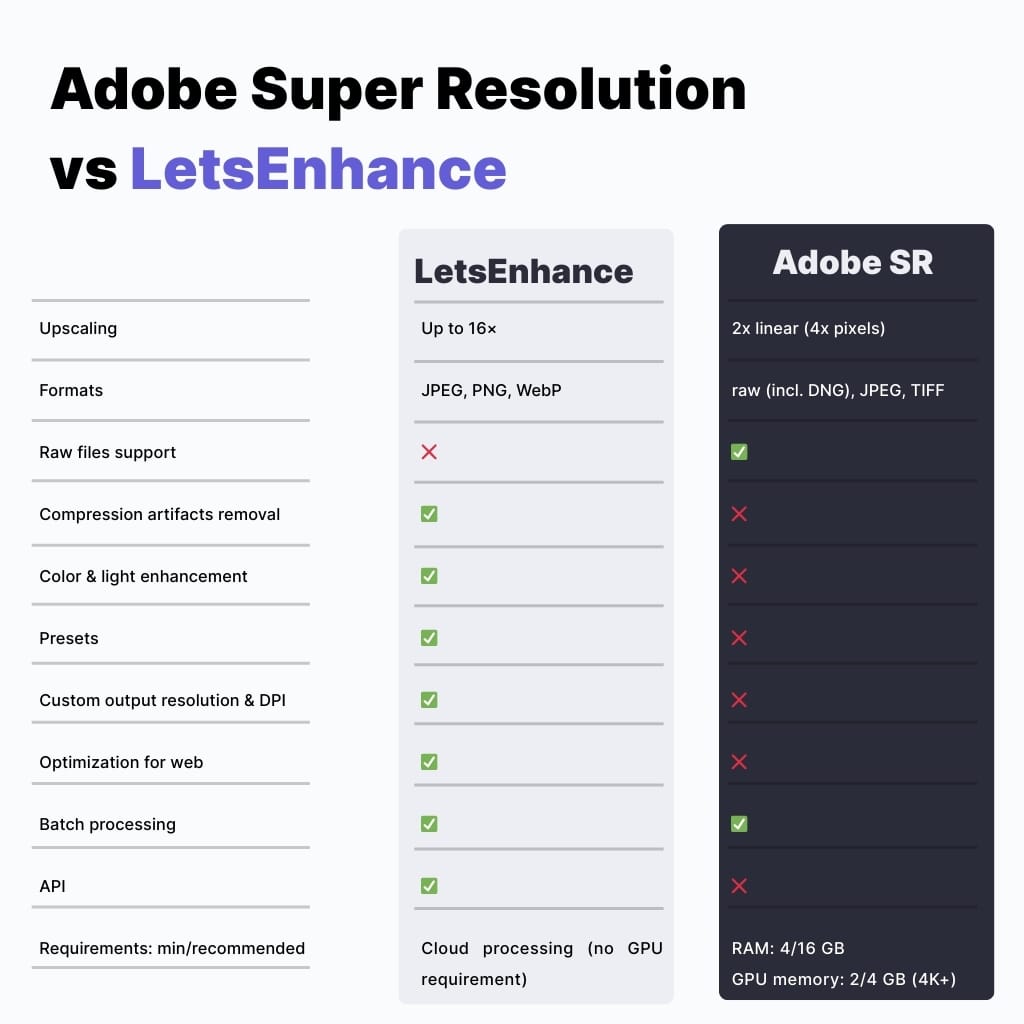
Both Photoshop’s Super Resolution and LetsEnhance aim at upscaling images while maintaining or even improving quality. Both are AI-based, but they work differently.
Adobe Super Resolution is a 2× linear upscaler built into Lightroom and Camera Raw. LetsEnhance is a cloud-based AI upscaler that goes up to 16x, clears compression artifacts, and exports print-ready files with DPI presets. The right choice depends on your source files and output requirements.
Below we cover pros & cons and side-by-side comparison created with each tool. Read through to explore more!
Key takeaways
- Adobe Super Resolution: best when you start from raw (or clean JPEG/TIFF) and want a fast 2× linear upscale inside an Adobe workflow. It creates an Enhanced DNG and leans on your GPU.
- LetsEnhance: best when your input is small, compressed, or user-generated, or when you need up to 16x, print presets and DPI targeting, or batch/API processing.
- If you need automation at scale (marketplaces, print-on-demand, catalog pipelines), check out Claid.ai for API and custom workflows. It's built by the same technology and same team as LetsEnhance.
Adobe Super Resolution
Super Resolution is part of Adobe’s “Enhance” family. Its defining characteristic is simple and strict:
- 2× linear resolution (2× width and 2× height), which equals 4× pixel count.
- Supports Adobe’s raw enhancement pipeline and also lists JPEG and TIFF among supported types.
- Creates an Enhanced DNG (a new file), and you generally do not “stack” Enhance on top of Enhance.
- Runs locally and heavily uses the GPU.
Note that it's not a full “repair” tool for messy inputs. If the source is heavily compressed, noisy, or riddled with artifacts, doubling the resolution can also make the defects easier to see.
Pros
- Fits the Adobe editing loop. No context switching if you already live in Lightroom/Camera Raw.
- Works with raw file formats
- Predictable output: always 2× linear, always an Enhanced DNG.
- Local processing can be preferable for sensitive shoots (client privacy, offline work).
Cons
- It offers a fixed scale. If you need 3×, 4×, or print-specific dimensions, you do extra steps elsewhere.
- Performance depends on your hardware. Adobe explicitly notes Enhance is GPU-heavy and documents GPU requirements in system requirement pages.
- Doesn’t support PNG, converts any file to DNG, which can add storage and catalog overhead.
- Not designed to handle small & compressed pictures.
- Not optimized for eCommerce product images and printing.
- No API support and no automated end-to-end image processing.
- One mode, no upscaling settings.
LetsEnhance
LetsEnhance is a cloud-based upscaler that can enlarge images up to 16× without losing quality. It offers seven AI models made for different purposes: Prime for natural, high-fidelity upscaling, Gentle and Balanced for a subtle resolution boost with minimal processing, Strong and Ultra for more constructive upscaling, Old photo for damaged, faded, or archival images and Digital art for AI-generated images and illustrations. It also provides presets for printing, real estate, and eCommerce, as well as an automated end-to-end API solution. The tool is completely cloud-based, so you need a constant internet connection.
LetsEnhance offers:
- Workflow-level features that matter outside Photoshop: printing presets, 300+ DPI targeting, and export that’s meant to pass print requirements.
- Credit-based processing. 1 image = 1 credit with output up to 256 MP on personal plans and up to 500 MP on business plans.
- Batch processing, so you can upscale 20 images at once and and automation options via Claid.ai.
Pros
- Designed for low-quality inputs: low-res, compressed, and inconsistent uploads.
- Output control that maps to real deliverables: print sizing and 300 DPI workflows.
- Cloud-based. Works on any laptops and mobile devices.
- 6-month free cloud storage.
Cons
- Cloud workflow requires upload and internet access.
- No raw formats support
- Free plan limited to 10 photos
Let's see both tools in tests
In the tests below, we compare Adobe Super Resolution and LetsEnhance across five practical scenarios: animal photography, portraits, small product images, real estate photos, and printing.
Adobe Super Resolution is a fixed 2× linear upscale, while LetsEnhance can go beyond that, so for these examples we used 4× in LetsEnhance. The goal is to see what happens when you push the input harder. In each category, pay attention to three things: whether edges stay stable, whether compression artifacts get worse or cleaner, and whether textures still look plausible when enlarged.
Animal photography
Wildlife photos are a hard case because the subject is often far away and fine detail is limited by distance, motion, and noise. Upscaling helps, but it also forces the algorithm to make decisions about feather patterns, fur texture, and small edge transitions around the eyes and beak.
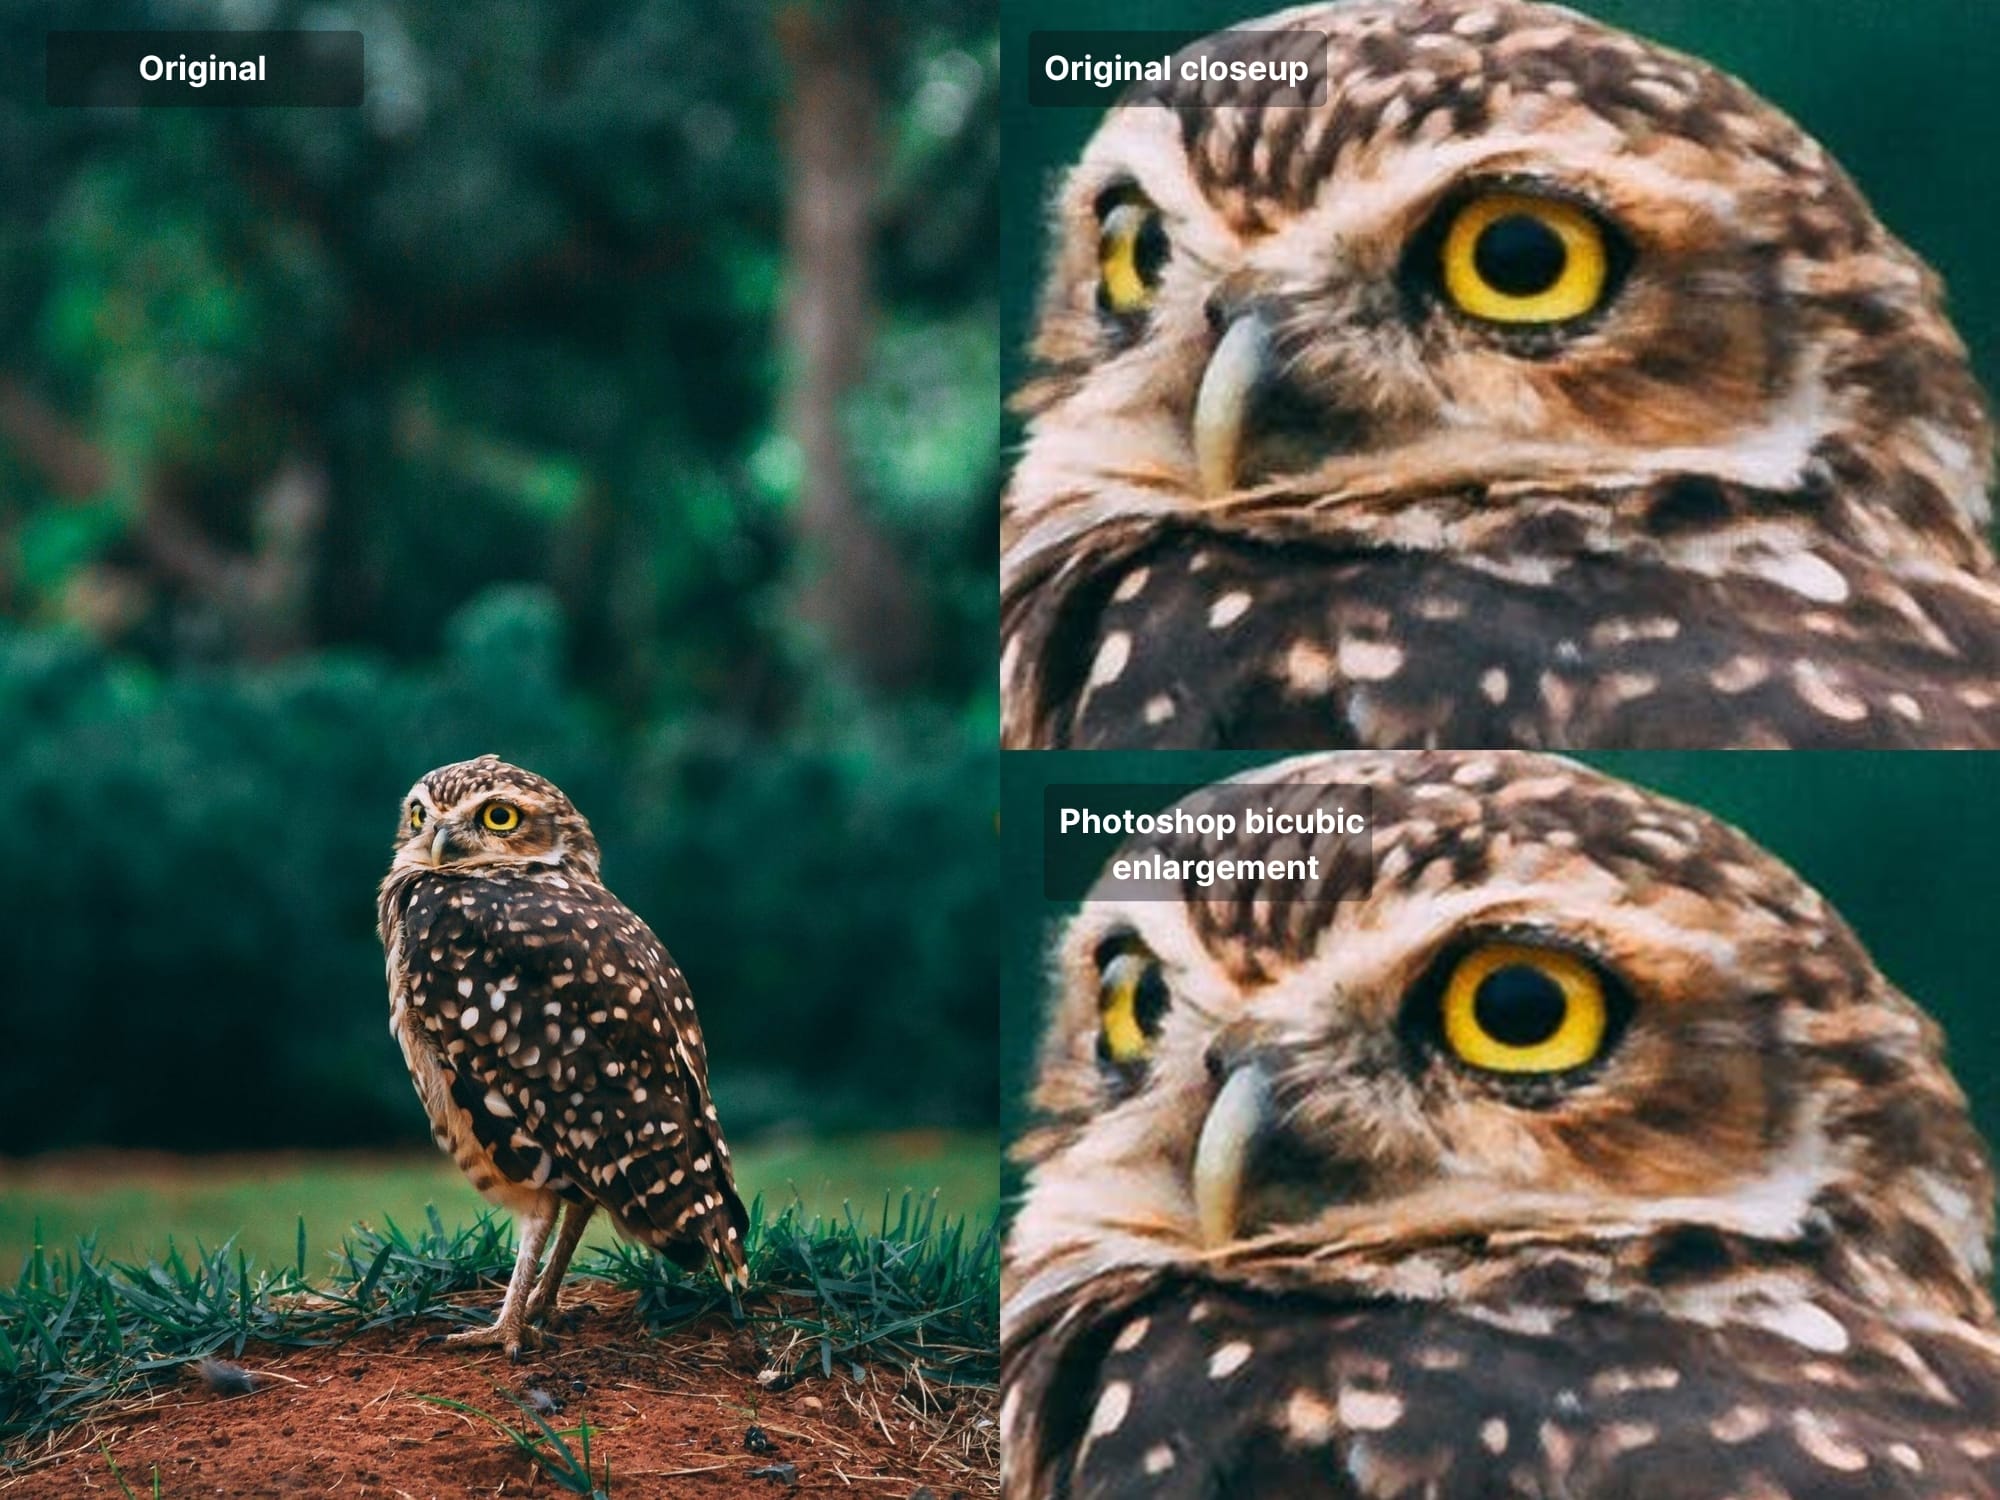
In the first test, Super Resolution produced results roughly comparable to older algorithms, like bicubic interpolation. It was one of the most advanced ways to enlarge the image before machine learning-based upsizing came into play.
Now let’s apply this new ML-based upscaling from Adobe and LetsEnhance to our image.
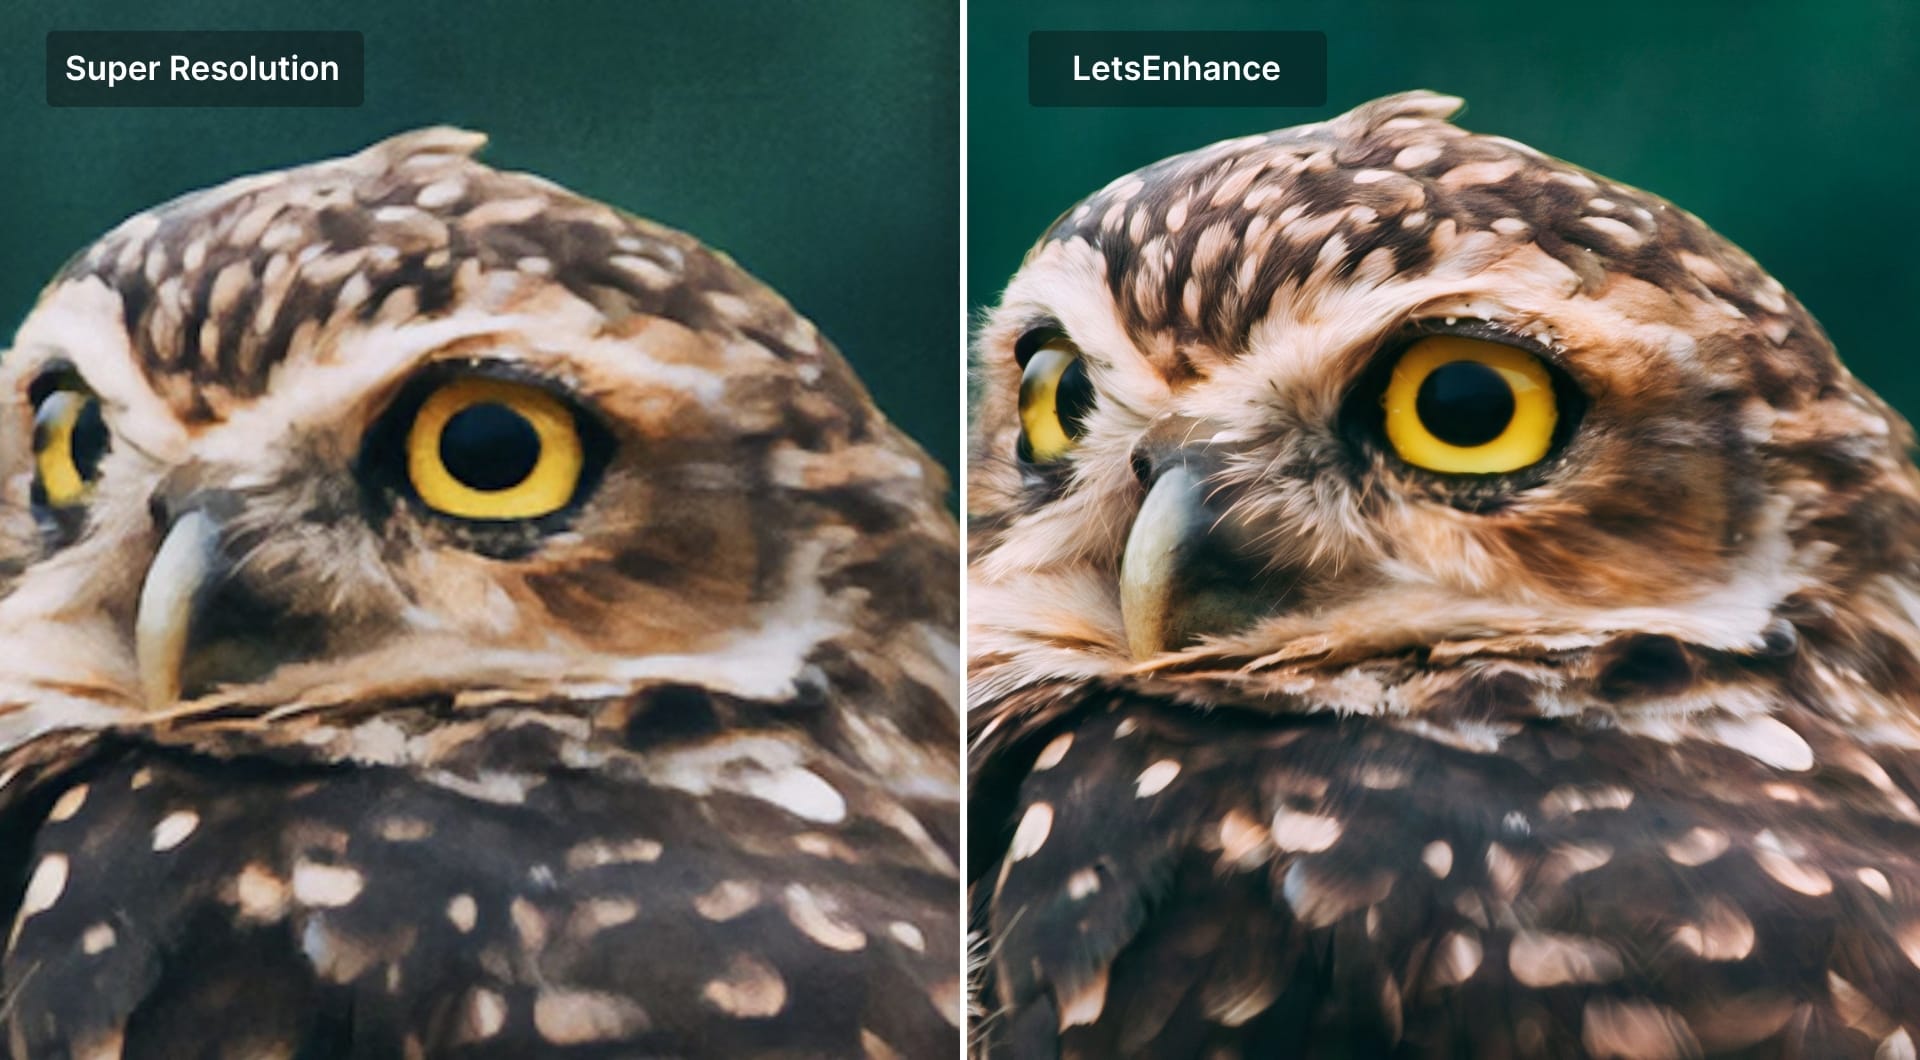
With Adobe Super Resolution, the result is usually conservative. You often get a cleaner and slightly sharper-looking image, but you do not always get meaningfully more subject detail. With LetsEnhance, the model has to do more work. When the input is decent, the best results look like a higher-resolution capture of the same moment: cleaner edges, clearer micro-contrast, and better subject separation.
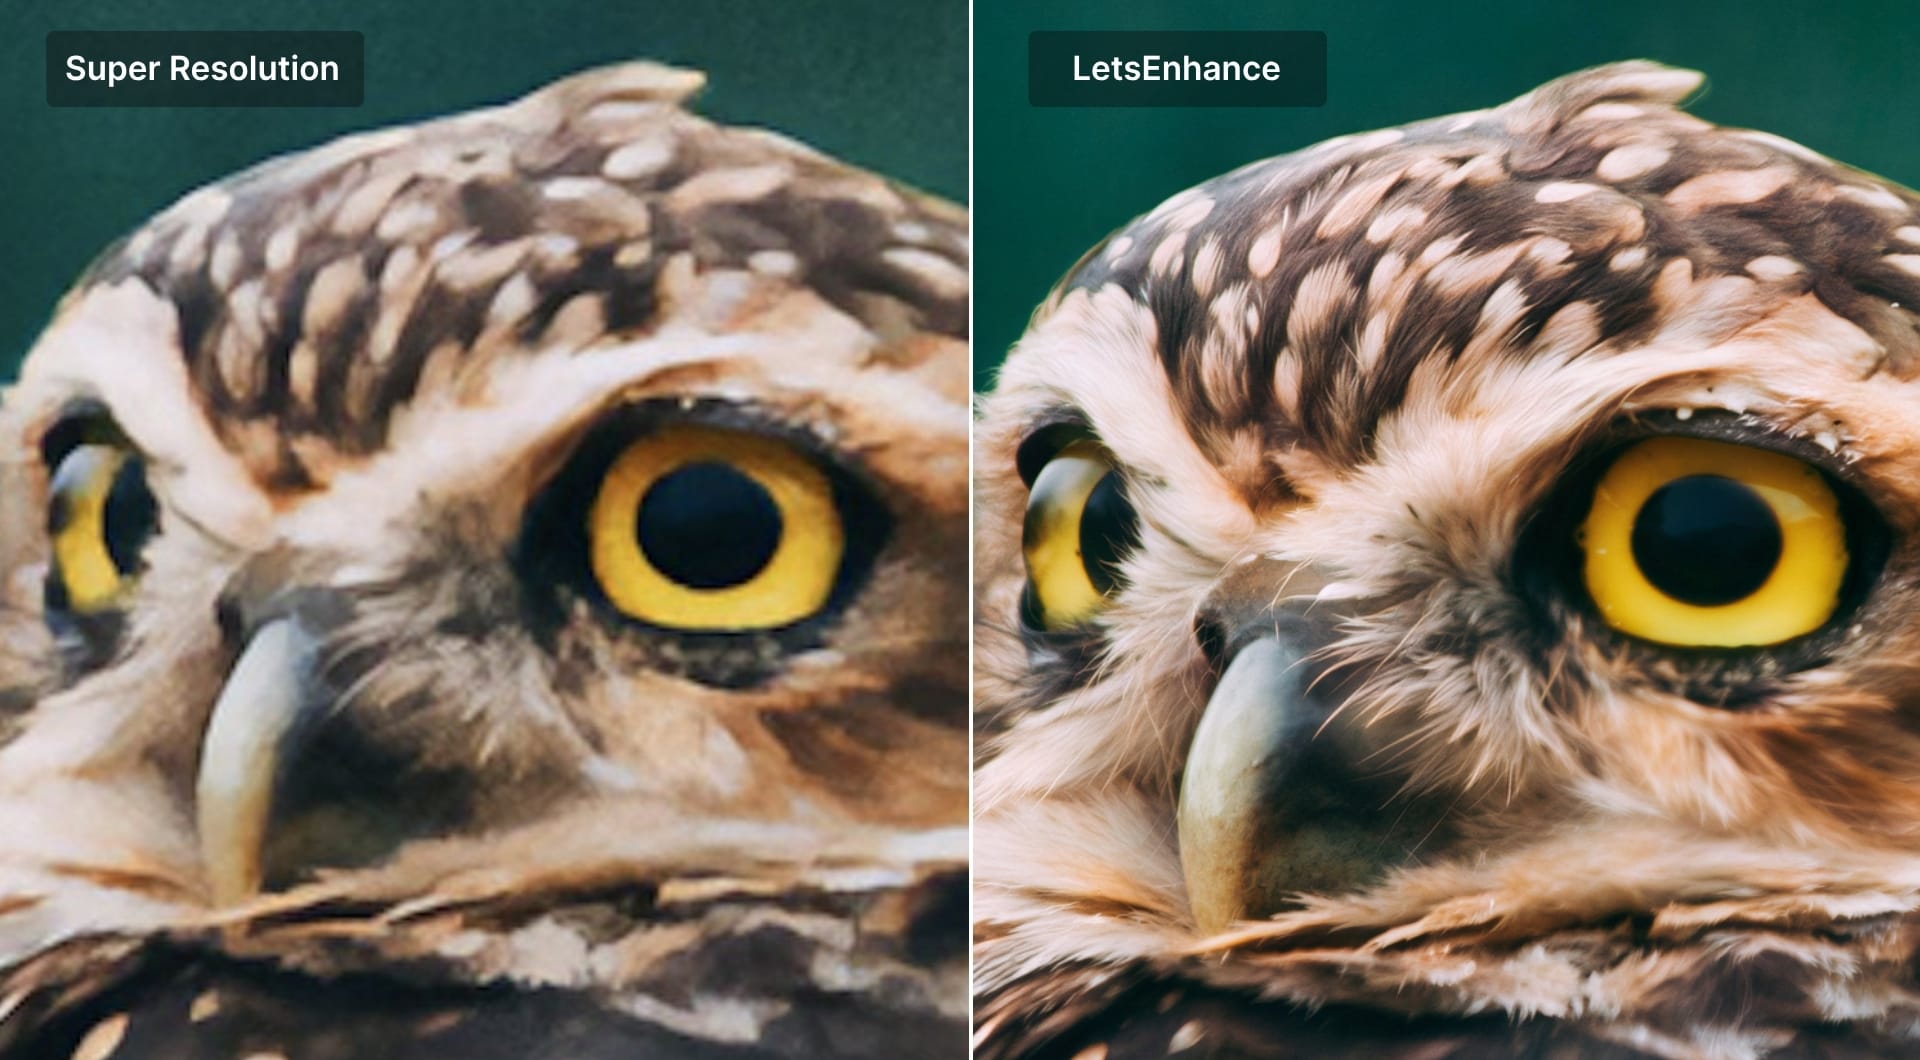
The difference becomes more distinct when we zoom in further:
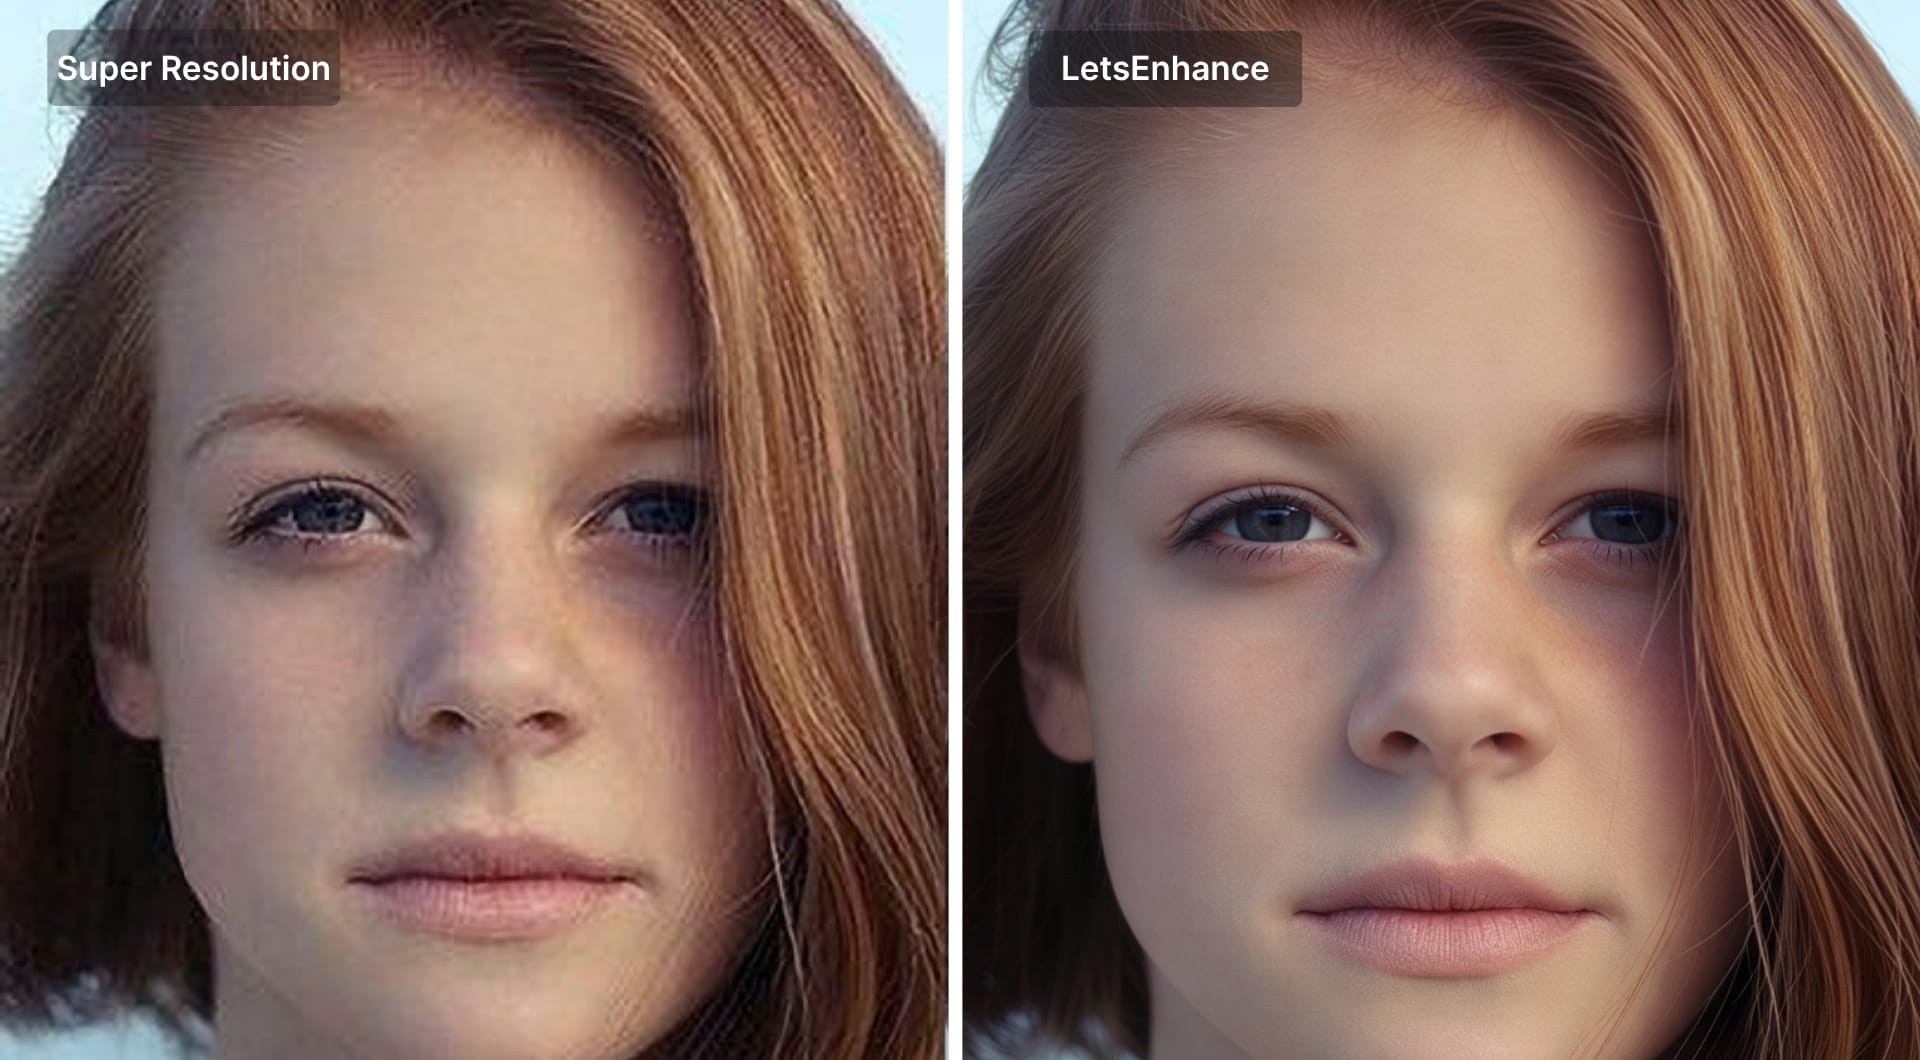
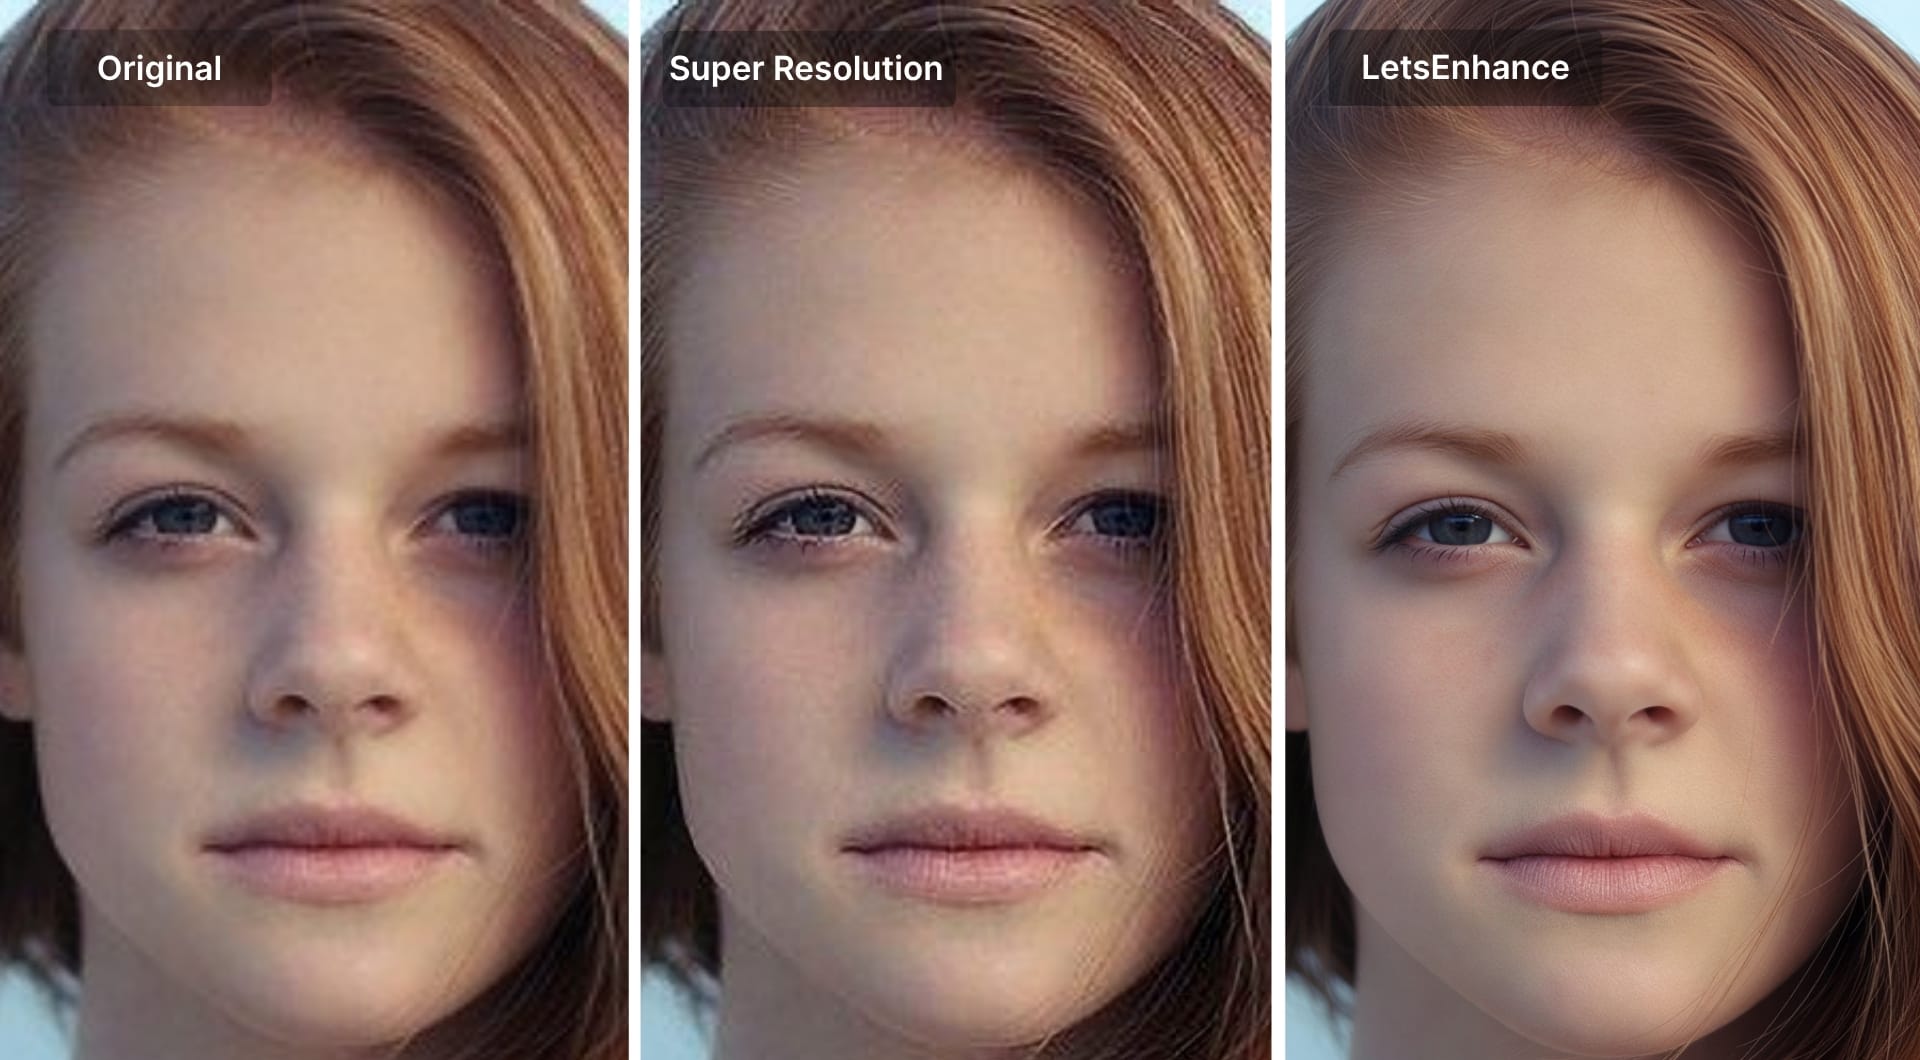
Portrait
Portraits are where upscalers get exposed. Faces have smooth gradients, fine hair detail, and features that humans detect errors in instantly. LetsEnhance has a dedicated face enhancer that automatically detects and sharpens facial features.
To test how both tools deal with portraits, we took a low-res (640 x 426) picture and enlarge it with Super Resolution and LetsEnhance Prime model.
With Adobe Super Resolution, portraits from clean sources often upscale nicely, but if the file is already compressed, it can make compression artifacts more obvious. A 4× face upscale with LetsEnhance should be approached as “stability first.” For portraits specifically, we recommend using the most natural Prime upscaler that delivers natural skin texture and details.
Let’s zoom in all 3 samples:
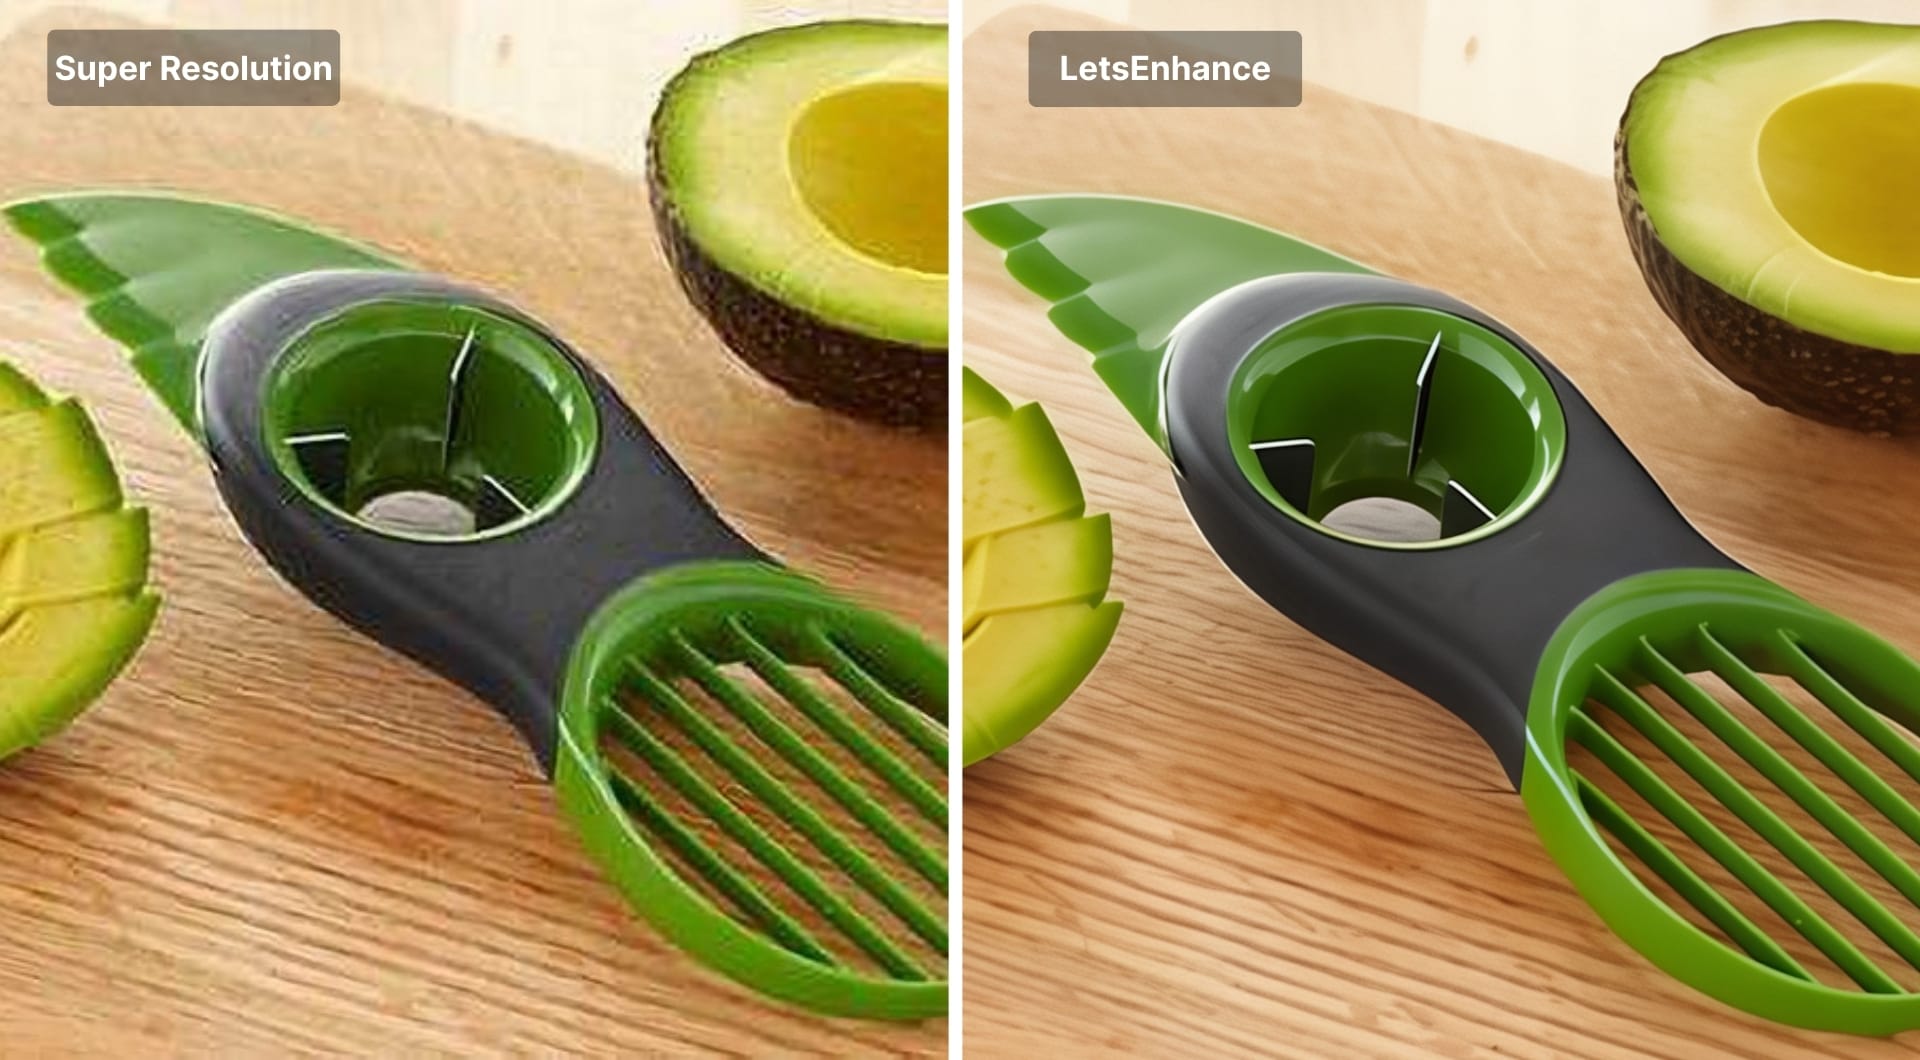
Small product image
Online stores and marketplaces often don’t have high-res photos of the products they sell. And as you know, image size and quality are among the main factors that help people make buying decisions.
Let’s check how Super Resolution and LetsEnhance coped with upscaling a small, low-quality product photo.
Original:

Enlarged:

Just like with other cases, Adobe Super Resolution can improve when the input is already decent. But when the starting file is tiny and heavily compressed, it can make the same problem larger. With LetsEnhance, the difference is usually clearer. A good 4× product upscale with Prime restores clarity without turning textures into noisy patterns, and it should keep hard edges clean without halos.
Let's see another test in action.
The same picture after enlargement with Super Resolution and LetsEnhance:
This time Super Resolution did a better job. But it’s still not enough to win the round.
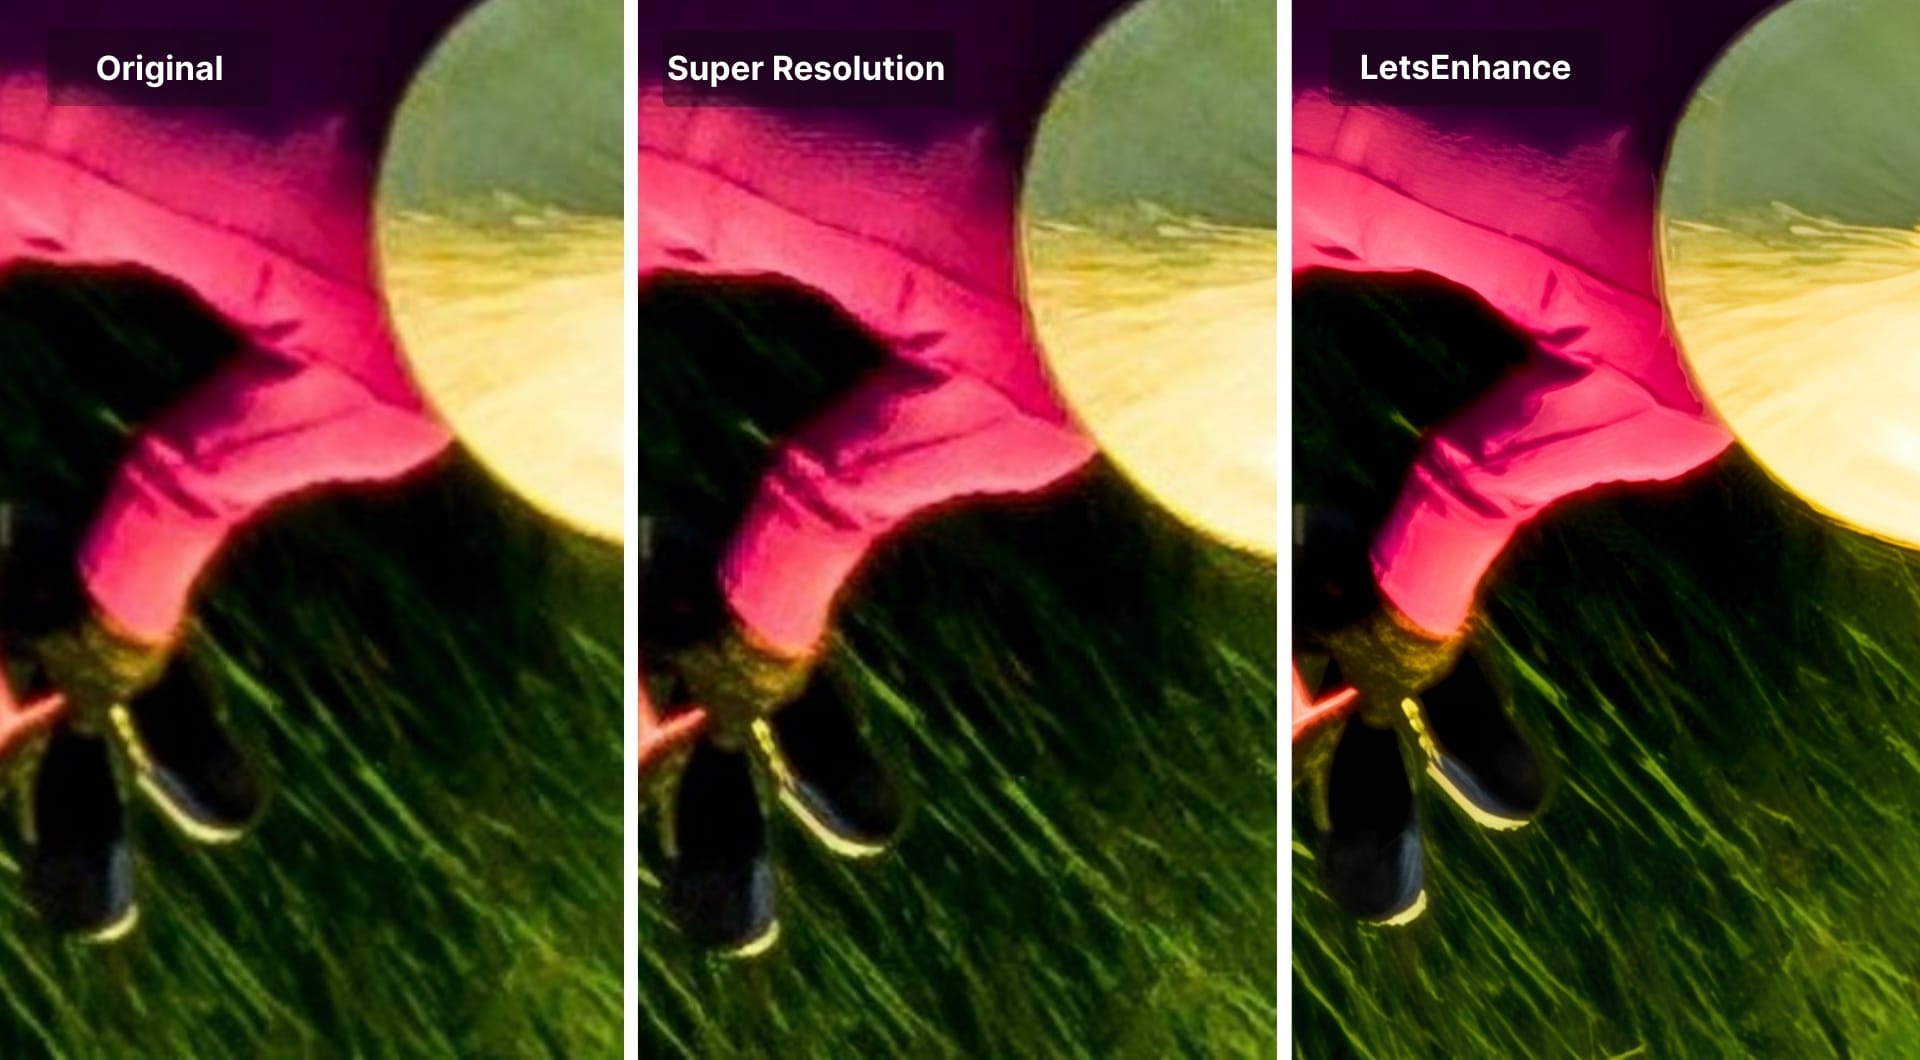
Real estate
Real estate websites often rely on user-generated content or low-quality photos copied from other websites. Considering how high the stakes are in the industry, real estate sites can win big from AI image enhancement.
Here’s an example of a compressed photo we can find on a typical real estate listing.
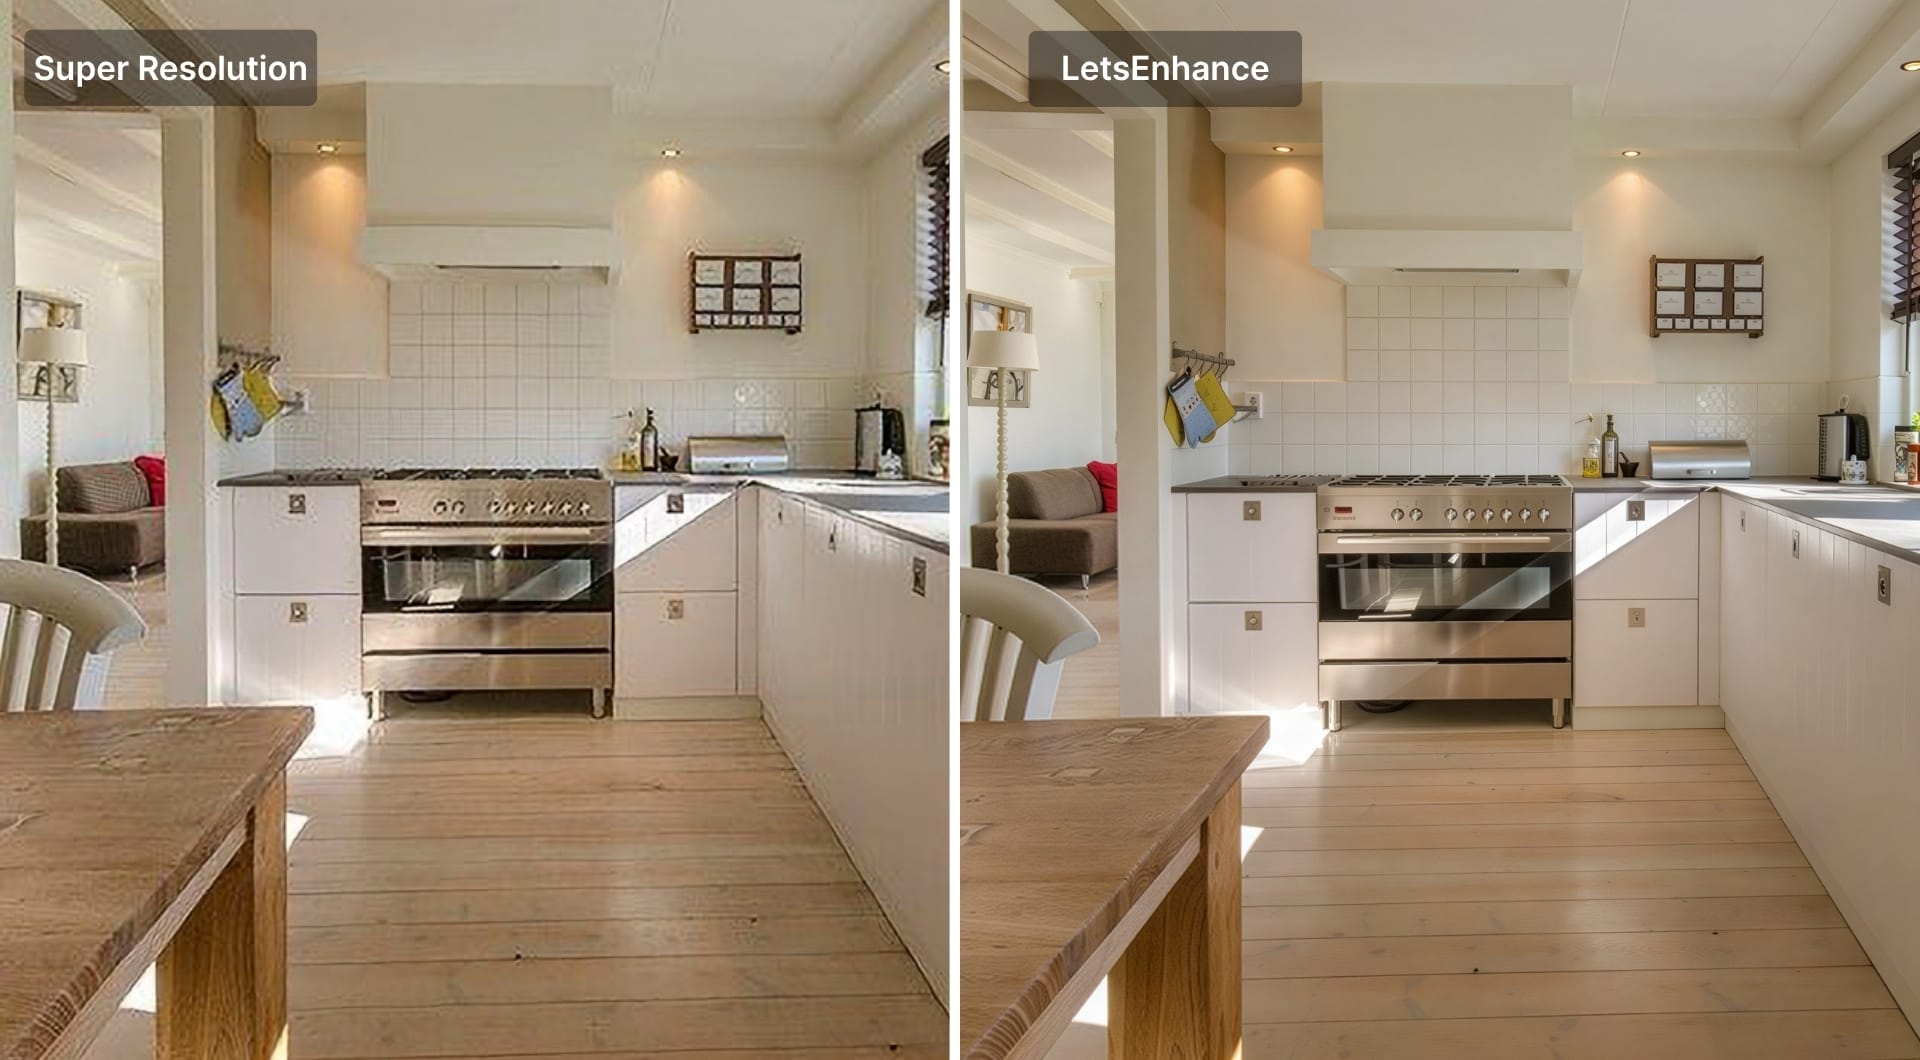
The difference might not be that obvious when pictures are zoomed out to fit on a web page. So let’s take a closer look.
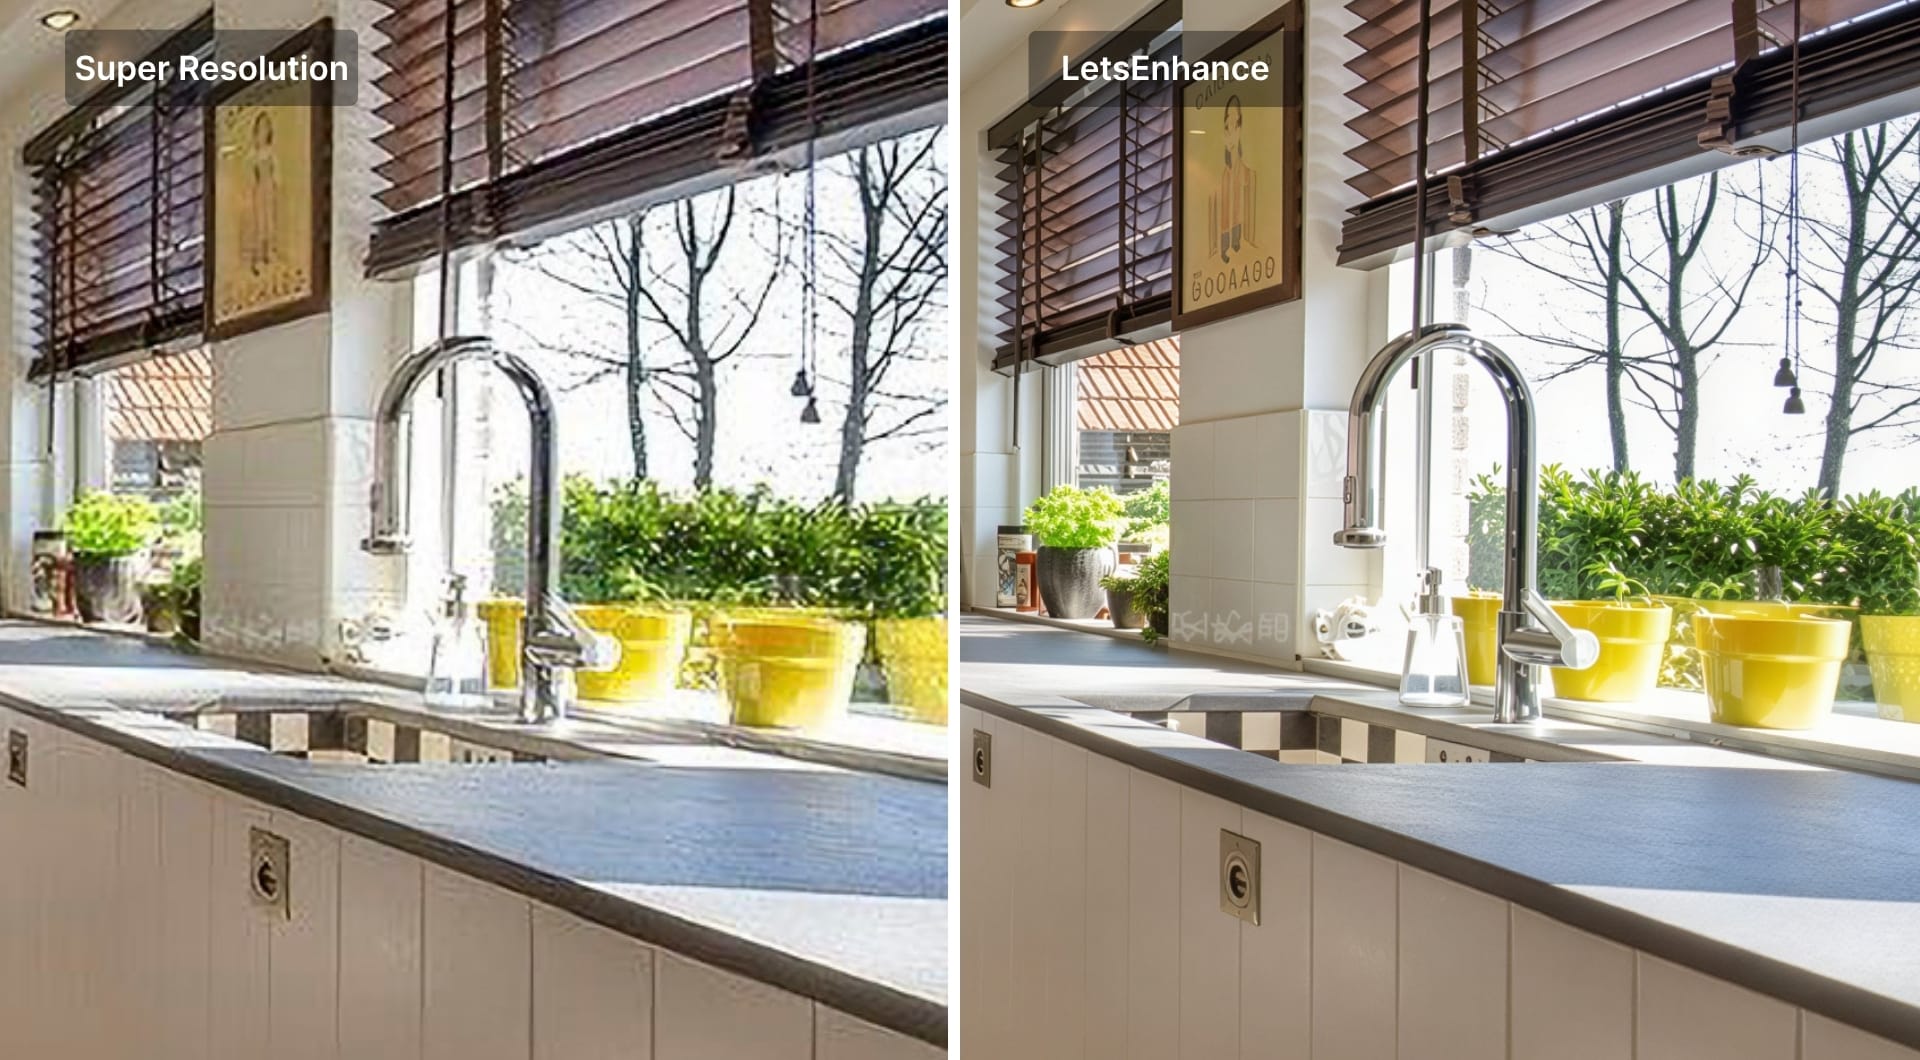
As you can see, the closer we zoom in, the bigger the difference is.
Let’s take one more interior photo.
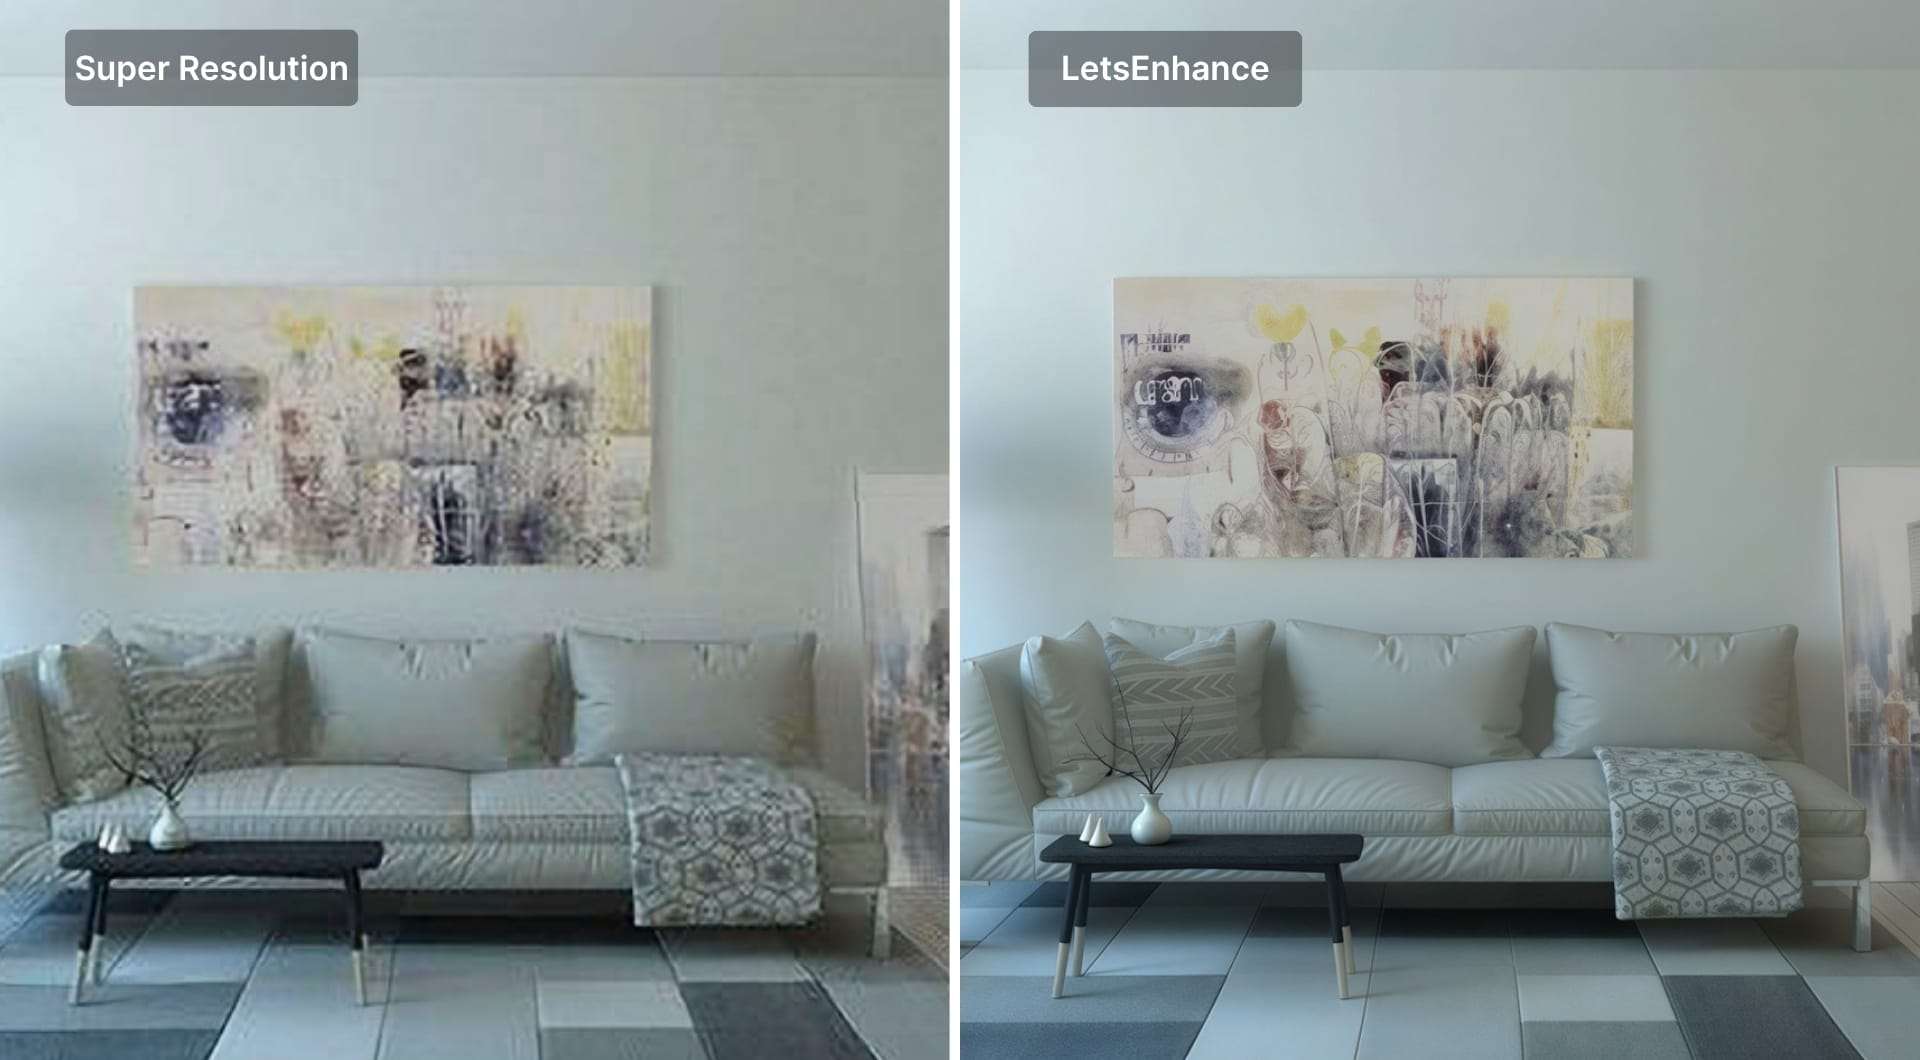
The last few tests proved that “Super Resolution” doesn’t work well with low-res user-generated content, whether it’s real estate or eCommerce product photos.
There’s no such thing as too many megapixels for print. Having a 50-100+ MP source file can really help you print a large, crisp exhibition photo or a poster.
For the next test, we took a 16.7-megapixel photo and blew it up to 67 megapixels. This will allow us to print a 36-inch wide poster at 300 DPI.
Let’s compare upscaled results at zoom.
And now all 3 samples at zoom:
Although neither option is perfect at this level of zooming in, both tools did a decent job of upscaling a medium-size photo for print.
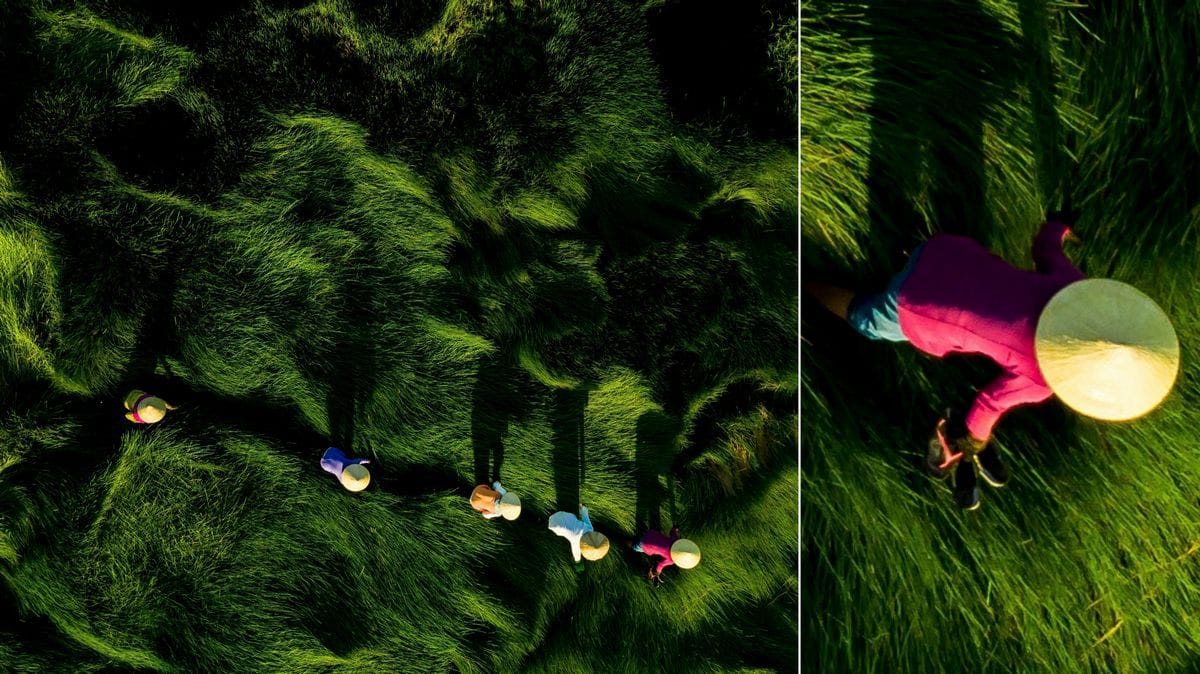
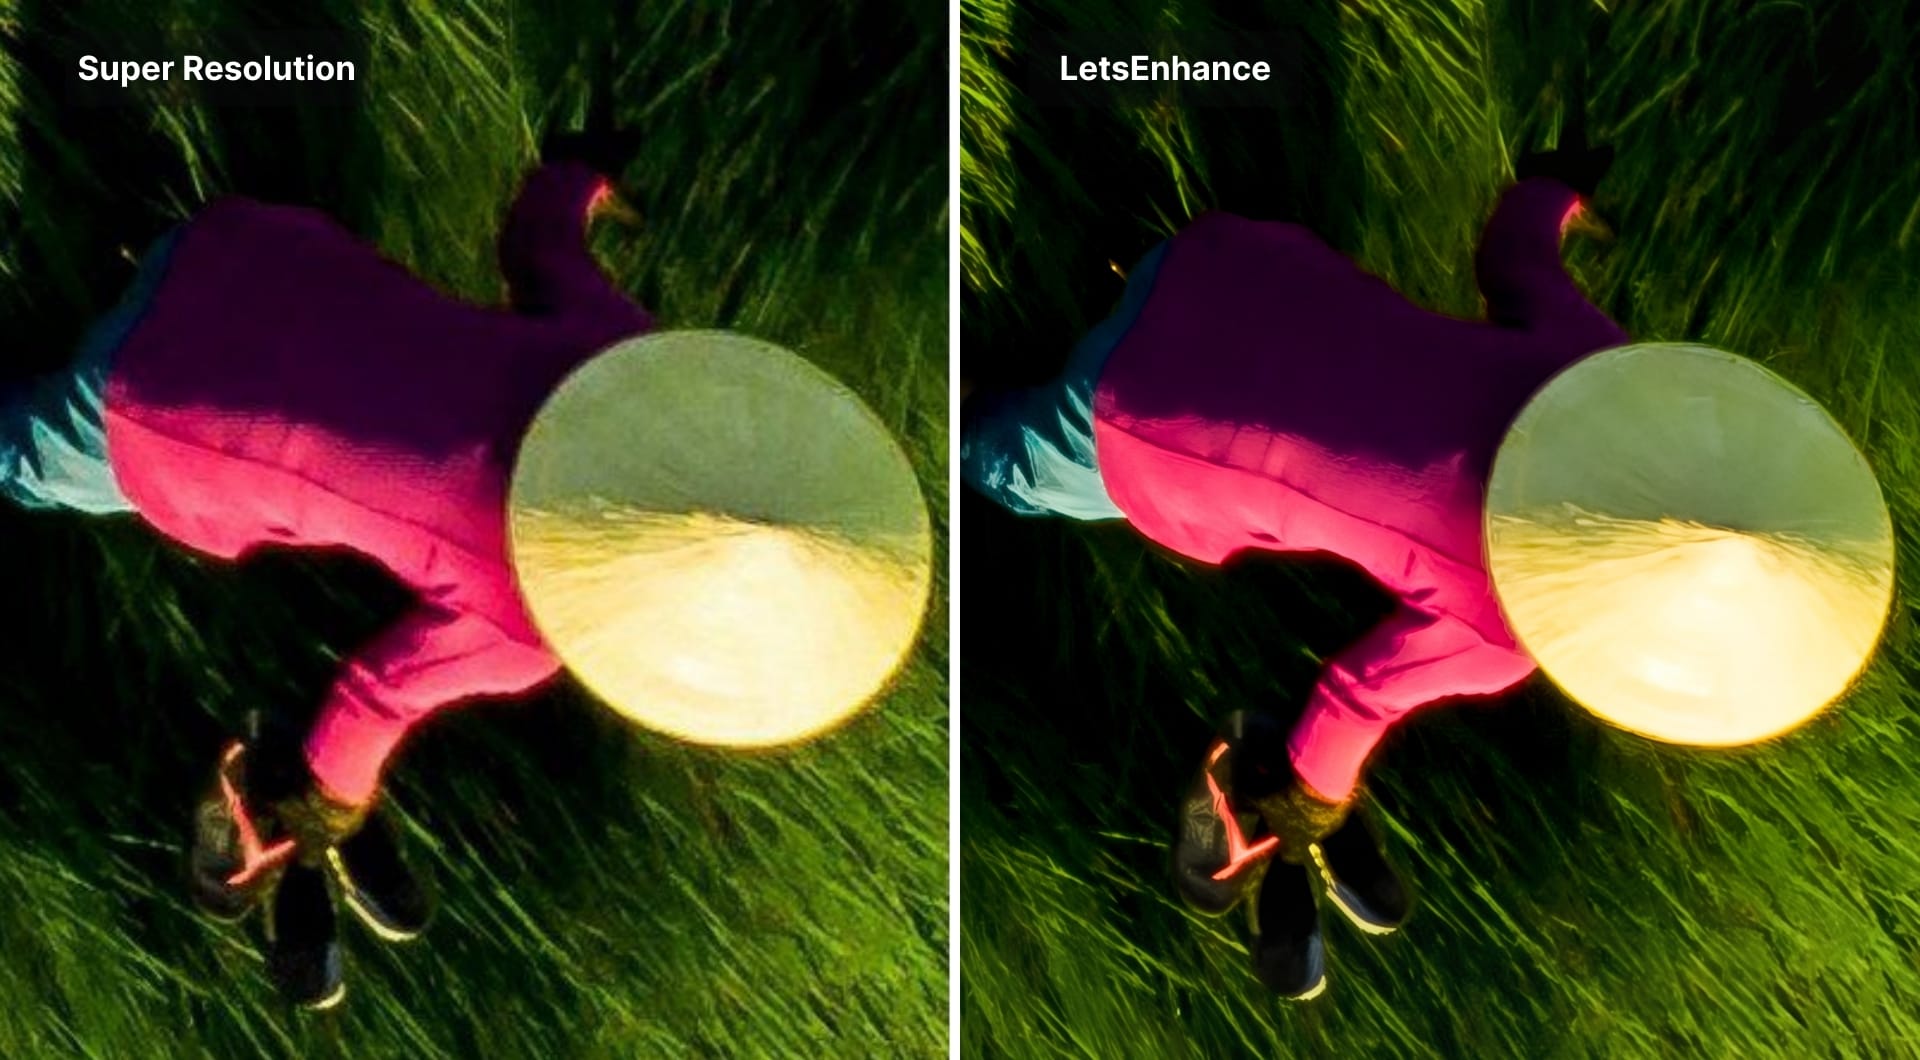
In the example below, we’ll take a 12 MP drone photo and upscale it to 48 MP. It would be enough to make a 26.67 × 20 inch print at 300 DPI density.
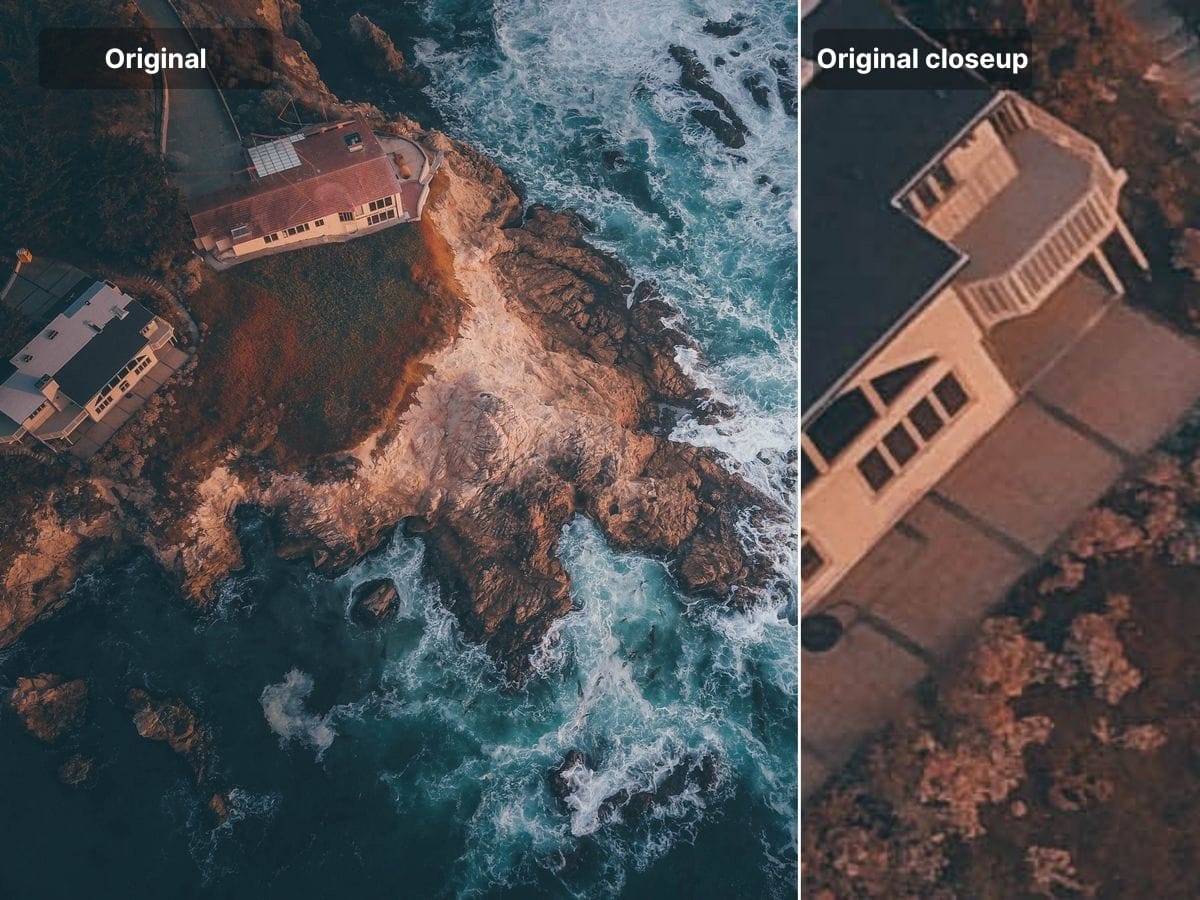
Close crop after upscaling:

The difference is especially visible on the parts of the image where a level of detail is important. On the rest of the image, the difference is less apparent but you would still see it on a large print.
Adobe Super Resolution vs. LetsEnhance: which one should you choose?
Super Resolution is definitely a step forward compared to older upsampling methods in Photoshop. You might find SR useful if you:
- Shoot raw, your images are already reasonably clean, and you want a 2× bump for cropping flexibility.
- You want to stay inside Lightroom/Camera Raw and avoid uploading assets.
- Have a powerful computer that can handle upscaling without freezing.
Being a specialized tool, LetsEnhance works better when it comes to lossless upscaling. It has a lot to offer for printing businesses and online platforms with user-generated content or low-res product images.
Choose LetsEnhance if:
- Your input is small and compressed (marketplace images, messenger saves, scraped photos, user uploads).
- You need specific target sizes (banner dimensions, marketplace requirements, print sizes), not just “2×”.
- You care about print readiness (DPI targeting, presets) and want fewer manual steps.
- Enhance images at scale with batch processing or via API
If you want to explore more about enhancing compressed JPEGs with AI, read this article.
Getting started with LetsEnhance
If you're already curious to upscale your images with LetsEnhance, you can sign up and get 10 free credits to test the tool. You can experiment with different images types, AI upscaling models and see if it fits your needs before buying a subscription.
Subscriptions start at 9$ per month, with pay as you go bundles also available with one time purchase.
FAQ
Does LetsEnhance support raw files?
In the LetsEnhance web workflow, you upload standard image formats like JPG/JPEG, PNG, or WebP rather than camera raw formats. If you shoot raw, the practical approach is to export a high-quality TIFF or JPEG first, then upscale.
What are the seven LetsEnhance models, and how do I choose between them?
The seven models are there to control how aggressive the enhancement is and what kind of content is protected.
- Prime is the most natural and realistic upscaler. Use it for portarits, food and fashion shots and anywhere where texturec clarity matters
- Gentle is the “do no harm” option when you want to preserve structure and avoid artifacts
- Balanced is the default for most photos
- Strong pushes harder on soft, low-resolution inputs
- Ultra is the most detail-forward option and works best when the source is already decent
- Old photo targets restoration patterns typical of aged scans
- Digital art is tuned for illustrations and line work so edges stay clean instead of turning mushy.
If you are unsure, start with Prime, then move toward Ultra/Strong if the result is still too soft.
How do I actually make an image “print-ready” at 300 DPI?
“300 DPI” is not a magic enhancement setting, it is a print mapping. What matters is whether your pixel dimensions are large enough for the physical size you want. The core math is simple: print width in inches × 300 equals the pixel width you need, and the same for height. For example, a 12×18 inch print at 300 DPI needs 3600×5400 pixels. If your file is smaller, you must upscale the pixel dimensions; changing DPI metadata alone does not add detail. LetsEnhance’s print workflow is built around hitting those target dimensions and exporting with the right pixel density for printing.
Which tool is better for web images and social media?
For web, the main goal is to deliver the right pixel dimensions without visible artifacts while keeping files reasonably small. Adobe's Super Resolution is useful when you have a clean source and simply want a 2× bump before you export for web. LetsEnhance is usually the better choice when your input is already web-compressed or small because it can clean artifacts while upscaling, and it accepts common web inputs like JPG/PNG/WebP.
Can Photoshop and LetsEnhance handle batch processing?
Yes, but they mean different things in practice. In Adobe, batch is tied to your desktop workflow and your machine’s performance; it works well if you are processing a set from the same shoot inside Lightroom/Camera Raw. In LetsEnhance, batch is about processing 20 uploads through the same enhancement settings in the cloud, which is often more convenient when the inputs come from mixed sources and you want consistent outputs.
When does Claid.ai matter instead of LetsEnhance?
Claid.ai matters when upscaling is only one step in a production pipeline and you need automation, consistency, and throughput. If you are processing catalogs, marketplace listings, print-on-demand uploads, or any workflow where images need to be standardized at scale, the API-first approach is the right tool shape.
Can Adobe Super Resolution upscale more than 2×?
No. Super Resolution is a fixed 2× linear upscale, meaning the image becomes 2× wider and 2× taller, which equals 4× the total pixels. If you need 3×, 4×, or an exact target size, you will still have to resize after enhancement or use a tool that lets you set a specific output resolution.
What does Adobe Super Resolution output, and why does it create a new file?
Super Resolution creates an “Enhanced” version as a new file, typically an Enhanced DNG. The practical implication is that you are not just resizing the current file in place. You get a separate enhanced source that you can continue editing and then export to JPEG/TIFF/PNG as needed. This is why SR can feel “sticky” in catalog workflows: it produces additional large files, and those files are the enhanced baseline going forward.
Which formats does Adobe Super Resolution support?
Super Resolution works best on raw files, but it can also be applied to common raster formats, including JPEG, PNG, and TIFF. If you start from a JPEG/PNG/TIFF, you should expect less headroom than from raw because there is less recoverable information and artifacts are already baked in.
Will Super Resolution remove compression artifacts from low-quality web images?
Not reliably. A 2× upscale can make edges look cleaner, but it can also make JPEG blocking, ringing, and smeared texture easier to notice because those defects get enlarged along with the image. If your input is clearly degraded, you generally need an upscaler that combines enlargement with artifact cleanup, not a fixed 2× upscale that stays close to the original signal.
